| ID |
Date |
Author |
Type |
Category |
Subject |
|
278
|
Mon Nov 27 14:22:30 2023 |
Tyler | Update | Lore | 1129 Assembly Update |
| [Tyler, Michael, Luke, Cynthia]
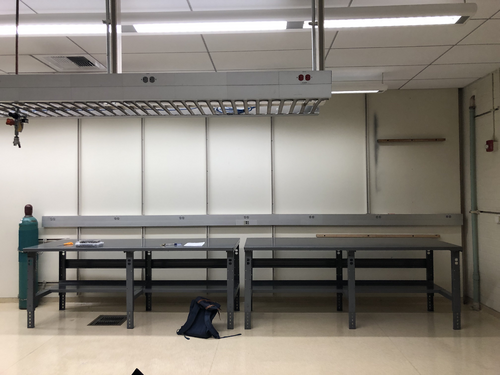
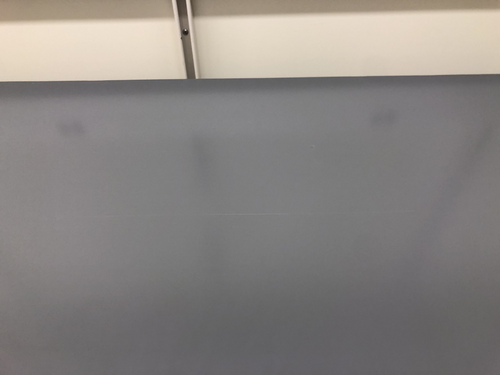
The tabletops have been attached to the workbench frames. Unfortunately, one of the tabletops came out of the box with a large scratch and small dent in the middle. One of the electric top shelves is ready to be attached to the undamaged table, but the other is yet to be opened. Assembly will be completed Wednesday morning.
|
| Attachment 1: IMG_7669.jpg
|
|
| Attachment 2: IMG_7668.jpg
|
|
|
281
|
Thu Nov 30 13:50:32 2023 |
Tyler | Update | Lore | Workbench Assembly Completed |
| [Tyler, Luke, Aiden]
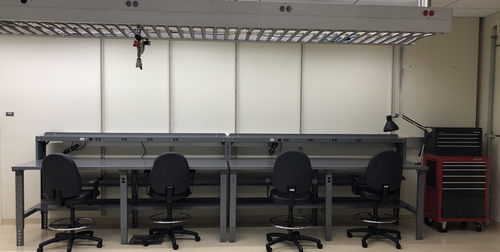
The workbenches are now completely assembled and put into their final places. Additionally, the tool chest has been moved.
|
| Attachment 1: IMG_7686.jpg
|
|
|
321
|
Tue Feb 13 01:26:30 2024 |
Peter | Update | Interferometer Simulations | CARM Power Simulations |
| Cao's simulations of the circulating power and gouy phase through a single arm cavity of the interferometer have been reproduced. Images of the plots can be shown in the pdfs attached. There are approx. 400 lines in this code (scenario_3_carm) that produces these plots. This code also calls on a separate code source file (thermal_models) that defines many of the functions used in this main simulation. The thermal_models file consists of over 1000 lines. More work needs to be done to fully understand and document the scripts. |
| Attachment 1: Scenario_3_CARM.pdf
|

|
| Attachment 2: Scenario_3_CARM_Gouy.pdf
|

|
|
322
|
Tue Feb 13 04:05:32 2024 |
Michael | Update | Interferometer Simulations | Shoelaces 1 Layout Simulated in GTrace |
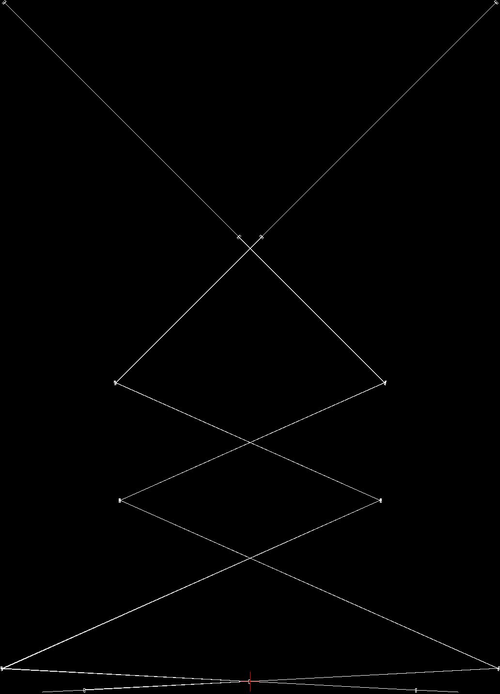
| I've worked on and have completed a first simulation of Cosmic Explorer's Shoelaces 1 layout. This is based off of Pooyan's original work with Gtrace much like the Long Crab 1 layout I worked on last week. This layout will allow me to quickly created the alternate shoelaces layouts. I've included an image of the dxf, and a desmos model for reference. |
| Attachment 1: shoelaces1_dxf.JPG
|
|
| Attachment 2: shoelaces1_desmos.JPG
|
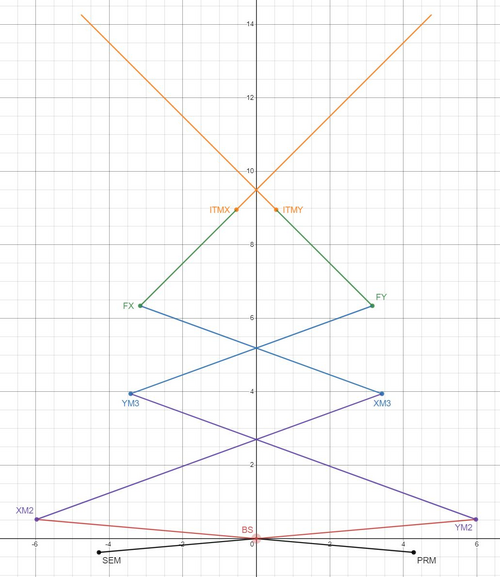
|
|
324
|
Tue Feb 13 12:26:23 2024 |
Tyler | Update | Interferometer Simulations | BS Code Update |
I reproduced Cao's CE beamsplitter code (see below for example plots). I received the current info on the beamsplitter parameters for A+ and A# from GariLynn also. The next steps are to perform a similar power loss analysis on the anticipated A# beamsplitter. |
| Attachment 1: thickness1.pdf
|

|
| Attachment 2: bs_opd_homloss_h6cm_w2cm.pdf
|

|
|
326
|
Tue Feb 13 13:02:41 2024 |
Pooyan | Update | Interferometer Simulations | Cacity sacn of Fabry-Perot |
| Created a simple model of Fabry-Perot cavity in SIS, and did a cavity scan. Total power in the cavity, 00 mode, and HOMs is measured. |
| Attachment 1: IFOSim_update_2_13_24.pdf
|

|
|
334
|
Wed Feb 21 23:15:07 2024 |
Michael | Update | Interferometer Simulations | Long Shoelaces 1 Layout Created in Gtrace and Fixed Ghosting in Beamsplitter |
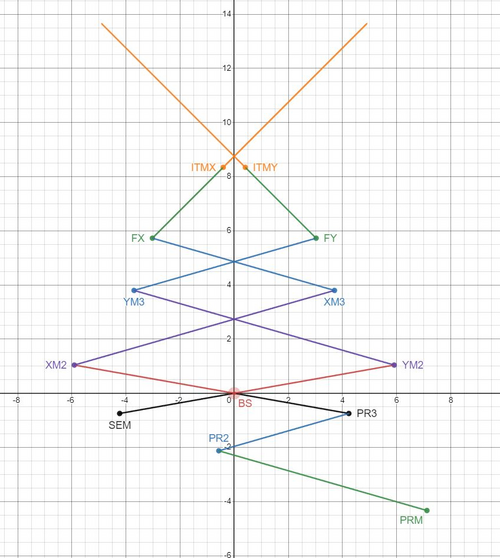
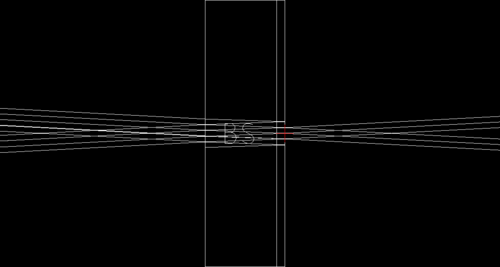
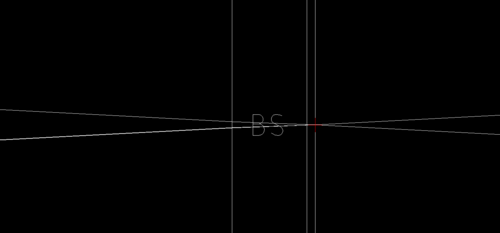
| I have created the long shoelaces 1 layout for cosmic explorer using gtrace, a slight modification from the shoelaces 1 layout design. I also modified the simulation code slightly to remove ghosting effects in the beamsplitter. Originally the python code specified that the HR and AR sides of the beamsplitter both have the same transmission/reflection. I modified this to the ideal case of: Refl_AR = 0, Trans_AR = 1. I have attached two images below to show the before and after effect of this modification. |
| Attachment 1: long_shoelaces1_desmos.JPG
|
|
| Attachment 2: AR_side_with_reflection.PNG
|
|
| Attachment 3: AR_side_without_reflection.PNG
|
|
|
342
|
Tue Feb 27 03:26:28 2024 |
Michael | Update | Interferometer Simulations | Reverse aLIGO Layout Created in Gtrace |
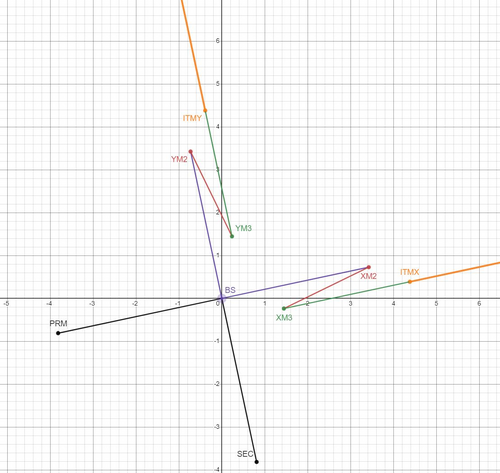
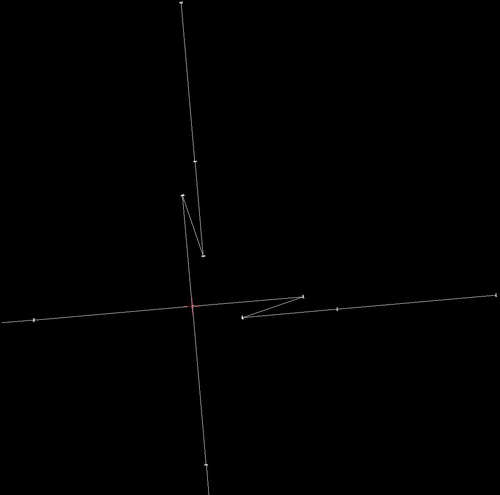
| I've created the simulation for reverse aLIGO layout in gtrace. Attached are the desmos model and the output dxf file. From here Pooyan and I plan to create a brief report of our progress to the CE optical design group. |
| Attachment 1: reverse_aligo_desmos.JPG
|
|
| Attachment 2: reverse_aligo_dxf.JPG
|
|
|
343
|
Tue Feb 27 09:06:29 2024 |
Cynthia | Update | Interferometer Simulations | cavity scan with higher order input laser |
| I performed a few cavity scan with the inputing laser with a different mode (not pure 00). For each laser I included a graph for just plotting the order with highest power (for example 1st order laser input the first plot only scanned for 1st order in that cavity), and I have also included a graph scanning for order 1-10. |
| Attachment 1: ligoPre_2_27.pdf
|

|
|
357
|
Sun Apr 7 13:42:51 2024 |
Michael | Update | Interferometer Simulations | Update on status of gtrace project |
| [Pooyan, Michael]
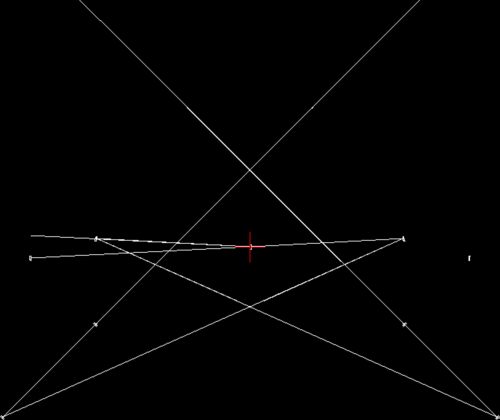
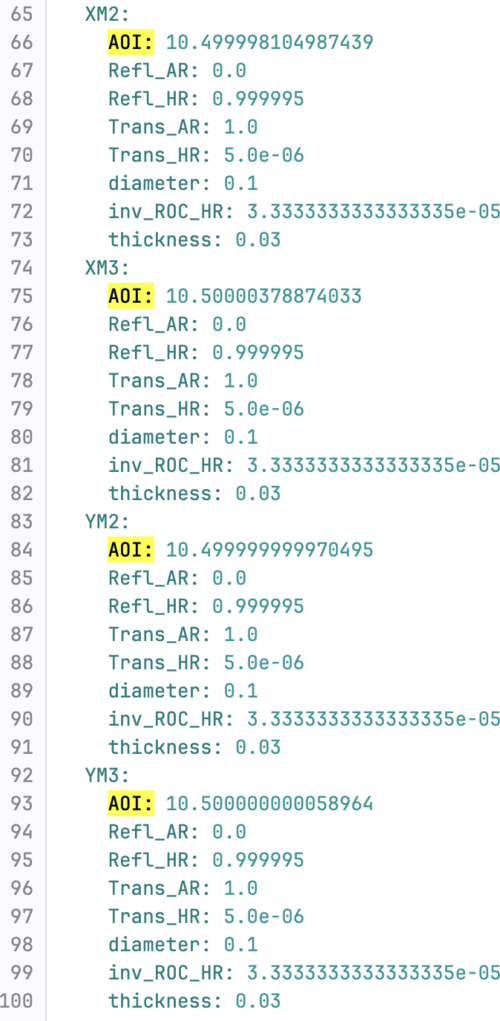
After meeting and discussing the current state of our work with Prof. Fulda a few weeks ago, we have decided that the best next step for the gtrace project is its integration into finesse work. Our first step towards this integration involved creating a sequential beam trace in contrast to the previous non sequential gtrace simulations. A sequential beam trace not only allows for faster runtimes of the simulation (<1 second) but also allows for more direct reading of certain beam parameters (beam size, gouy phase, and angle of incidence). The sequential model was created alongside a yaml output which provides values of parameters, now including the angle of incidence on a mirror.
Last Monday, Pooyan gave a report to the Cosmic Explorer optical design team on the current state of our project and the ultimate goal of our work. During the same meeting another group working in the optical design team presented their own work with gtrace and optical design, focusing more on optimization of parameters based on desired beam sizes at each mirror. It might be a good idea to begin attempting to bring our individual projects together to allow for collaboration and further developments.
Currently, only the crab1 layout has a sequential trace model. Pooyan is currently working on creating a finesse model for crab1 to serve as a proof of concept for how gtrace could be integrated with finesse by providing useful values such as angles of incidence. |
| Attachment 1: Sequential_beam_trace_crab1.png
|
|
| Attachment 2: angle_of_incidence_yaml_example.png
|
|
|
358
|
Mon Apr 8 14:43:29 2024 |
Pooyan | Update | Interferometer Simulations | SIS update single and coupled cavities |
| [Pooyan, Cynthia]
Attached is a brief recap PDF file. A video file showing separate HOMs plots for the cavity scan with ETM08 surface map is also attached.
The codes are available at https://git.ligo.org/uc_riverside/hom-rh/-/tree/main/SIS |
| Attachment 1: IFOSim_SIS__update_4_8_24.pdf
|

|
| Attachment 2: Screen_Recording_2024-03-31_at_2.46.29_AM.mov
|
|
359
|
Mon Apr 8 14:57:41 2024 |
Cynthia, Pooyan | Update | Interferometer Simulations | performed cavity scans for O4 O5, and coupled cavity |
|
| Attachment 1: LIGO_update_week1.pdf
|

|
|
361
|
Mon Apr 15 15:25:10 2024 |
Cynthia | Update | Interferometer Simulations | progress on simulation so far |
|
| Attachment 1: LIGO_update_week3_(2).pdf
|
.png)
|
|
363
|
Mon Apr 22 15:06:33 2024 |
Cynthia | Update | Interferometer Simulations | cavity scan update |
| [Cynthia,Pooyan]
Completed some simulations injecting 0-10th order modes. Some graphs will be used for the poster after some further titles, axis, and range adjustments. |
| Attachment 1: LIGO_4_22.pdf
|

|
|
374
|
Mon Jun 3 14:59:44 2024 |
Cynthia | Update | Interferometer Simulations | Created cavity scan with LG modes |
|
| Attachment 1: ligo_update_6_3.pdf
|

|
|
381
|
Mon Jun 24 14:28:51 2024 |
Cynthia | Update | Interferometer Simulations | SIS cavity with thermal effect |
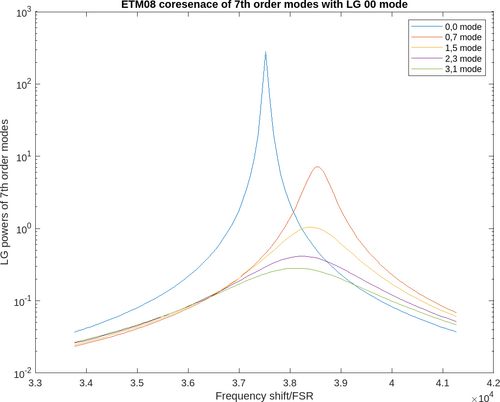
| tried to run a cavity scan with thermal deformation and ring heater for ITM04 ETM08 (aLIGO mirrors). Not sure about the accuracy of the graph as there is some commands that still need to verified. |
| Attachment 1: ETM08thermal.png
|
|
|
391
|
Mon Jul 1 11:45:45 2024 |
Sid | Update | Interferometer Simulations | |
| Progress update: Most of last week was spent getting set up with SIS, and learning how to do basic simulations. The goal for this week is to begin reproducing the methodology from T2000338. I have begun with studying perturbations to mirror curvature and position in a simple FP cavity, but thus far have been unable to get the same results. |
|
392
|
Mon Jul 1 15:19:42 2024 |
Cynthia | Update | Interferometer Simulations | O4 and O5 mirror cavity scans with thermal effect |
|
| Attachment 1: cavityScan_07_01.pdf
|

|
|
393
|
Fri Jul 5 13:17:44 2024 |
Liu | Update | Interferometer Simulations | Four-quadrant FROSTI-like RH for astigmatic thermal actuation for CE optics |
| In the CE corner layout design and down selection study, interferometer layouts with large incidence angles on some of the curved optics are being considered, such as the folding mirrors in the "long crab". This however generates astigmatic beams upon reflection and results in mode mismatches in coupled cavities that need to be mitigated. Astigmatic thermal actuation for the optics involved is thus essential. One way we are considering is to implement a FROSTI-like barrel RH that delivers different irradiance for the four quadrants. This post summarizes primitive results on the astigmatic thermal actuation for the HR surface by powering the heater elements from one diagonal differently compared to the other.
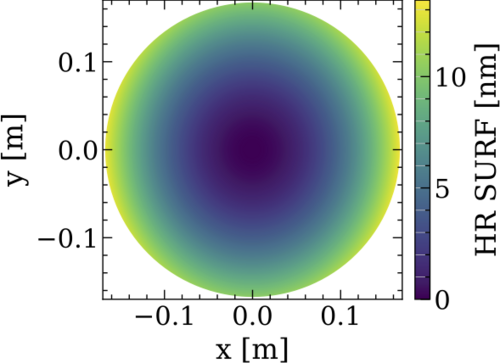
For this study, we looked at a simple case with an aLIGO-like test mass geometry (R=0.17m, H=0.2m) plus a barrel RH with 0.02m width at 0.03m from the AR surface with FEniCSx. The irradiance profiles are constant inside the width along the longitudinal direction, and zero outside the width. For the baseline non-astigmatic actuation with constant irradiance azimuthally. We have obtained roughly equal quadratic actuations along the x and y directions, as shown in figure. The total delivered power on the entire barrel is normalized to 1 W. The actuation on the curvature per power Delta S/Delta P in this non-astigmatic case thus is 0.835 uD/W.
For the astigmatic case however, the irradiance for the regions from one diagonal is increased by a given amount, compared to the non-astigmatic case, whereas for the other diagonal regions is decreased by the same amount (thus the total power is unchanged at 1 W). The HR deformation when the power is changed by 50%, for instance, is shown in picture, where the deformation along the x direction is larger than the y direction. The deformation in each direction however remains quadratic, with different curvature per powers for the x and y components, as shown in plot. The actuation on the curvature per power for an increasing amount of astigmatism is shown in plot. In terms of Zernike polynomials, the maximum amount of Z22 (astigmatism) for 1 W of total power is 2um while the remaining curvature content (Z20) is 6nm. This is shown in plot. |
| Attachment 1: SURF_05.png
|
|
| Attachment 2: SURF_xy.pdf
|

|
| Attachment 3: SURF_dsdp_converge.pdf
|

|
| Attachment 4: SURF_dsdp_astigs.pdf
|

|
| Attachment 5: overlaps_zers.pdf
|

|
| Attachment 6: SURF_xy_nonastig.pdf
|

|
| Attachment 7: SURF_xy_nonastig.pdf
|

|
|
394
|
Fri Jul 5 14:12:32 2024 |
Liu | Update | Interferometer Simulations | CE BS Mechanical Resonances |
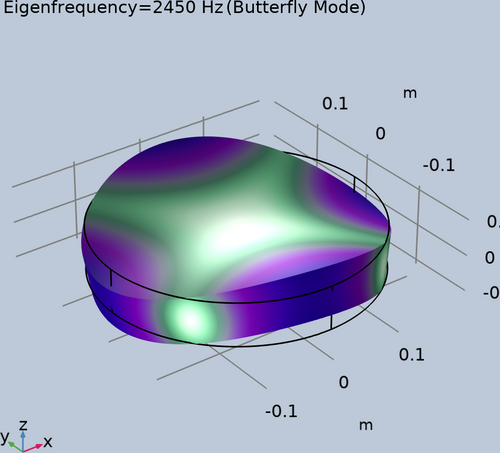
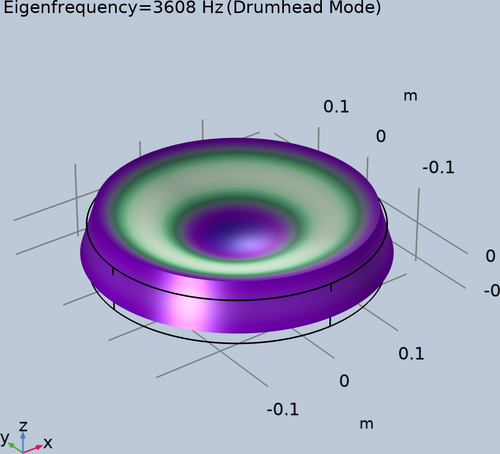
| The butterfly and drumhead mechanical modes for the aLIGO BS were calculated in COMSOL. The resonant frequencies for the two acoustic modes are 2.45 kHz and 3.61 kHz, matching the results in reference for instance.
For a quick projection for the resonant frequencies going from aLIGO to CE, the height and width of the BS are increased assuming the mass is increased from 14 kg to 70 kg, while keeping the aspect ratio fixed. The resonant frequencies for the two mechanical modes as a result becomes smaller, to 1.43 kHz and 2.11 kHz respectively, risking getting in the detection band.
Next step is to implement a mechanical ring with high stiffness outside the BS barrel to combat the decrement of the resonant frequencies of the relevant mechanical modes. |
| Attachment 1: butterfly.png
|
|
| Attachment 2: drumhead.png
|
|
|
395
|
Fri Jul 5 14:23:13 2024 |
Liu | Update | Interferometer Simulations | Engineering drawings for straight edge heater element designs for FROSTI |
| Step files and engineering drawings for the straight edge heater element designs have been created in COMSOL and SolidWorks. They are available in the group Git Repo. With those, we will initiate a discussion with the ceramics supplier for an estimate of the feasibility and benefits of the straight edge element over the curved element in terms of manufacturing cost and time. |
|
397
|
Mon Jul 8 12:26:10 2024 |
Michael | Update | Interferometer Simulations | Minimizing Astigmatic Effects in the SRC of LIGO |
| This is the first look and analysis of the effects of astigmatism in the aLIGO optical layout which can lead to mode mismatch and therefore increased losses into higher order modes. Specifically I am currently looking at measuring the effect of changing the radii of curvature of the SRC mirrors https://docs.google.com/presentation/d/1qhIehqyNukg4g8S2fqfQZz83yr9aB76tEa6fn2J-TrM/edit?usp=sharing |
|
404
|
Mon Jul 15 09:36:44 2024 |
Liu | Update | Interferometer Simulations | ETM Profile Optimization for FROSTI |
This is to optimize the FROSTI heating profile for ETM, by minimizing the residual RMSE of the HR surface deformation after the beam size weighted curvature is removed by the current RH. The parameters of the profile being explored are the location, width, and total power for the Gaussian Annulus. As shown in the attached series of plots, the optimal location is 9.9 cm, with a width of 7.7 cm, and a total FROSTI power of 12.7 W (for 1 W of Gaussian beam absorption). The residual RMSE is 1.2 nm. About 0.5% of the FROSTI power is lost at the edges of the TM.
For comparison, without FROSTI, the residual RMSE after the beam size weighted curvature removed by the current RH is 44.5 nm. When the width of the Annulus is set to be 3 cm however, the residual RMS is 3.1 nm, with much smaller FROSTI power needed at 4.7 W, and less power loss at 0.02%. |
| Attachment 1: pdf_merged.pdf
|

|
|
406
|
Mon Jul 15 14:28:32 2024 |
Pooyan | Update | Interferometer Simulations | aLIGO test mass surface profiles |
Created a Google Slides presentation to summarize all the mirror surface map information that we use for simulating interferometers.
A+ expected maps are based on correspondence with G. Billingsley. The estimate for the A+ ITMs will be to take the “as polished” data and add coating non-uniformity to it. (T2000398) Neither of these are scaled for the precise thickness of the Ti:Ge coatings.
Google Slides link: https://docs.google.com/presentation/d/1ge-ciAiEdNyyTvSShYdZz2JpACFRY2W3JDpxHRqMnOQ/edit?usp=sharing
|
|
408
|
Mon Jul 15 15:44:52 2024 |
Cynthia | Update | Interferometer Simulations | performed cavity scans with thermal effects and ring heater |
|
| Attachment 1: cavity_scan_07_15.pdf
|

|
|
409
|
Mon Jul 15 15:52:40 2024 |
Michael | Update | Interferometer Simulations | aLIGO locking with varying SRC mirrors and measuring mode mismatch |
|
| Attachment 1: SRC_Astigmatism_Analysis_7_15_24.pdf
|

|
|
413
|
Mon Jul 29 12:18:52 2024 |
Liu | Update | Interferometer Simulations | Update on FROSTI O5 ETM profile optimization |
| Update on FROSTI O5 ETM profile optimization is attached. |
| Attachment 1: pdf_merged.pdf
|

|
|
414
|
Mon Jul 29 12:20:56 2024 |
Liu | Update | Interferometer Simulations | Update on wavefront actuation with astigmatically driven RH for CE |
| Update on wavefront actuation with astigmatically driven RH for CE is attached. |
| Attachment 1: SURF_nonastig_merged.pdf
|

|
|
415
|
Mon Jul 29 12:23:10 2024 |
Liu | Update | Interferometer Simulations | Update on mechanical resonances of CE BS with stiffener ring |
| Update on mechanical resonances of CE BS with stiffener ring is attached. |
| Attachment 1: eigen_freqs_merged.pdf
|

|
|
Draft
|
Sun Aug 4 09:01:01 2024 |
Michael | Update | Interferometer Simulations | Update on SRC Mode Mismatch Analysis |
| An update on my analysis to minimize mode mismatch/scattering by introducing toroidal mirrors to the SRC. |
| Attachment 1: SRC_Mode_Mismatch_Update_8_2_24.pdf
|

|
| Attachment 2: SRC_Mode_Mismatch_Update_8-12-24.pdf
|

|
|
421
|
Tue Aug 6 13:07:07 2024 |
Xuejun | Update | Interferometer Simulations | |
| [Xuejun]
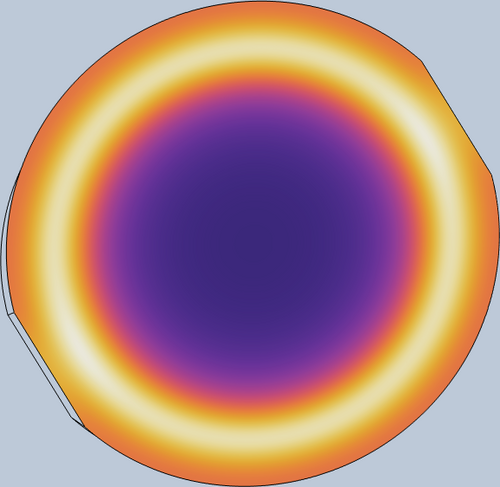
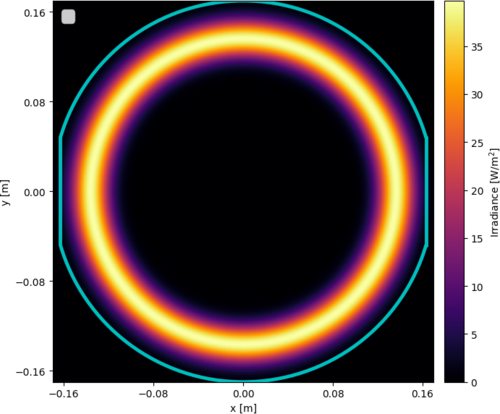
The width and location of the measured in-air change in temperature profile has been determined to be 0.045m and 0.137m respectively. Subsequently, a fake irradiance profile was able to be generated that best resembled what the actual irradiance profile could be using this information for testing in COMSOL. The generated irradiance profile that output the most similar change in temperature profile as the measured in-air profile has been included as well as the change in temperature profile it produced on the blackbody screen "test mass" model in COMSOL. |
| Attachment 1: Thermal_model_image.png
|
|
| Attachment 2: generated_irradiance_profile.png
|
|
|
424
|
Mon Aug 12 17:09:04 2024 |
Cynthia | Update | Interferometer Simulations | O4 vs O5 cavity scans with ITM plume guess or ETM |
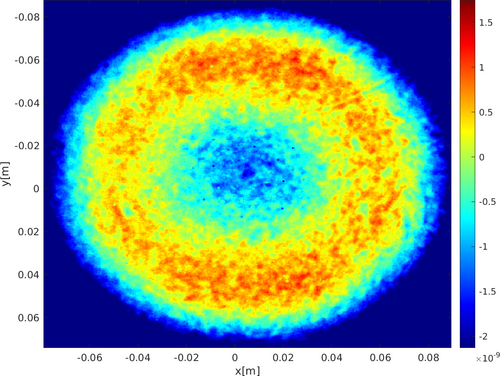
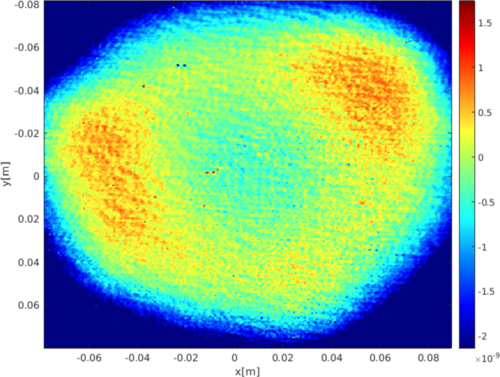
| So far the proposed solution for what to use for O5 ITM mirror for SIS simulations is either the plume guess file or using the O5 ETM mirror for ITM. I had ran a cavity scan for both of these possibilities and it seems like the results produced are fairly different. The next step is most likely moving on to adding the Frosti effects including both of the proposed possibilities, and before this, a few confirmations and verifications are needed using similar previous studies to make sure my code produce the right result. |
| Attachment 1: O5_plots_and_tables.pdf
|

|
| Attachment 2: O4_plots_and_tables.pdf
|

|
| Attachment 3: ETM12mapO5.png
|
|
| Attachment 4: Screenshot_2024-08-12_at_5.05.31_PM.png
|
|
|
426
|
Mon Aug 19 07:11:55 2024 |
Cynthia | Update | Interferometer Simulations | cavity scans with FROSTI effects |
|
| Attachment 1: LIGO_update_8_19.pdf
|

|
|
428
|
Mon Aug 26 14:42:04 2024 |
Cynthia | Update | Interferometer Simulations | current status on cavity scan with effects of FROSTI |
| I used the code and arm cavity model used for previous O5 study on mirrors and HOM (the pdf of the study and the result can be found at https://dcc.ligo.org/LIGO-G2100878), but it seems like the result I obtained is different from the study result. Since my cavity scans codes have a large portion of it relying on this code, I will have to go over the study result and the code to make sure there is no issue with that code itself first. There are also some other updates or issued encountered when I tried to plot the mirror maps with effects of FROSTI. |
| Attachment 1: LIGO_updates_8_26.pdf
|

|
|
430
|
Tue Aug 27 18:37:40 2024 |
Luke | Update | Interferometer Simulations | Ringheater model update |
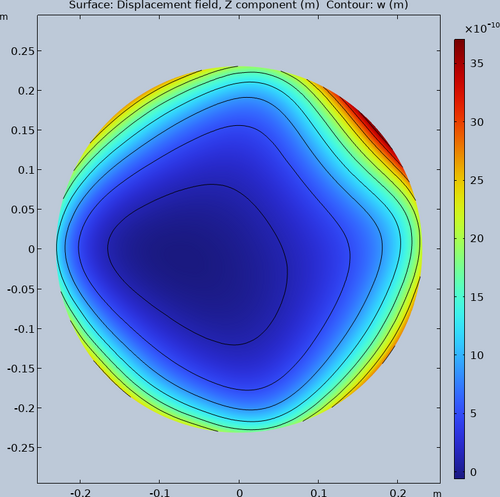
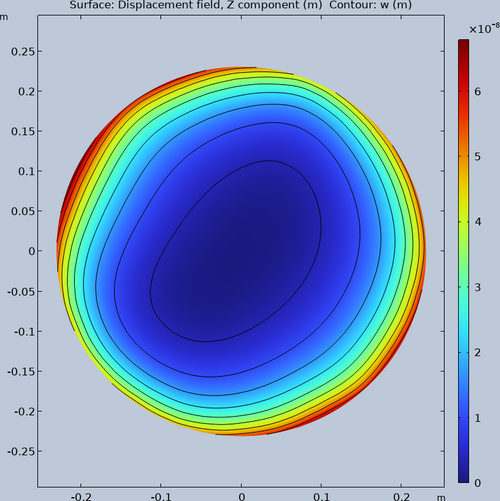
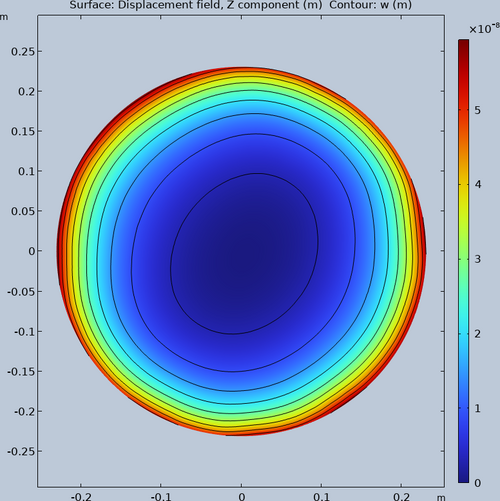
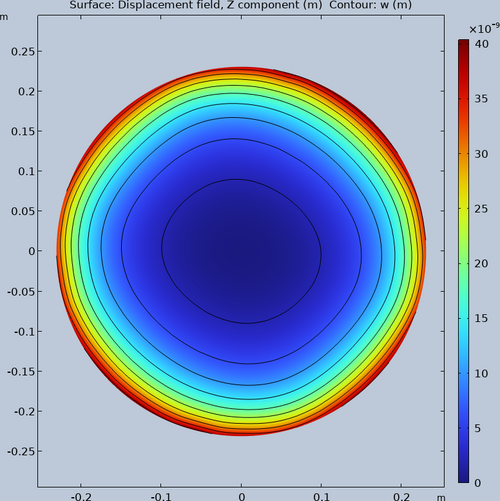
| Updated the model to produce a more circular deformation in the HR surface. The first three attachments are from irradiance patterns gotten from ray tracing. The last is from a pre-defined irradiance pattern. |
| Attachment 1: Initial_1W.png
|
|
| Attachment 2: Increased_rays_100W.png
|
|
| Attachment 3: Increased_rays_more_100W.png
|
|
| Attachment 4: Initial_100W.png
|
|
|
436
|
Mon Sep 9 12:36:45 2024 |
Michael | Update | Interferometer Simulations | Update on Analysis of Mode Mismatch Minimization in A# |
| I have taken a closer look at the solution curve in the mirror parameter space which I have searched, focusing on the "resilience" of specific points, with the plan to analyze how certain conditions of the interferometer change as we move along this solution curve. |
| Attachment 1: SRC_Mode_Mismatch_Update_9_9_24.pdf
|

|
|
439
|
Mon Sep 16 07:28:16 2024 |
Luke | Update | Interferometer Simulations | Ring heater update |
|
| Attachment 1: 20240916_Ringheater_updates.pptx
|
|
443
|
Mon Sep 16 15:18:59 2024 |
Cynthia | Update | Interferometer Simulations | a breakdown of FROSTI and thermal effects and the resulting cavity scan |
|
| Attachment 1: ligo_update_9_16_(1).pdf
|
.png)
|
|
444
|
Mon Sep 23 08:29:49 2024 |
Luke | Update | Interferometer Simulations | Ringheater update |
|
Ringheater Update
If the link does not work here is the file. |
| Attachment 1: 20240923_Update.pptx
|
|
446
|
Mon Sep 23 15:00:41 2024 |
Cynthia | Update | Interferometer Simulations | corrections on assumption for O5 coating |
| The document recording ETM07 and ETM08 coating (T2300093) was discussed:
the current plume files are not necessarily correct in a way that LIGO lab have tried to add it on uncoated ETM such as ETM07 and it does not match what the coated ETM07 would look like.
the plume should be added on top of the uncoated ETM instead of assuming an ideal ETM. According to Garilynn, the imperfection on uncoated ETM matters.
So far the possible ETM data used for O5, ETM 11,14,19, and 20 are all uncoated, and different ways could be used to predict the plume, including the plume data on LIGO dcc or subtract the uncoated data from the coated for O4 ETM and use that as another guessed plume. |
| Attachment 1: Uncoated_S1_ETM07-v2.pdf
|

|
|
454
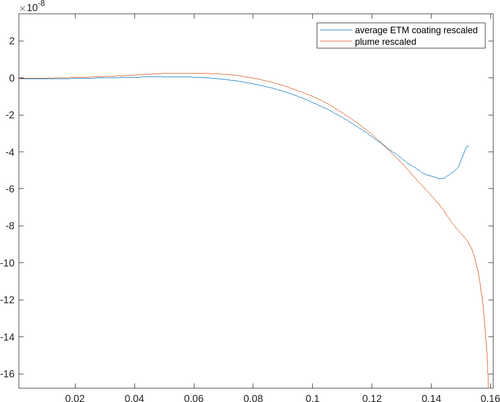
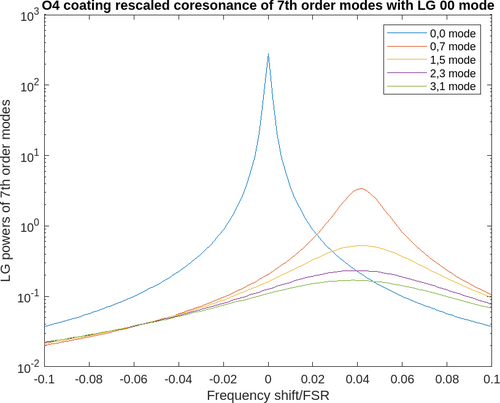
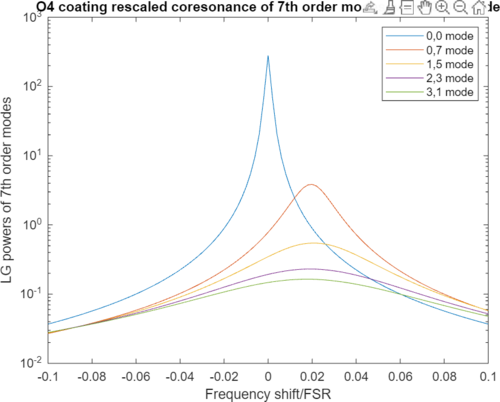
|
Wed Oct 2 13:38:00 2024 |
Cynthia | Update | Interferometer Simulations | cavity scan with averaged O4 ETM coating as plume |
|
| Attachment 1: O5plumevsCoating.png
|
|
| Attachment 2: O5CoatAvgpt5.png
|
|
| Attachment 3: O5AVgcoatingFROSTIpt5.PNG
|
|
|
469
|
Wed Nov 6 13:48:55 2024 |
Liu | Update | Interferometer Simulations | QN modeling update |
| Slides |
|
482
|
Mon Dec 2 00:11:23 2024 |
Michael | Update | Interferometer Simulations | Status Update on Toroidal Mirrors Project Work |
| As it has been significant time from my last update on this project, I compiled a few notes about what I have been working on, current issues, and my future plans. The past few weeks have been focused on me attempting to obtain a reliable symbolic expression for mismatch. This is important going forward as it allows us to determine optimal points in the parameter space and the surrounding behavior efficiently without significant computational cost. However this been quite difficult since I've encountered some fundamental discrepancies in the way values like the ABCD matrix and q-parameters are calculated/returned in Finesse. Since I have yet to resolve this, I'm focusing on next steps in developing tools for statistical simulations.
Update Slides |
|
523
|
Tue Feb 25 01:37:00 2025 |
Michael | Update | Interferometer Simulations | Updates and Current Next Steps for Toroidal Mirrors Project |
| Since the previous discussion of this project, I've worked on building finesse models to verify mathematical results which model the astigmatism in a two mirror system which we attempt to minimize. This left us with a single condition for an output non-astigmatic beam. However, as can be seen in finesse simulations, there does exist other configurations which have a negligibly small astigmatism, which we may want to consider. Below I've attached the link to my overleaf project which has some updated information which I plan on discussing.
https://www.overleaf.com/project/67968921426e61d5b2fd8c96 |
|
526
|
Tue Feb 25 10:56:25 2025 |
Cynthia | Update | Interferometer Simulations | mirror coating added for simulation rerun |
| I have tried to rerun the simulation on finesse after adding the mirror coating. The result has a large fluctuation in required input power vs arm power that is concerning. I am currently working on potentially resolve this issue and get a reasonable graph before I proceed to optimizing the thermal maps. |
| Attachment 1: updats_(3).pdf
|
.png)
|
|
530
|
Tue Mar 4 10:18:43 2025 |
Cynthia | Update | Interferometer Simulations | attempted to remove curvature and tilt for the coating |
|
| Attachment 1: 3_4_updates.pdf
|

|
|
540
|
Tue Mar 11 11:28:52 2025 |
Cynthia | Update | Interferometer Simulations | flattening mirror to study power discrepency |
|
| Attachment 1: updates_3_11_(1).pdf
|
.png)
|
|
548
|
Tue Apr 8 00:17:01 2025 |
Michael | Update | Interferometer Simulations | Squeezing Performance Graphs for Case With and Without Toroidal Mirrors in LIGO |
| I've created some graphs for the frequency dependent observed squeezing level in LIGO for both the nominal case and the case where we include toroidal mirrors, giving some interesting results. https://docs.google.com/presentation/d/1RBr47hNaxFTdGrwys5ZCUEUOgVOVHmZ2B_5EQwY62IY/edit?usp=sharing |
|
554
|
Tue Apr 15 11:37:17 2025 |
Cynthia | Update | Interferometer Simulations | Finishing up mirror coating map step |
|
| Attachment 1: updates_4_15_2025.pdf
|

|
|
555
|
Thu Apr 17 12:12:29 2025 |
Liu | HowTo | Interferometer Simulations | Preventing Thread Contention in Multiprocessing with Finesse and Cython |
Avoiding Thread Contention When Using Multiprocessing with Finesse and Cython
When running Monte Carlo simulations or other computational workloads, it's common to use Python's ProcessPoolExecutor to parallelize multiple independent tasks. This approach works well—until it interacts with low-level libraries that themselves use multi-threading under the hood.
The Problem: Thread Over-Subscription
In a recent project, I ran into a significant performance issue while executing a large number of Monte Carlo trials using a process pool with 30 worker processes on Megatron (with 48 cores). Each trial ran a function that internally used cython.parallel.prange for fast, element-wise operations, which is what Finesse uses under the hood for many internal numerical calculations. Cython, via OpenMP, was configured to use all available CPU threads per process by default.
This resulted in severe thread over-subscription. With 30 parallel processes and each process attempting to use all 48 threads, the system was launching over 1,400 threads concurrently. The CPU quickly became saturated, and the tasks stalled. In some cases, the system became unresponsive, and the jobs had to be canceled repeatedly.
This happens because when the function calls into these libraries from within a Python multiprocessing context, each subprocess will attempt to use the full number of threads available to the machine.
The Solution: Limit Threads per Process
The solution is simple: explicitly limit the number of threads each subprocess is allowed to use. This can be done by setting the environment variable at the top of your script, before importing any thread-hungry libraries like Finesse.
import os
os.environ["OMP_NUM_THREADS"] = "1"
By setting OMP_NUM_THREADS to "1", we ensure that each multiprocessing worker uses only one thread internally, preventing them from overloading the system and allowing the tasks to run more efficiently.
|