| ID |
Date |
Author |
Type |
Category |
Subject |
|
565
|
Wed Apr 30 13:42:45 2025 |
Shane | Update | CDS | UPS comms successful |
| Update on UPS1 serial interfacing: communication is now successful. On 4/15/25 we connected to UPS1 via ethernet rather than USB, and manually added its static ip address (noted in lab network wiki) to the router. Able to connect and unpack all desired data nicely using telnet server connection via telnetlib. In process of finalizing code and will work next on interfacing UPS2. |
|
564
|
Tue Apr 29 10:59:25 2025 |
Liu | Update | Interferometer Simulations | Test Mass Thermal State Decoder with Updated Comparison Cases |
|
| Attachment 1: Update.pdf
|

|
|
563
|
Mon Apr 28 22:08:28 2025 |
Luis | Update | VAC | Vacuum Leak Test result |
[Ma, Luke, Luis]
April 24, 2025
3:00 PM
Ma and Luis attempted to connect to the RGA to initialize the leak test but encountered some difficulties.
3:20 PM
After restarting both the computer and the RGA, we realized that the DB9 cable was not connected to Spica. After connecting it, we had no further issues communicating with the RGA.
3:30 PM
Luke and Luis performed the leak test. There were no significant leaks in the vacuum system. The highest leak rates we found are listed in the table below; the rest of the entries were limited by noise, as we could not detect any change in the program after spraying the ports with He.
| Connection |
Leak rate (torr) |
| ZLR(2.75"-4.5") - Reducing Cross |
6.0e-12 |
| Cross - Turbo Pump (small) |
1.4e-11 |
| Port - Pressure Sensor |
8.0e-12 |
|
|
562
|
Fri Apr 25 19:18:10 2025 |
Luke | Update | Scripts/Programs | New optimization plots |
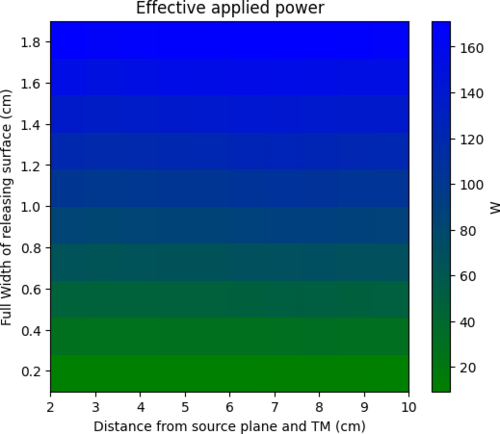
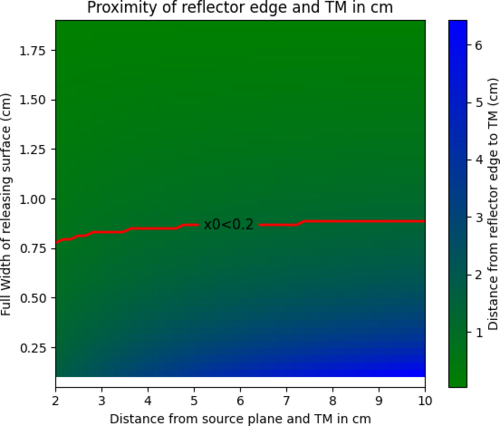
I have created two more plots. One on the transmitted power for a specific configuration. This was done by taking the product of the efficiency and the power released by surface area of the source plane for a configuration assuming it is at 300C. The second is a plot of how close the reflector is to the test mass I have included a contour line at 2mm the nominal proximity constraint. Both of these plots are generated for a 2cm wide target plane.
Somethings of note: Because the proximity requires no modeling and can be determined purely mathematically it is easy to re-generate this plot of other target widths. If you increase the target width the proximity contour moves upward and downwards if reduced. |
| Attachment 1: effective_power.png
|
|
| Attachment 2: proximity.png
|
|
|
561
|
Fri Apr 25 09:09:03 2025 |
Luke | Update | Scripts/Programs | Update to optimization plots |
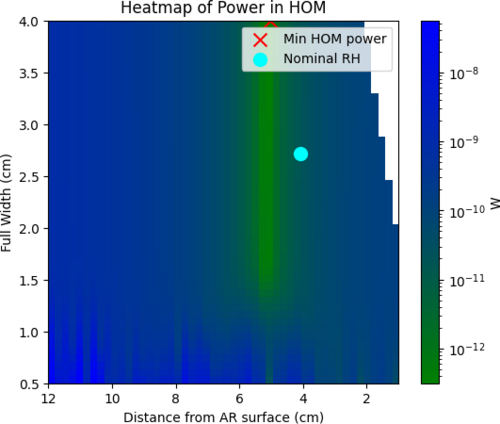
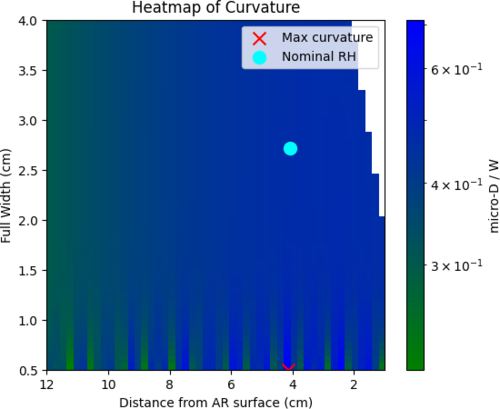
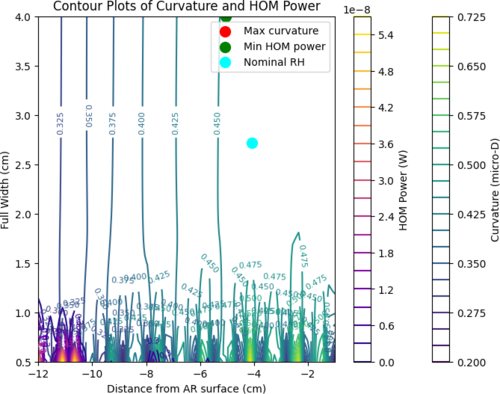
| I have calculated the curvature of the surface plots and created a heat map out of the data. I have also created a contour plot of them together. It is very rough and the artifacts at small w make it hard to read. I am planning on excluding that data and replot them. In the meantime I have created a temporary function that balance the two values. (log_10(curvature/HOMscattering))
|
| Attachment 1: HOM_scattering_100kg_modified.png
|
|
| Attachment 2: curvature_100kg.png
|
|
| Attachment 3: initial_contour_plot_with_hom_and_curvature.png
|
|
| Attachment 4: temp_quality_(log10_ratio).png
|
.png.png)
|
|
560
|
Tue Apr 22 13:00:04 2025 |
Nathan | Update | VLC Update | Photodiode signal check and additional signal check due to 20Mhz signal and amplifier |
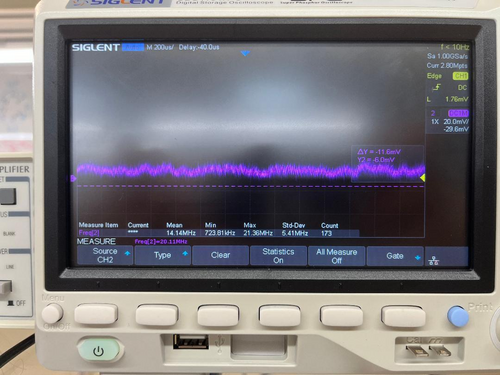
| In general, photodiode was able to achieve signal. Below are the voltage signals and frequency measurements of the photodiode with the dc bias and amplifier connected to the EOM (Vpp = 2mV for first and Vpp= 1 for second). Also I need assistance in using the PZT driver. |
| Attachment 1: thumbnail_(8)_(1).jpg
|
_(1).jpg.png)
|
| Attachment 2: vpp.jpg
|
|
|
559
|
Tue Apr 22 12:08:46 2025 |
Xuesi Ma | Update | | |
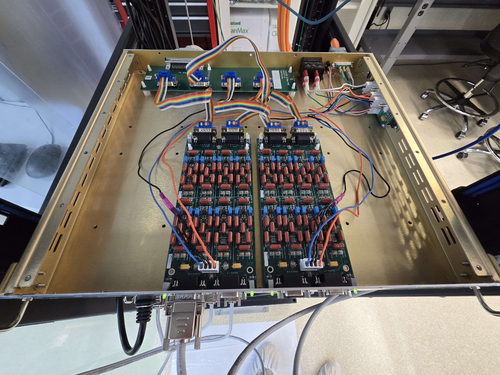
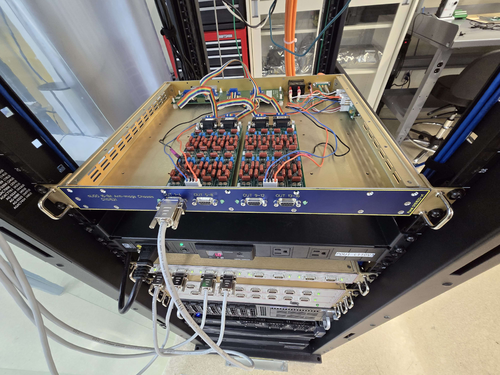
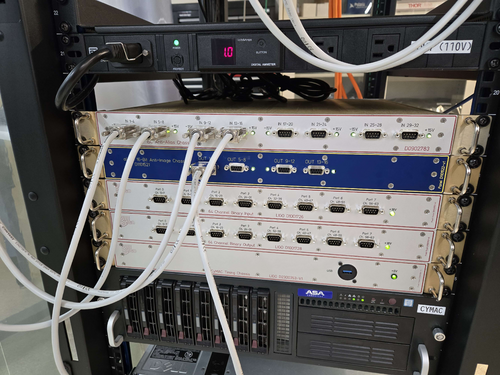
Test 7: Reconnect ribbon cables
- Setup: Reconnect all the ribbon cables, and turned on the AI Chassis while isolated rack
- Observation: No spike observed.
Test 8: Reconnect to rack
- Setup: Reconnect the AI Chassis to the rack.
- Observation: No spike observed.
Test 9: Restore to original position.
- Setup: CLose up the AI Chassis, and put it back to its original location.
-
- Observation: No spike observed.
|
| Attachment 1: 20250415_161755.jpg
|
|
| Attachment 2: 20250416_174640.jpg
|
|
| Attachment 3: 20250422_105614.jpg
|
|
|
558
|
Tue Apr 22 11:04:31 2025 |
Liu | Update | Interferometer Simulations | Test Mass Thermal State Decoder Update with Interferometer Operation |
|
| Attachment 1: Update.pdf
|

|
|
557
|
Tue Apr 22 08:00:39 2025 |
Luke | Update | Scripts/Programs | Thermal optimization modeling 40kg |
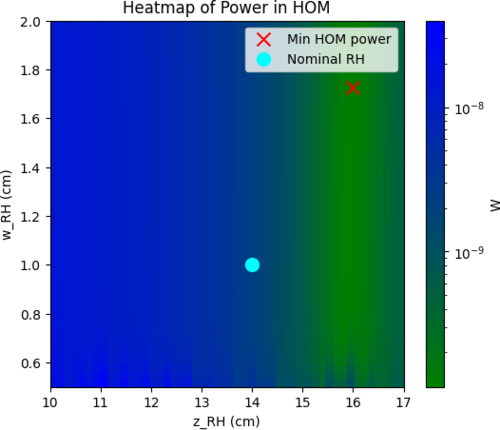
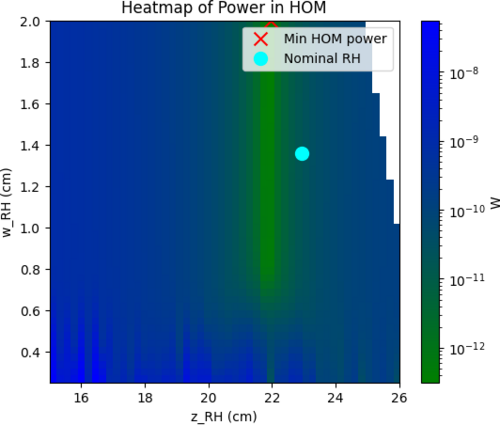
I have redone the width and location optimization with a 40kg test mass. This was to see where the nominal ring heater would fall in this optimization map see attached.
There are two concerns I have with this modeling:
- I am using normalized power only imparting 1W, which may effect the single pass scattering used for optimization.
- I am only looking at the surface deformation and I believe that looking at OPD may also be something that is important to consider.
Note z_RH is measured from the HR surface and w_RH is the half width of the target plane |
| Attachment 1: 40kg_into_HOM.png
|
|
|
556
|
Mon Apr 21 16:56:42 2025 |
Michael | Update | Interferometer Simulations | Fixed Observed Squeezing Curve for Toroidal Mirror Case |
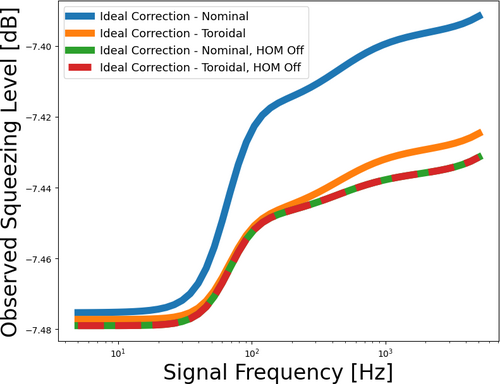
| We've resolved the issue with the observed squeezing curve for the toroidal mirror case showing worse performance at lower frequencies and better performance at higher frequencies compared to the nominal case. This issue was caused by the beam parameter at the squeezer being fixed before changing the radii of curvature of the mirrors. This has been changed to be fixed after changing the mirrors, and we see an improvement in the toroidal mirror case. |
| Attachment 1: updated_observed_squeezing_plot.png
|
|
|
555
|
Thu Apr 17 12:12:29 2025 |
Liu | HowTo | Interferometer Simulations | Preventing Thread Contention in Multiprocessing with Finesse and Cython |
Avoiding Thread Contention When Using Multiprocessing with Finesse and Cython
When running Monte Carlo simulations or other computational workloads, it's common to use Python's ProcessPoolExecutor to parallelize multiple independent tasks. This approach works well—until it interacts with low-level libraries that themselves use multi-threading under the hood.
The Problem: Thread Over-Subscription
In a recent project, I ran into a significant performance issue while executing a large number of Monte Carlo trials using a process pool with 30 worker processes on Megatron (with 48 cores). Each trial ran a function that internally used cython.parallel.prange for fast, element-wise operations, which is what Finesse uses under the hood for many internal numerical calculations. Cython, via OpenMP, was configured to use all available CPU threads per process by default.
This resulted in severe thread over-subscription. With 30 parallel processes and each process attempting to use all 48 threads, the system was launching over 1,400 threads concurrently. The CPU quickly became saturated, and the tasks stalled. In some cases, the system became unresponsive, and the jobs had to be canceled repeatedly.
This happens because when the function calls into these libraries from within a Python multiprocessing context, each subprocess will attempt to use the full number of threads available to the machine.
The Solution: Limit Threads per Process
The solution is simple: explicitly limit the number of threads each subprocess is allowed to use. This can be done by setting the environment variable at the top of your script, before importing any thread-hungry libraries like Finesse.
import os
os.environ["OMP_NUM_THREADS"] = "1"
By setting OMP_NUM_THREADS to "1", we ensure that each multiprocessing worker uses only one thread internally, preventing them from overloading the system and allowing the tasks to run more efficiently.
|
|
554
|
Tue Apr 15 11:37:17 2025 |
Cynthia | Update | Interferometer Simulations | Finishing up mirror coating map step |
|
| Attachment 1: updates_4_15_2025.pdf
|

|
|
553
|
Tue Apr 15 11:13:43 2025 |
Xuesi Ma | Update | | |
Test 4: AI Chassis ground isolation
- Setup: AI Chassis isolated from the ground with readout directly connected to adapter board
- Observation: No spike observed.
Test 5: Ribbon cable check
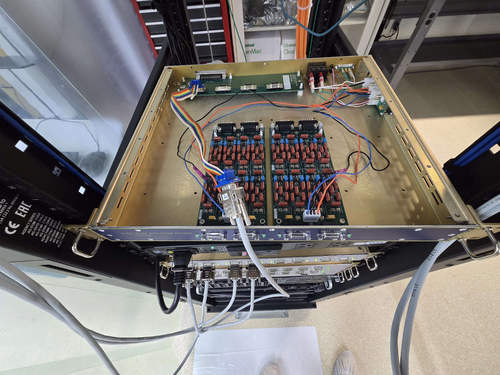
- Setup: AI Chassis remains isolated from the ground. The signal is measured after the ribbon cable. (Attachment 3)
- Observation: No spike observed.
Test 6: Single ground connection check
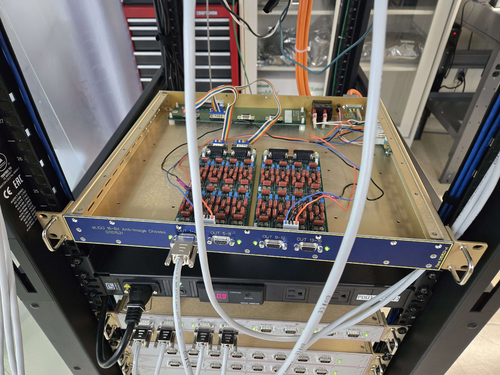
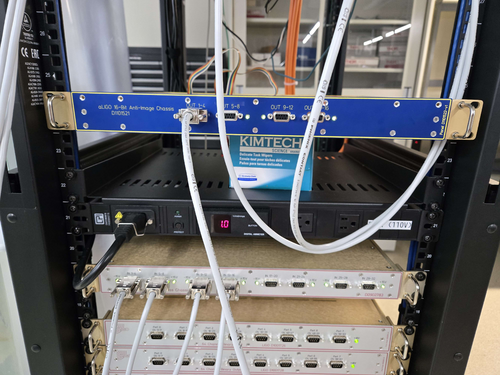
- Setup: AI chassis powered on but remains isolated from the frame. The signal is measured from the output of the AI Chassis. (Attachment 1 ,2)
-
- Observation: No spike observed.
|
| Attachment 1: 20250414_120428.jpg
|
|
| Attachment 2: 20250414_120423.jpg
|
|
| Attachment 3: 20250411_163105.jpg
|
|
|
552
|
Tue Apr 15 11:09:37 2025 |
Liu | Update | FLIR | Test Mass Thermal State Decoder Update with robustness study |
|
| Attachment 1: Update.pdf
|

|
| Attachment 2: Update.pdf
|

|
|
551
|
Tue Apr 8 20:04:35 2025 |
Nathan | Update | VLC Update | PDH Lock Progress |
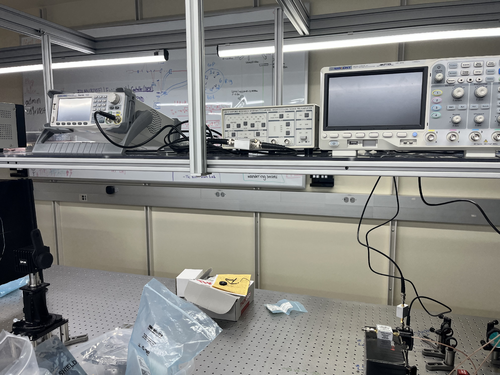
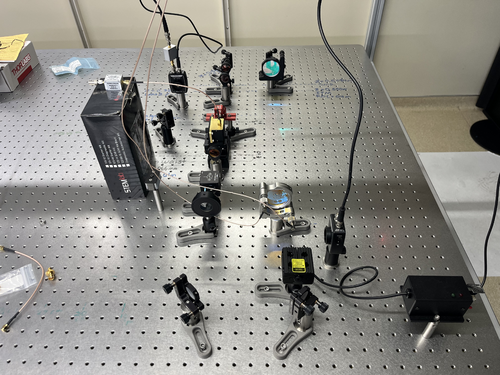
| Connected the DC bias and mixer. Need to connect signal generator now to RF Amp and mixer, and also need to connect power supply. After that will see if I can get a detection on the oscilloscope and if so will set up the driver. [Photos attached] |
| Attachment 1: IMG_5450.jpeg
|
|
| Attachment 2: IMG_5449.jpeg
|
|
|
550
|
Tue Apr 8 12:15:59 2025 |
Luke | Update | Scripts/Programs | Updated optimization plot |
|
| Attachment 1: HOM_scattering_w__nominal_and_min.png
|
|
|
549
|
Tue Apr 8 10:47:10 2025 |
Liu | Update | General | Test Mass Thermal State Decoder Update |
|
| Attachment 1: Update.pdf
|

|
|
548
|
Tue Apr 8 00:17:01 2025 |
Michael | Update | Interferometer Simulations | Squeezing Performance Graphs for Case With and Without Toroidal Mirrors in LIGO |
| I've created some graphs for the frequency dependent observed squeezing level in LIGO for both the nominal case and the case where we include toroidal mirrors, giving some interesting results. https://docs.google.com/presentation/d/1RBr47hNaxFTdGrwys5ZCUEUOgVOVHmZ2B_5EQwY62IY/edit?usp=sharing |
|
547
|
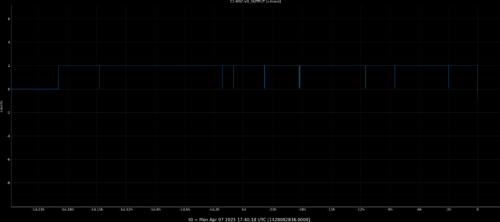
Mon Apr 7 13:28:49 2025 |
Xuesi Ma | Update | | |
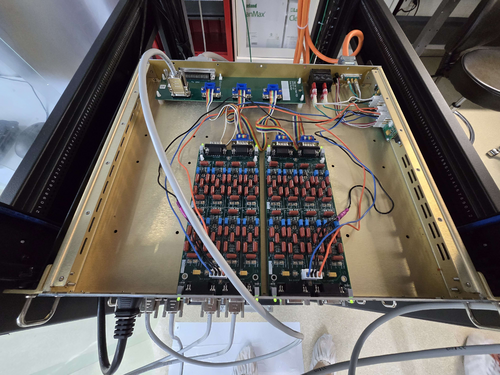
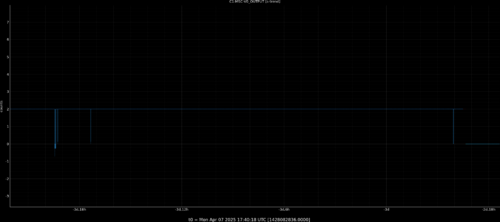
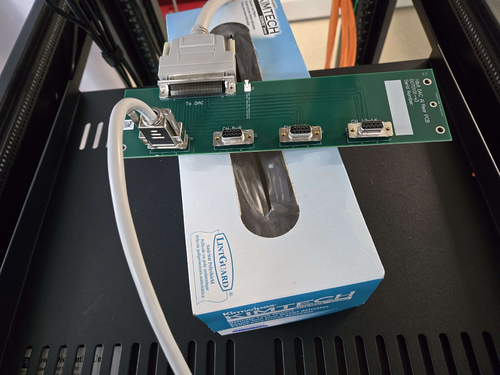
Test 1: Adapter Board Connected to Filter Board
- Setup: AI Chassis is powered on. Signal is measured directly from the adapter board. All other ports on the adapter board are connected to the filter board.
- Observation: Two distinct spikes observed at the beginning of the measurement.
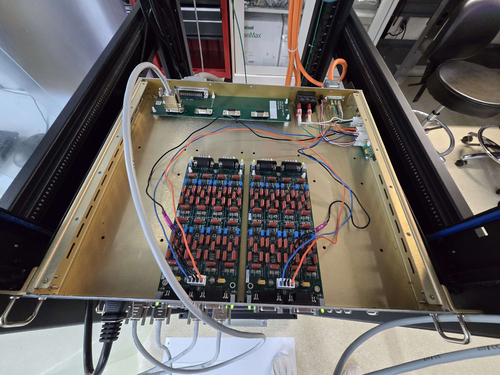
Test 2: Adapter Board Disconnected from Filter Board
- Setup: AI Chassis remains powered on. Signal is again measured directly from the adapter board. This time, the remaining ports on the adapter board are not connected to the filter board.
- Observation: Multiple spikes observed, distributed evenly across the entire measurement.
Test 3: Isolation Test with Spare Adapter Board (ongoing)
- Setup: Suspecting the original adapter board may be faulty, a spare adapter board is used for comparison. Signal is measured directly from this spare board.
-
Update, 04/08/25, Tue 17:30
Took the old adapter board out of the AI chassis and and used it to connect DAC to AA chassis. If no spikes are seen, it means that the glitches are not originating from this board.
Also checked al the previous spikes using the raw data (65536 Hz sample rate). The duration of the glitches are ~1 second, despite the previous guess that they are happening in the Milli-second scale.
|
| Attachment 1: 20250403_151946.jpg
|
|
| Attachment 2: ELOG_Spike_adapter_filter_on.png
|
|
| Attachment 3: 20250404_143624.jpg
|
|
| Attachment 4: ELOG_Spike_adapter_isolate.png
|
|
| Attachment 5: 20250407_105846.jpg
|
|
|
546
|
Thu Apr 3 13:23:37 2025 |
shane | Update | CDS | UPS interfacing |
| Update on UPS serial interfacing: the driver for the UPS webcard has been installed on spica (for UPS1 in room 1119) and logrus (for UPS2 in room 1129). Static IP addresses have been assigned for both and noted on the lab wiki. Neither is yet able to connect, as the initial ip address webpage connection test failed for both. In the process of troubleshooting now. |
|
545
|
Tue Apr 1 11:47:08 2025 |
Liu | Update | | |
|
| Attachment 1: Thermal_state_decoder_update.pdf
|

|
|
544
|
Mon Mar 31 15:41:56 2025 |
Xuesi Ma | Update | | |
The result from AI Chassis bypass test showed that the AI Chassis may be the problem. There are no spikes from DAC's direct output.
All chassis except timing chassis are turned off. Power supplies for 24V, 18V, and -18V are turned off
The AI chassis has been taken out of the rack for further inspection
Refer to:
https://dcc.ligo.org/LIGO-E2300117
https://dcc.ligo.org/cgi-bin/private/DocDB/ShowDocument?.submit=Identifier&docid=D2300124&version= |
|
543
|
Mon Mar 31 11:26:45 2025 |
Luke Johnson | Update | Scripts/Programs | Heatmaps of power delivery performance |
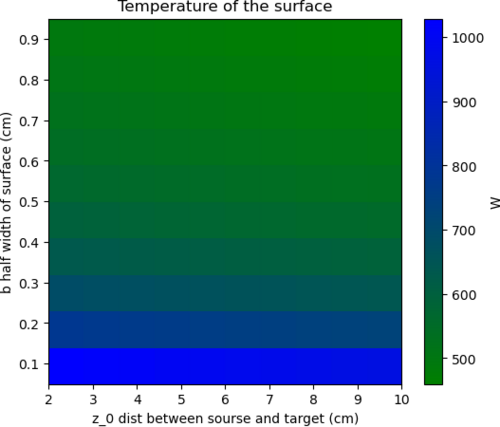
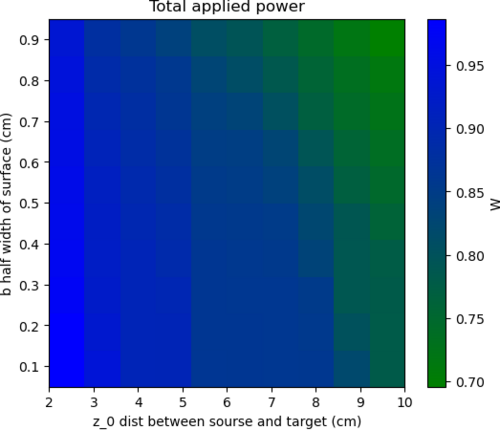
| These plots show the required temperature to release 100W of power and the efficiency of a particular configuration with half-width w and distance away from the barrel z. I want to add to these heat maps a limit line that has restricts the proximity of the reflectors from the barrel. |
| Attachment 1: temp_required.png
|
|
| Attachment 2: efficiency.png
|
|
|
542
|
Tue Mar 25 12:56:47 2025 |
Tyler | Update | TCS | FROSTI Analysis Finalization |
Upon final review of the FROSTI analysis included in the (hopefully) soon-to-be submitted instrument paper, I've made some adjustments to the reflectivity analysis that estimates the amount of power delivered to the test mass by the FROSTI. Initially, as detailed in elog 447, the delivered power was approximated to be 12.6 W (later adjusted to 12.9 W), with roughly 18% of this power being reflected by the test mass. After some final adjustments, this value now is closer to 12.0 W, with 10.2 W absorbed (15% power reflection). Below is a table showing the updated values for the FROSTI prototype tests:
|
Old Value |
New Value |
| Delivered Power |
12.9 W |
12.0 W |
| Absorbed Power |
10.6 W (18% reflectivity) |
10.2 W (15% reflectivity) |
| Measured Peak Temperature Difference |
5.39 +/- 0.03 K |
5.26 +/- 0.03 K |
| Model Peak Temperature Difference |
5.42 K |
5.21 K |
| Measured Peak OPD |
765 +/- 9 nm |
771 +/- 7 nm |
| Model Peak OPD |
630 nm |
654 nm |
|
| Attachment 1: FROSTI_OPD_profile.pdf
|

|
| Attachment 2: FROSTI_temperature_profile.pdf
|

|
|
541
|
Sun Mar 23 15:39:06 2025 |
Luke Johnson | Update | Scripts/Programs | Ringheater Location optimization |
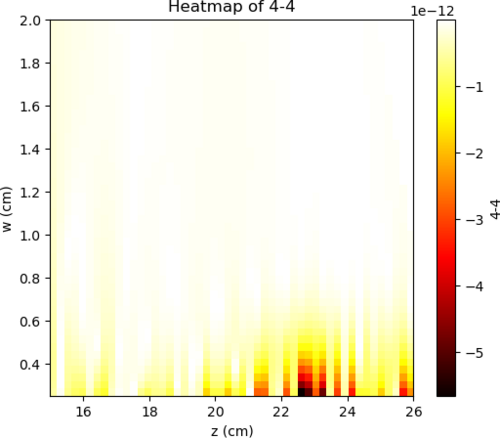
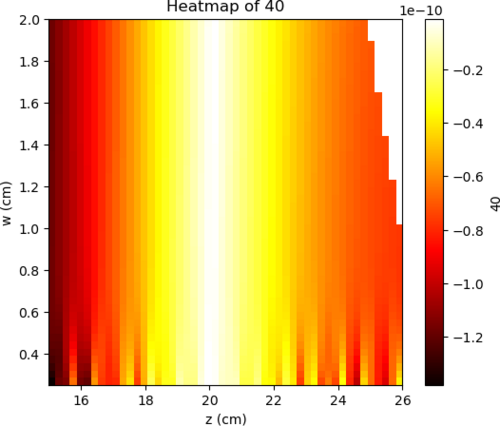
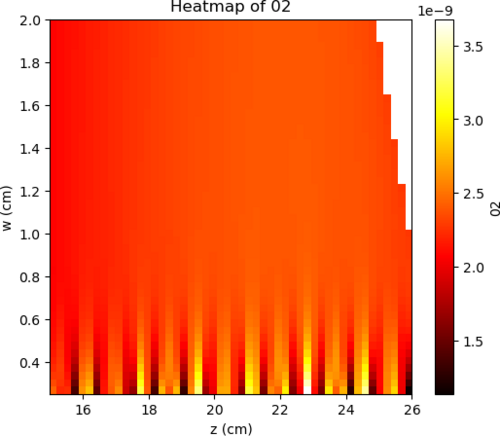
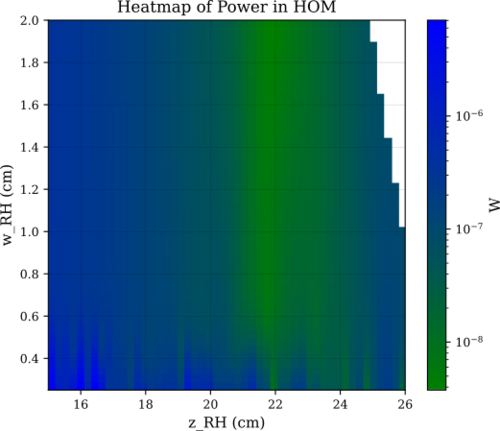
| Attached are some plots that show a new parameter sweep with a finer mesh then before. I have also been able to get a heatmap of power of HOMs in a very simple finesse model. |
| Attachment 1: _4-4.png
|
|
| Attachment 2: _40.png
|
|
| Attachment 3: 02.png
|
|
| Attachment 4: HOM_power.svg
|
|
|
540
|
Tue Mar 11 11:28:52 2025 |
Cynthia | Update | Interferometer Simulations | flattening mirror to study power discrepency |
|
| Attachment 1: updates_3_11_(1).pdf
|
.png)
|
|
539
|
Tue Mar 11 10:43:57 2025 |
Xuesi Ma | Update | | |
Continue investigation in the spikes
Pulsed ADC with a function generator and find no spikes. Rules out ADC for causing the spikes
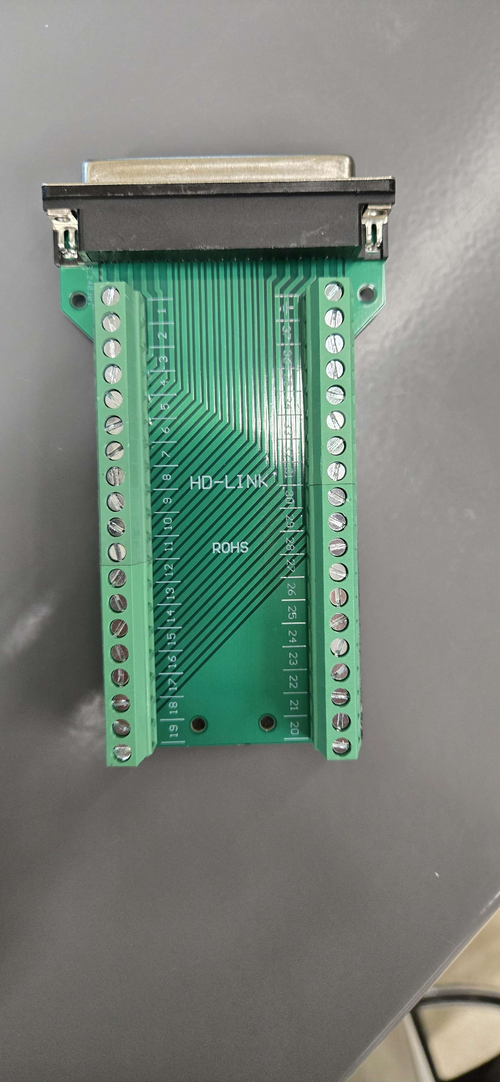
Loopback test that bypasses the FROSTI Chassis shows spikes (spikes happened on all channels at the same time)
Next step is to bypass the AI Chassis to find the source of the spikes |
| Attachment 1: 20250310_171936.jpg
|
|
|
537
|
Mon Mar 10 21:32:29 2025 |
Nathan | Physics | Electronics | Beam Profiling and PBS Measurements |
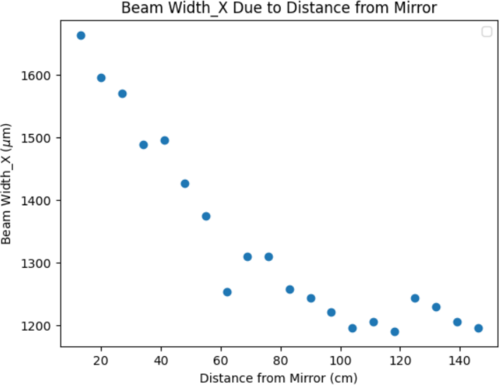
| Beam wasn't diverging, however maybe was about to diverge when measurements stopped? Will discuss the PBS measurements and how the voltage changed due to the wave plate. |
| Attachment 1: Beam_Profiling_2_20_(2).pdf
|
.png)
|
| Attachment 2: beamprfl.png
|
|
| Attachment 3: thumbnail_(6).jfif
|
|
536
|
Mon Mar 10 21:13:12 2025 |
Nathan | Update | VLC Update | PDH Lock Progress and Next Steps |
| Progress update: Photodiode is set up, need to set up DC bias tee, EOM has 400-600nm wavelength range with a resonance frequency of 0.1-100MHz. Additionally need to connect the DC bias to SR560, put it in low pass, then connect to the function generator and connect it to oscilloscope to observe. Once everything looks good and working, need to connect the driver and we can start actuating on the cavity ETM. |
| Attachment 1: thumbnail_(2).jfif
|
| Attachment 2: thumbnail_(4).jfif
|
| Attachment 3: thumbnail_(5).jfif
|
| Attachment 4: Visible_Light_Optical_Cavity_(2).pdf
|
.png)
|
|
535
|
Mon Mar 10 17:03:52 2025 |
Shane | Update | CDS | Pressure Gauge successful connect |
| Vac system serial interfacing update: the pressure gauge is now able to communicate successfully through the code. It's been set to a static ip of 192.168.1.30, on port 8000. |
|
534
|
Wed Mar 5 18:13:20 2025 |
Shane | Update | CDS | vac system comms |
|
[Shane, Jon]
Update on the serial interfacing with the Inficon VGC503 pressure gauge: We began setup of the Inficon pressure gauge today. We configured the ethernet setting via USB and assigned it a static IP address of 192.168.1.30, which is listed in the network table on the lab wiki. It is showing up on the network successfully, and is responding to pings. Will attempt communication via code next.
|
|
533
|
Wed Mar 5 12:16:28 2025 |
Shane | Update | CDS | Vac system communications update |
|
[Shane, Jon]
Update on the serial interfacing with the vacuum system: both turbo pumps are now able to successfully communicate through the code. The older pump, for unknown reasons, required a newer version of the communication syntax (despite the newer, small pump being able to communicate fine with the old communication format). We have also confirmed that the newer pump works with this new format as well. Next step is interfacing the pressure gauge.
|
|
532
|
Tue Mar 4 10:47:03 2025 |
Shane | Update | CDS | Vac system pinouts |
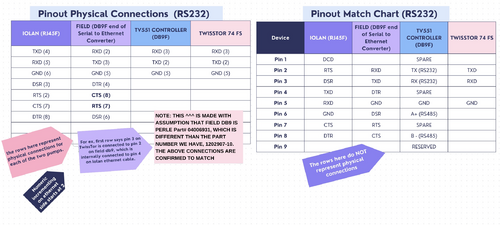
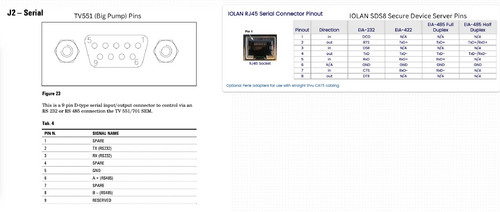
| Attached here are the pinouts, as we currently know them, for the vacuum system. The three items focused on here are the Agilent TwissTorr 74 FS turbo pump (the smaller/newer pump) and controller, the Agilent TV 551 Navigator turbo pump (the larger/older pump) and controller, and the Eight-channel Perle IOLAN SDS8 terminal server. The 'field' pinouts in the attached tables refer to the DB9 end of the RJ45F to DB9F converter. |
| Attachment 1: vac_pinouts_1.jpeg
|
|
| Attachment 2: vac_pinouts_2.jpeg
|
|
|
531
|
Tue Mar 4 10:28:58 2025 |
Tyler | Update | TCS | RIN Plot Updates |
|
| Attachment 1: Dark_bin_veto.pdf
|

|
| Attachment 2: Mock_final_plot_inst.pdf
|

|
|
530
|
Tue Mar 4 10:18:43 2025 |
Cynthia | Update | Interferometer Simulations | attempted to remove curvature and tilt for the coating |
|
| Attachment 1: 3_4_updates.pdf
|

|
|
529
|
Tue Mar 4 03:33:18 2025 |
Xuesi Ma | Update | | Update |
Spikes Appear Again, need to address it systematically.
Power on and off before reaching steady state ✔
At 12V, the rise and fall time of heater elements are different from 24V.
Initial guess is due to temperature in the chamber. However, it does not seem to be the case, 24V with 30c have the same hall time as 24V at lower temperature.
Attached are some graphs for rise and fall time
After a weekend of powering on, the main chamber pressure stabilized in the UHV region.
Temperature in the chamber seems also not to change. |
| Attachment 1: resistance_vs_time_all_channels_all_time.pdf
|

|
| Attachment 2: resistance_vs_time_rise_time.pdf
|

|
| Attachment 3: resistance_vs_time_fall_time.pdf
|

|
| Attachment 4: resistance_vs_time_rise_time_12V.pdf
|

|
| Attachment 5: resistance_vs_time_fall_time_12V.pdf
|

|
| Attachment 6: resistance_vs_time_fall_time_24V_30c.pdf
|

|
|
528
|
Tue Mar 4 03:05:42 2025 |
Xuesi Ma | Update | ELOG | LOG |
1424564097.243212 2025/02/26 00:14:39 UTC Time start
12V 2A right after start all 8 elements
1424564478.079428 2025/02/26 00:21:00 UTC Time stop
12V 1.8A right before stop all 8 elements
1424564832.211584 2025/02/26 00:26:54 UTC Time start
12V 1.9A right after start all 8 elements
1424565208.359935 2025/02/26 00:33:10 UTC Time stop
12V 1.8A right before stop all 8 elements
1424565573.565066 2025/02/26 00:39:15 UTC Time start
12V 1.8A right after start all 8 elements
1424565931.242394 2025/02/26 00:45:13 UTC Time stop
12V 1.7A right before stop all 8 elements
1424566292.67104 2025/02/26 00:51:14 UTC Time start
12V 1.8A right after start all 8 elements
1424566648.619952 2025/02/26 00:57:10 UTC Time stop
12V 1.7A right before stop all 8 elements
1424566996.312246 2025/02/26 01:02:58 UTC Time start
12V 1.8A right after start all 8 elements
1424567381.748943 2025/02/26 01:09:23 UTC Time stop
12V 1.7A right before stop all 8 elements
1424567756.528736 2025/02/26 01:15:38 UTC Time start
12V 1.7A right after start all 8 elements
0.2A right before start
spikes!?
1424643001.864687 2025/02/26 22:09:43 UTC
change c_0(VEXC0 & VCXC0) to 2V (why is it on 5V ?)
2025/02/26 22:18:51 UTC
Main chamber pressure:5.92e-9
RGA chamber pressure:1.98e-9
1424650528.240947 2025/02/27 00:15:10 UTC Time start (increase voltage)
24V 2.1A right after start all 8 elements
disconnect and reconnect (exc 1-4)(out 9-12) & (exc 5-8)(out 13-16)
2025/02/27 19:34:26 UTC
Main chamber pressure:1.34e-8
RGA chamber pressure:4.33e-9
Main chamber temp: 29
RGA chamber temp:29
2025/02/28 18:02:29 UTC
Main chamber pressure:1.05e-8
RGA chamber pressure:3.53e-9
Main chamber temp: 29
RGA chamber temp:30
1424801097.374902 2025/02/28 18:04:39 UTC Time stop
24V 1.8A right before stop all 8 elements
0.1A right after stop
1424827460.71372 2025/03/01 01:24:02 UTC Time start
24V 2.9A right after start all 8 elements
0.1A right before start
2025/03/01 01:25:34 UTC
Main chamber pressure:5.98e-9
RGA chamber pressure:2.06e-9
Main chamber temp:27
RGA chamber temp:27
2025/03/03 20:28:03 UTC
Main chamber pressure:7.8e-9
RGA chamber pressure:2.64e-9
Main chamber temp:27
RGA chamber temp:27 |
|
527
|
Thu Feb 27 18:22:21 2025 |
Shane | Update | CDS | Ongoing work in server rack and desk area (1119) |
| As part of the vacuum communications debugging process, there is ongoing work in the server rack and desk area in 1119. Please be careful not to move any of the materials left out in the server rack or on the work bench. |
|
526
|
Tue Feb 25 10:56:25 2025 |
Cynthia | Update | Interferometer Simulations | mirror coating added for simulation rerun |
| I have tried to rerun the simulation on finesse after adding the mirror coating. The result has a large fluctuation in required input power vs arm power that is concerning. I am currently working on potentially resolve this issue and get a reasonable graph before I proceed to optimizing the thermal maps. |
| Attachment 1: updats_(3).pdf
|
.png)
|
|
525
|
Tue Feb 25 10:02:32 2025 |
Xuesi Ma | Update | | |
1424039912.625576 2025/02/19 22:38:14 UTC Time start
24V 2.8A right after start all 8 elements
1424044804.902443 2025/02/19 23:59:46 UTC Time stop
24V 1.8A right before stop all 8 elements
0.1A right before start and right after stop
note: turned on briefly to check current right before stop
2/20 RGA Scan
spikes??
1424129207.857777 2025/02/20 23:26:29 UTC Time start
24V 2.9A right after start all 8 elements
1424140789.856096 2025/02/21 02:39:31 UTC Time stop
24V 1.7A right before stop all 8 elements
0.1A right before start and right after stop
2025/02/21 02:43:19 UTC
Main chamber pressure: 1.54e-8
RGA chamber pressure:5.06e-9
spikes are due to loose connection between connectors.
1424210410.173863 2025/02/21 21:59:52 UTC Time start
24V 2.9A right after start all 8 elements
1424218357.96404 2025/02/22 00:12:19 UTC Time stop
24V 1.7A right before stop all 8 elements
each elements: 0.3A (0.2A increment)(all)
0.1A right before start and right before stop
2/24 RGA Scan
1424467918.129082 2025/02/24 21:31:40 UTC Time start
12V 2A right after start all 8 elements
1424478936.635821 2025/02/25 00:35:18 UTC Time stop
12V 1.6A right before stop all 8 elements
each elements: 0.4A (0.2A increment)(all)
0.2A right before start
rise time: A(1-exp(-t/tau))+B
fall time: Aexp(-t/tau) +B |
| Attachment 1: resistance_vs_time_all_channels_all_time.pdf
|

|
| Attachment 2: temperature_vs_time_all_channels_all_time.pdf
|

|
| Attachment 3: resistance_vs_time_rise_time.pdf
|

|
| Attachment 4: resistance_vs_time_fall_time.pdf
|

|
|
523
|
Tue Feb 25 01:37:00 2025 |
Michael | Update | Interferometer Simulations | Updates and Current Next Steps for Toroidal Mirrors Project |
| Since the previous discussion of this project, I've worked on building finesse models to verify mathematical results which model the astigmatism in a two mirror system which we attempt to minimize. This left us with a single condition for an output non-astigmatic beam. However, as can be seen in finesse simulations, there does exist other configurations which have a negligibly small astigmatism, which we may want to consider. Below I've attached the link to my overleaf project which has some updated information which I plan on discussing.
https://www.overleaf.com/project/67968921426e61d5b2fd8c96 |
|
522
|
Mon Feb 24 17:50:13 2025 |
Luis | Update | VAC | RGA Scan |
| [Ma, Luis]
February 24, 2025 - 1:00PM
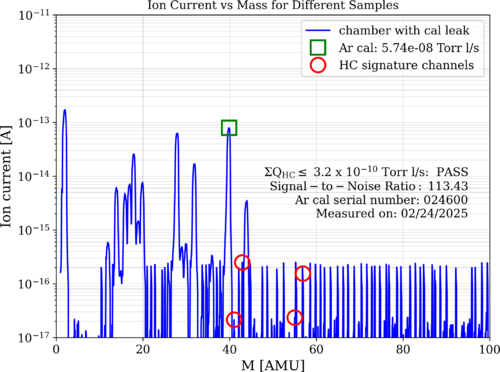
Ma performed an RGA scan with the vacuum system containing the heater elements. The results are attached below.
|
Pressure (Torr) |
Temperature (°C) |
| RGA Volume |
3.31 × 10⁻⁹ |
25 |
| Main Volume |
5.75 × 10⁻⁹ |
24 |
|
| Attachment 1: 2025-2-24_HeaterElement_ArO.png
|
|
|
521
|
Sun Feb 23 16:00:07 2025 |
Luke | Update | Scripts/Programs | Ringheater modeling Update |
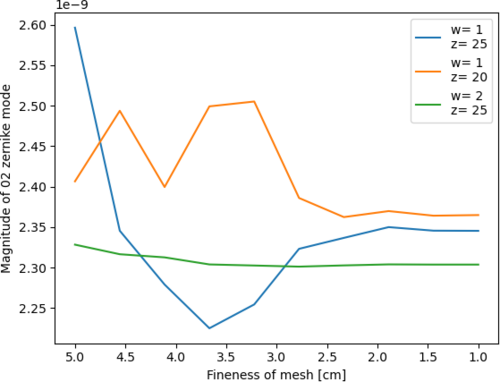
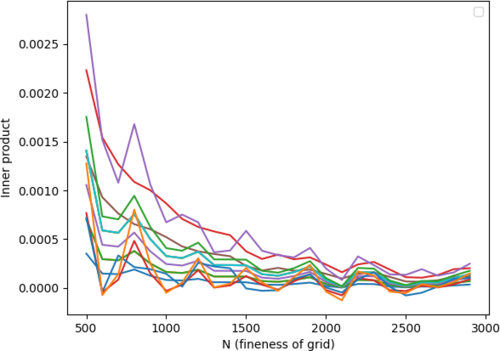
These are some plots:
The first shows the convergence of the 02 mode reducing the size of the mesh. The second shows the the numerical error of the zernike.
The first is found by sweeping a parameter that changes the size of the mesh. The HR surface was set to half a cm for all values.
The second by taking the inner product of a zernike mode with its self and calculating its deviation from pi for varying fineness of the mesh. |
| Attachment 1: mesh_convergence.png
|
|
| Attachment 2: numerical_error_in_innerproduct_of_zernike_basis_elemets.png
|
|
|
520
|
Sun Feb 23 12:11:43 2025 |
Luke | Summary | Cleanroom | Cleanroom cleaning |
[Luke, Mary, Luis]
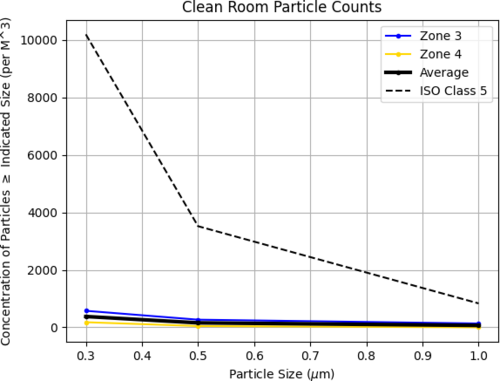
Particle Count Measurements:
- Pre-cleaning (8:40 am):
- Zone 3:
- 0.3 µm: 441
- 0.5 µm: 44
- 1.0 µm: 0
- Zone 4:
- 0.3 µm: 353
- 0.5 µm: 176
- 1.0 µm: 44
- Started Cleaning (3:16 pm)
- Finished Cleaning (4:10 pm)
- Post-cleaning (4:15 pm):
- Zone 3:
- 0.3 µm: 574
- 0.5 µm: 265
- 1.0 µm: 132
- Zone 4:
- 0.3 µm: 177
- 0.5 µm: 44
- 1.0 µm: 0
|
| Attachment 1: partical_count_2-21-25.png
|
|
|
519
|
Thu Feb 20 17:07:36 2025 |
Luis | Update | VAC | RGA Scan |
| [Ma, Luis]
February 20, 2025 - 3:30 PM
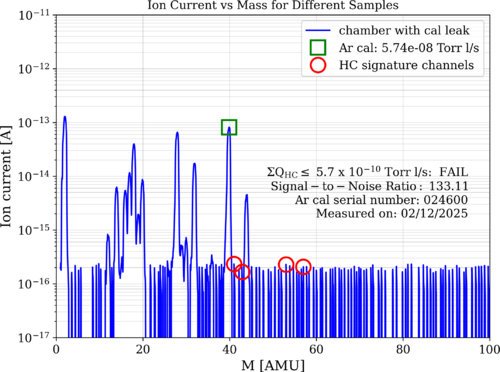
Ma performed an RGA scan with the vacuum system containing the heater elements. The results are attached below.
|
Pressure (Torr) |
Temperature (°C) |
| RGA Volume |
1.87× 10⁻⁹ |
23 |
| Main Volume |
5.70 × 10⁻⁹ |
23 |
As we can see, we are not yet under cleanliness standards. The passing threshold is 4 × 10⁻¹⁰, we are very close to it.
|
| Attachment 1: 2025-2-20_HeaterElement_ArO.png
|
|
|
518
|
Wed Feb 19 13:44:48 2025 |
Shane | Update | CDS | Vac serial interfacing update |
|
[Jon, Shane]
Debugging update for vac system serial communications: we were able to successfully connect the smaller turbo pump to the Varian (manufacturer) software today by plugging the controller db9 directly into spica, and verified that the pump was able to send and receive information. Still no success on communication with the larger pump via python serial code, though. Issue potentially lies in the pinout mapping of the connectors, as the pinouts we'd been using work successfully for the small pump which only requires 3 connections (RXD, TXD, GND), but the large pump may require more. Tried to test this on the big pump by keeping the pinout setup for the small pump, and incrementally adding the remaining 6 connections on a one to one scale (Pin 1 matched to Pin 1, etc) between the controller DB9 and the field DB9 connected to the IOLAN ethernet cable. After each new connection was added, I retried running the serial connection code. None of the additional connections yielded any results, and the large pump remained unable to connect through the code. Next step is further looking into documentation on the pinouts to see if the large pump requires a different connection setup than the small pump.
|
|
517
|
Tue Feb 18 11:19:13 2025 |
Luke | Configuration | VAC | Repositioning of the lid's temperature probe |
| Before the recent bake I slightly repositioned the temperature probe on the lid from beside the heater tape to under the heater tape. This was done to better know and control the temperatures of the chamber while baking. It has appeared to work with the temperatures being held very close to the 120C target. |
|
516
|
Tue Feb 18 10:12:39 2025 |
Tyler | Update | TCS | Final RIN Plot Update |
Below is a preview of the final RIN figure that will be included in the FROSTI instrument paper. A quick summary of what is shown below:
The original RIN CSD measurement is shown on the top panel in red. Frequency bins that exhibit external electronics noise (ex. ADC, photodetector noise, etc.) are identified and shaded in gray. These noisy bins are then excluded from the dataset before beginning the next step in the analysis process: rebinning. Here, the resolution of the spectrum can be changed by averaging frequency bins together within a specified interval, with the goal of pushing the measurement curve closer to the A+ requirement shown in the figure. For demonstration below, the spectrum goes from a resolution of ~0.93 Hz to 14.90 Hz.
|
| Attachment 1: Preliminary_RIN_plot.pdf
|

|
| Attachment 2: FROSTI_ON.pdf
|

|
| Attachment 3: Dark_Noise.pdf
|

|
| Attachment 4: ADC_Noise.pdf
|

|
|
515
|
Tue Feb 18 10:02:16 2025 |
Xuesi Ma | Update | | Group Meeting Slides 2/18/2025 |
https://docs.google.com/presentation/d/1WiV2VqS0BzXNCK6VYYQ-Ty8xlHnzXatQaFbMf1-0rsY/edit?usp=sharing |
|
514
|
Tue Feb 18 10:01:07 2025 |
Xuesi Ma | Update | | |
[Ma, Pooyan, Tyler]
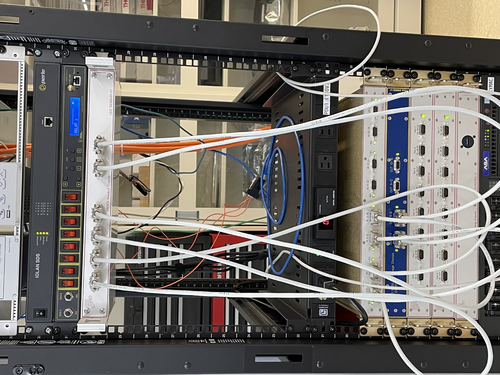
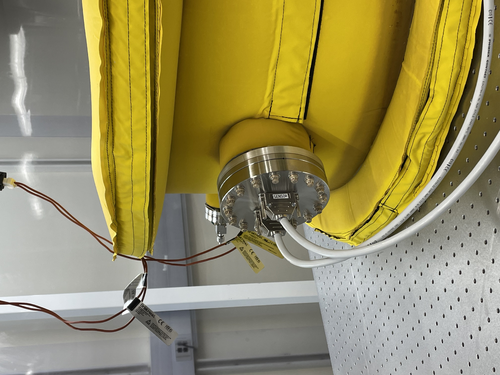
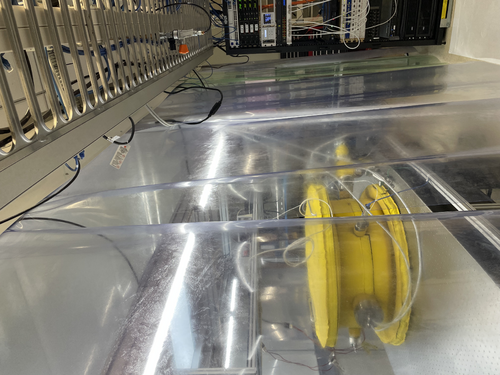
On Friday, we connected the vacuum chamber with the Cymac. |
| Attachment 1: IMG_7916.jpeg
|
|
| Attachment 2: IMG_7915.jpeg
|
|
| Attachment 3: IMG_7917.jpeg
|
|