| ID |
Date |
Author |
Type |
Category |
Subject |
|
509
|
Fri Feb 7 12:25:56 2025 |
Luke | Summary | VAC | Started bake |
[Luke, Luis]
The vacuum chamber is currently baking.
We stepped up to 120°C by increments of 30°C starting at 60°C. We took about an hour break at 90°C to let the temperatures equilibrate.
Current state as of 12:20:
The gate valve is open, the calibrated Argon leak is open, and the filament of the RGA is on.
The temperatures are as follows:
PID right barrel upper: 113°C, RGA volume: 120°C
PID left barrel lower: 121°C, Lid: 114°C
The lower temperatures should climb as the whole system heats up.
|
|
513
|
Sun Feb 16 16:45:18 2025 |
Luke | Update | General | Ringheater position optimization |
Over the last couple weeks I have been working on finding the optimal position of the ringheater's thermal profile.
Today I would like to give an update of where I am at and my next steps.
Using the python COMSOL interface I have been able to run and save deformation data sweeping through a great deal of potential combinations of widths and positions.
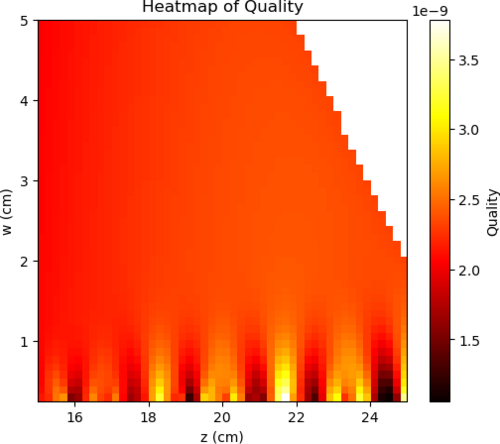
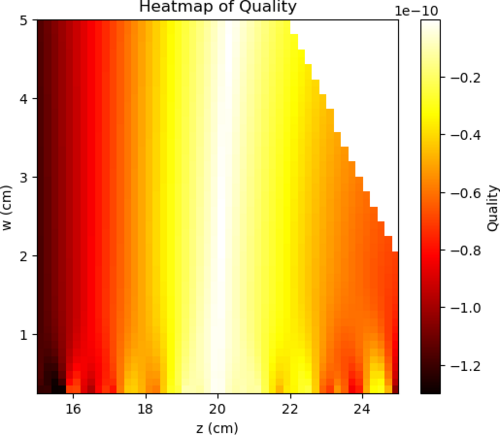
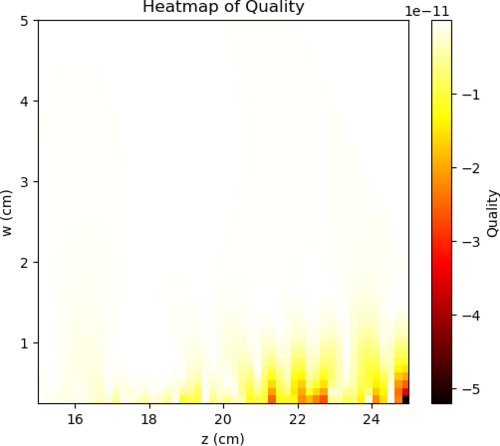
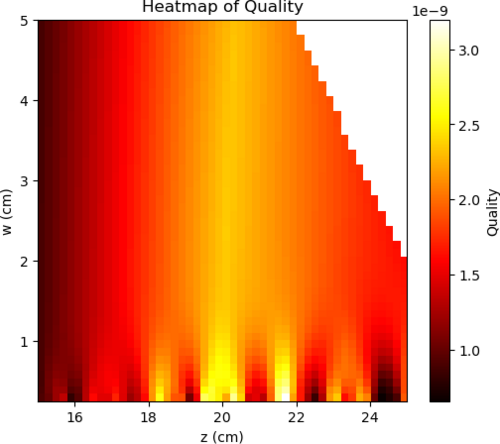
I then calculated their zernike coefficients and using a very simple "quality" function (02 - (40)*10 - (4-4)*10), where 02 stands for the zernike mode of quadratic deformation, I was able to generate a heat map of comparing the "quality" verses the width and position used.
Seen below are four plots. The first is simply the 02 coefficient of the decomposition followed by the negative of 40 and 4-4 then the "quality."
This 'quality' function was an arbitrary choice on my part. I believe that my next step would either be defining a more useful function or using finesse to model the actual effects of this surface deformation. |
| Attachment 1: 02.png
|
|
| Attachment 2: _40.png
|
|
| Attachment 3: _4-4.png
|
|
| Attachment 4: 02_40_4-4.png
|
|
|
517
|
Tue Feb 18 11:19:13 2025 |
Luke | Configuration | VAC | Repositioning of the lid's temperature probe |
| Before the recent bake I slightly repositioned the temperature probe on the lid from beside the heater tape to under the heater tape. This was done to better know and control the temperatures of the chamber while baking. It has appeared to work with the temperatures being held very close to the 120C target. |
|
520
|
Sun Feb 23 12:11:43 2025 |
Luke | Summary | Cleanroom | Cleanroom cleaning |
[Luke, Mary, Luis]
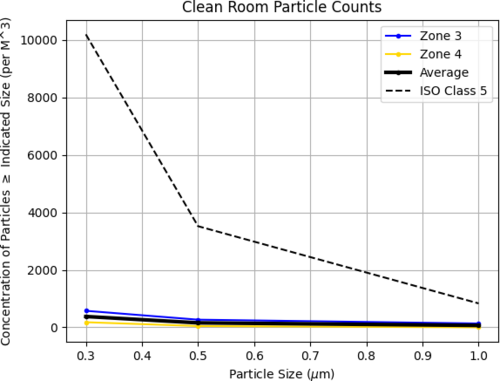
Particle Count Measurements:
- Pre-cleaning (8:40 am):
- Zone 3:
- 0.3 µm: 441
- 0.5 µm: 44
- 1.0 µm: 0
- Zone 4:
- 0.3 µm: 353
- 0.5 µm: 176
- 1.0 µm: 44
- Started Cleaning (3:16 pm)
- Finished Cleaning (4:10 pm)
- Post-cleaning (4:15 pm):
- Zone 3:
- 0.3 µm: 574
- 0.5 µm: 265
- 1.0 µm: 132
- Zone 4:
- 0.3 µm: 177
- 0.5 µm: 44
- 1.0 µm: 0
|
| Attachment 1: partical_count_2-21-25.png
|
|
|
521
|
Sun Feb 23 16:00:07 2025 |
Luke | Update | Scripts/Programs | Ringheater modeling Update |
These are some plots:
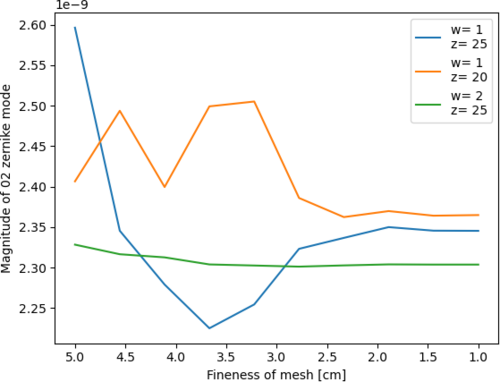
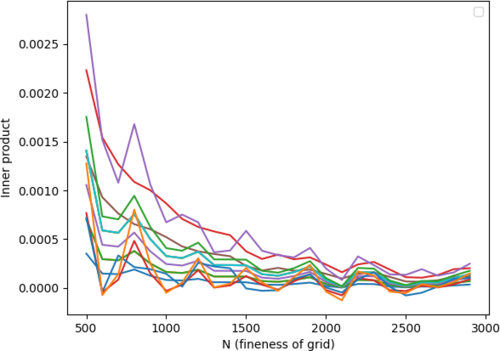
The first shows the convergence of the 02 mode reducing the size of the mesh. The second shows the the numerical error of the zernike.
The first is found by sweeping a parameter that changes the size of the mesh. The HR surface was set to half a cm for all values.
The second by taking the inner product of a zernike mode with its self and calculating its deviation from pi for varying fineness of the mesh. |
| Attachment 1: mesh_convergence.png
|
|
| Attachment 2: numerical_error_in_innerproduct_of_zernike_basis_elemets.png
|
|
|
550
|
Tue Apr 8 12:15:59 2025 |
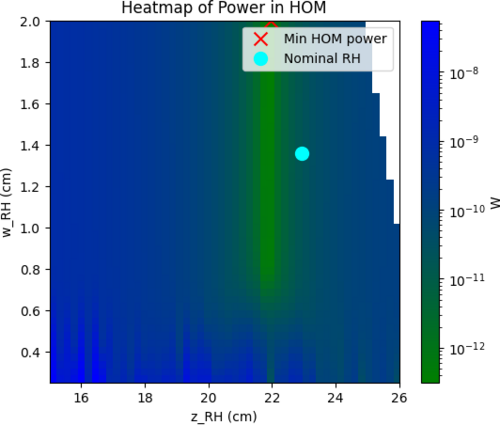
Luke | Update | Scripts/Programs | Updated optimization plot |
|
| Attachment 1: HOM_scattering_w__nominal_and_min.png
|
|
|
557
|
Tue Apr 22 08:00:39 2025 |
Luke | Update | Scripts/Programs | Thermal optimization modeling 40kg |
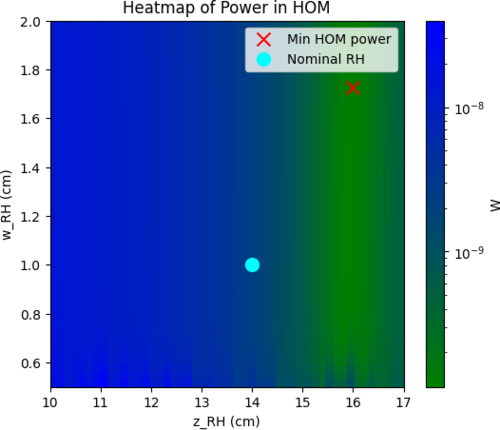
I have redone the width and location optimization with a 40kg test mass. This was to see where the nominal ring heater would fall in this optimization map see attached.
There are two concerns I have with this modeling:
- I am using normalized power only imparting 1W, which may effect the single pass scattering used for optimization.
- I am only looking at the surface deformation and I believe that looking at OPD may also be something that is important to consider.
Note z_RH is measured from the HR surface and w_RH is the half width of the target plane |
| Attachment 1: 40kg_into_HOM.png
|
|
|
561
|
Fri Apr 25 09:09:03 2025 |
Luke | Update | Scripts/Programs | Update to optimization plots |
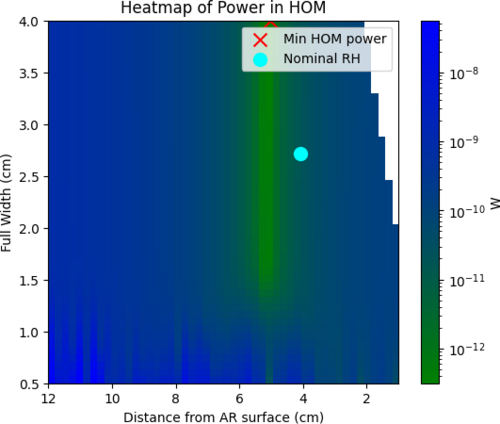
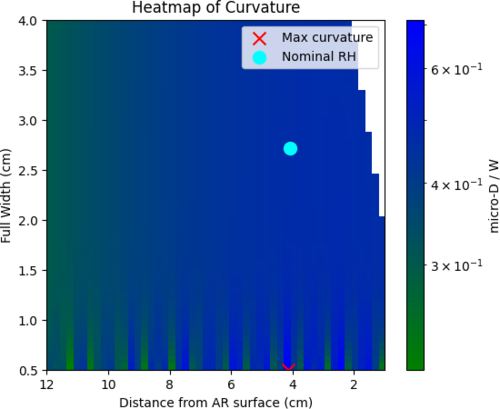
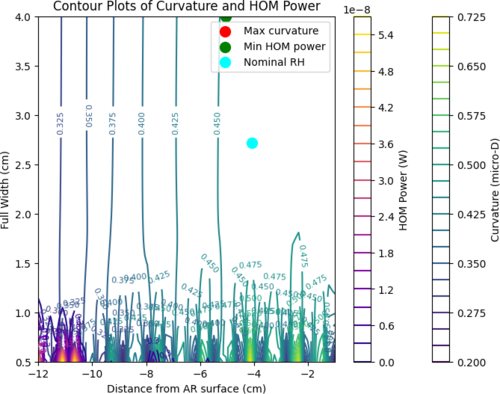
| I have calculated the curvature of the surface plots and created a heat map out of the data. I have also created a contour plot of them together. It is very rough and the artifacts at small w make it hard to read. I am planning on excluding that data and replot them. In the meantime I have created a temporary function that balance the two values. (log_10(curvature/HOMscattering))
|
| Attachment 1: HOM_scattering_100kg_modified.png
|
|
| Attachment 2: curvature_100kg.png
|
|
| Attachment 3: initial_contour_plot_with_hom_and_curvature.png
|
|
| Attachment 4: temp_quality_(log10_ratio).png
|
.png.png)
|
|
562
|
Fri Apr 25 19:18:10 2025 |
Luke | Update | Scripts/Programs | New optimization plots |
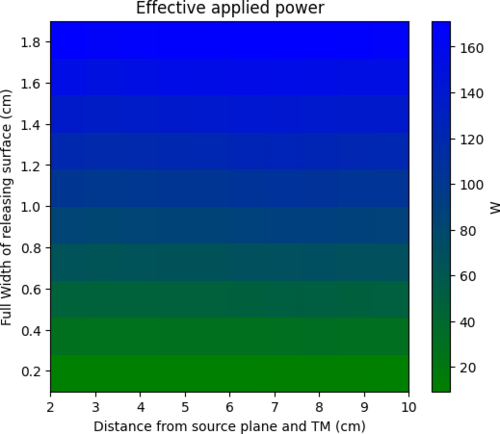
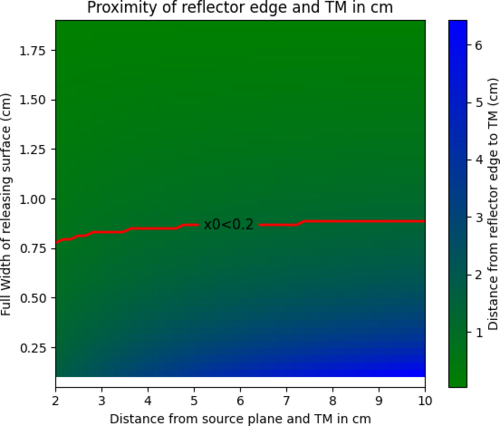
I have created two more plots. One on the transmitted power for a specific configuration. This was done by taking the product of the efficiency and the power released by surface area of the source plane for a configuration assuming it is at 300C. The second is a plot of how close the reflector is to the test mass I have included a contour line at 2mm the nominal proximity constraint. Both of these plots are generated for a 2cm wide target plane.
Somethings of note: Because the proximity requires no modeling and can be determined purely mathematically it is easy to re-generate this plot of other target widths. If you increase the target width the proximity contour moves upward and downwards if reduced. |
| Attachment 1: effective_power.png
|
|
| Attachment 2: proximity.png
|
|
|
569
|
Sun May 4 18:17:45 2025 |
Luke | Update | Scripts/Programs | Ringheater modeling Update |
Slides
I have changed some properties of the thermal model and am re-running the thermal sweeping
I have also been messing around with making a logo |
|
574
|
Fri May 9 20:06:27 2025 |
Luke | Summary | Cleanroom | Cleanroom cleaning |
[Luke, Mohak, Luis]
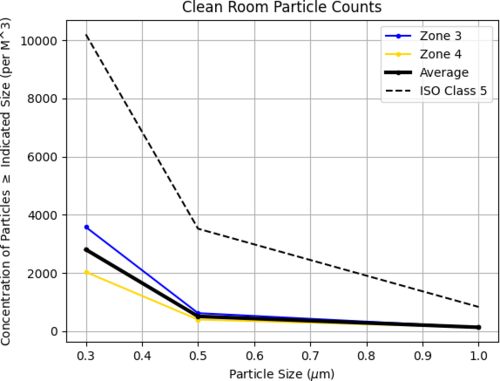
We were also able to remove the residue that has built up on the soft walls by donning a skinny bunny suit and with two wipes rubbing both sides of the soft walls at the same time. The wipes would get gummy very quickly and need to be replaced frequently.
Particle Count Measurements:
- Pre-cleaning (1:20 pm):
- Zone 3:
- 0.3 µm: 3577
- 0.5 µm: 1369
- 1.0 µm: 485
- Zone 4:
- 0.3 µm: 1062
- 0.5 µm: 442
- 1.0 µm: 177
- Started Cleaning (3:00 pm)
- Finished Cleaning (4:00 pm)
- Post-cleaning (4:22 pm):
- Zone 3:
- 0.3 µm: 3577
- 0.5 µm: 618
- 1.0 µm: 132
- Zone 4:
- 0.3 µm: 2031
- 0.5 µm: 397
- 1.0 µm: 132
|
| Attachment 1: 20250509_particalcount.png
|
|
|
575
|
Sun May 11 19:36:42 2025 |
Luke | Update | Scripts/Programs | New optimization plots |
Slides
I have re-run the optimization plots with the changes mentioned last week.
I have added the heat maps of the HOM scattering from HR deformation and the HOM scattering due to the OPD difference as well as the curvature actuation of the surface. |
|
584
|
Mon Jun 2 09:45:06 2025 |
Luke | Update | Scripts/Programs | Ringheater modeling Update |
Slides
I have added some slides to my meeting updates. The updates include: my choice in position and width, some figures I have added to my write up, and what I think my immediate steps are to wrap up.
I have also made a new FROSTI model that conducts its raytracing in real time. Something that was severely lacking in the previous model. |
|
599
|
Wed Jun 25 15:44:47 2025 |
Luke | Update | Cleanroom | Cleanroom cleaning |
[Luke, Luis, Tyler, Ma, Christina, Maple]
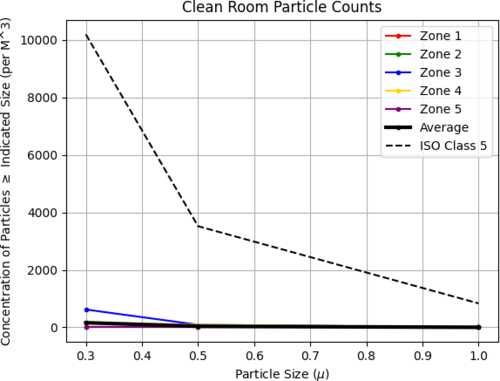
We started by cleaning outside of the cleanroom wiping down the cable channel and working our way down. We replaced the air filter in the HEPA filter with what seemed to be the last one in storage. We then vacuumed outside, before wiping down the inside of the cleanroom. We then vacuumed, mopped, and wiped down the floor inside the cleanroom.
We are ready for venting the vacuum chamber which is planned to take place 6/26/25 at 10am.
Particle Count Measurements:
- Pre-cleaning (12:00 pm):
- Zone 3:
- 0.3 µm: 2517
- 0.5 µm: 662
- 1.0 µm: 176
- Zone 4:
- 0.3 µm: 177
- 0.5 µm: 44
- 1.0 µm: 0
- Post-cleaning (1:45 pm):
- Zone 3:
- 0.3 µm: 619
- 0.5 µm: 88
- 1.0 µm: 0
- Zone 4:
- 0.3 µm: 177
- 0.5 µm: 88
- 1.0 µm: 0
|
| Attachment 1: parttical_count_6-25-25.png
|
|
|
609
|
Mon Jul 14 20:45:20 2025 |
Luke | Summary | Cleanroom | HEPA filter performance metrics |
[Luke, Luis]
We’ve been looking into methods for evaluating the performance of the HEPA filters in the clean room. Measuring flow rate appears to be a promising approach, since the filter manual specifies a recommended minimum of 70 ft/min.
At the moment, we don’t have a flow rate measurement device on hand. We're currently looking into two options:
- A standard vane-style anemometer, which is more affordable but may lack sensitivity near the minimum required flow rate.
- A hot-wire anemometer, which offers better resolution and accuracy at lower speeds, though it's more expensive.
In the next few days, either Luis or I will contact Terra Universal to see if they have any measurement solutions that would integrate well with our clean room setup, or if they can recommend best practices for verifying HEPA performance. |
|
371
|
Fri May 31 19:37:47 2024 |
Luke | Update | | Vacuum chamber Disassembly |
| [Luke, Aiden, Jon, Michel, Tyler]
Work done:
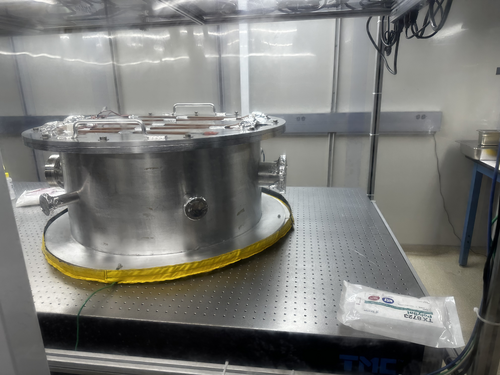
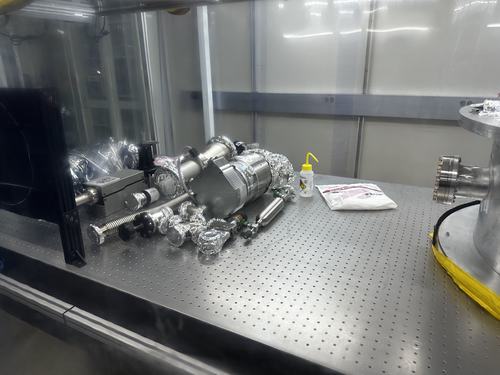
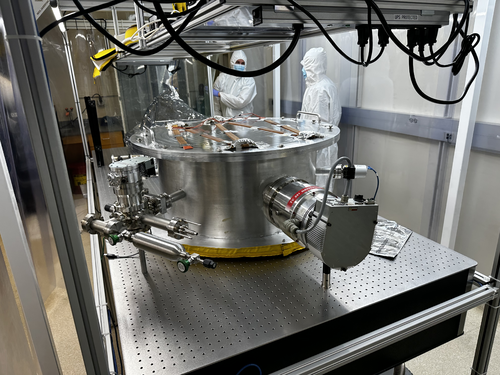
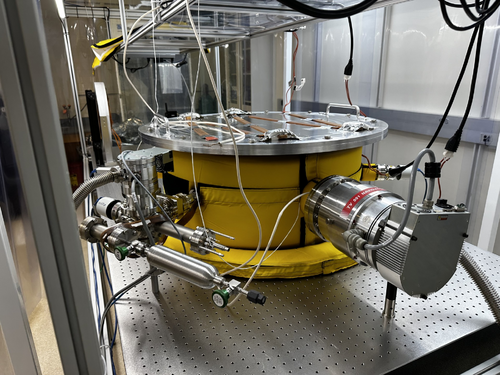
On Tuesday (5/28) we removed the RGA line with minimal difficulty. On Wednesday (5/29) we removed the turbo pump, which had a few bolts that we needed to cut. We borrowed a dremel with ceramic blades from the machine shop to help remove some of the bolts. On Thursday we moved the vacuum chamber onto the floor to check and resecure the heating band on the bottom of the vacuum chamber. We then relocated the posts the vacuum chamber rests on closer to the end of the table and reinstalled the chamber. The post’s height was also reduced from 2in to 1in.
Current state of vacuum chamber:
The vacuum chamber is currently reinstalled in its new position. Some of the parts on the table will be used in the assembly of the turbo pump and RGA lines with the others being able to be moved to storage. |
| Attachment 1: IMG_1681.jpg
|

|
| Attachment 2: IMG_1680.jpg
|

|
| Attachment 3: IMG_1680.jpg
|
|
| Attachment 4: IMG_1681.jpg
|
|
|
378
|
Wed Jun 19 18:45:14 2024 |
Luke | Update | | Vacuum chamber reassembly |
| [Luke, Aiden, Mohak , Tyler]
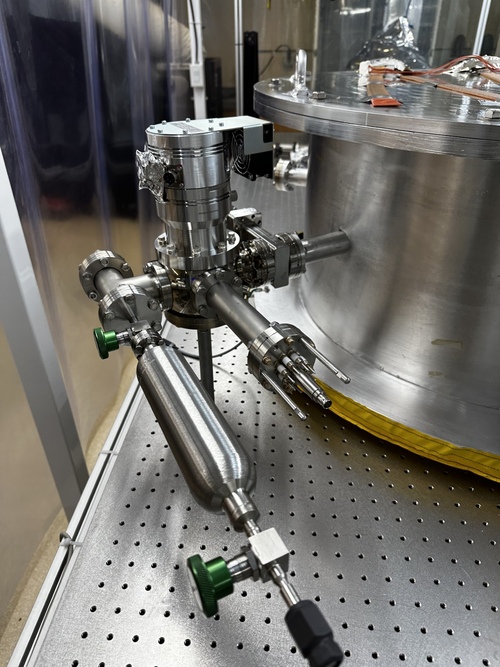
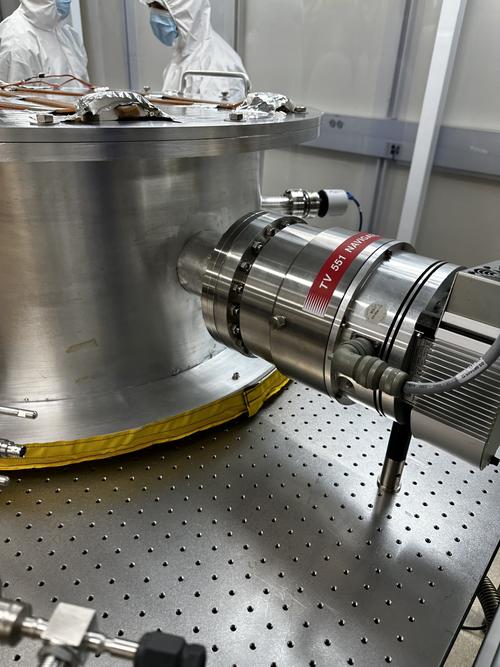
On Tuesday we had the silver screws for the spherical cube shortened by a quarter of an inch so that they would fit into the gate valve. We then attached the spherical cube to the vacuum chamber.
On Wednesday we finished assembling the RGA line and the main turbo pump. |
| Attachment 1: image_2024-06-19_182556383.png
|
|
| Attachment 2: image_2024-06-19_182631737.png
|
|
| Attachment 3: IMG_1710.jpg
|
|
|
384
|
Tue Jun 25 17:19:42 2024 |
Luke | Update | VAC | Vacuum chamber leak checking |
| Currently our main leak is in the RGA line. We found this by closing the gate valve from the main volume to see if which side was leaking more.
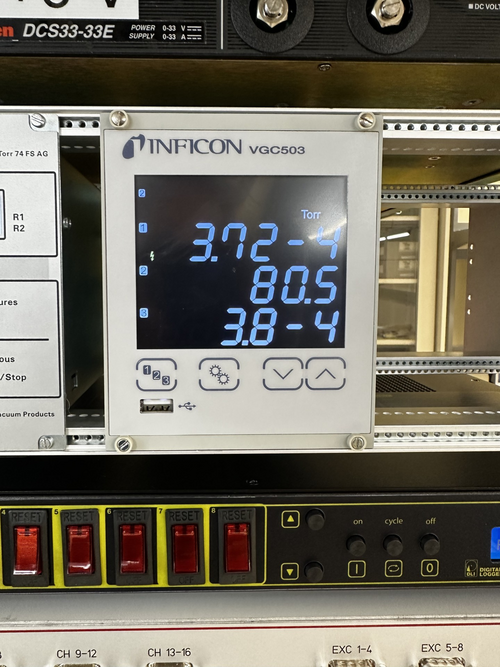
After identifying this we are pumping down the main volume to see how low it can go the third attachment was taken at 4:16 6/25/24. Pumping started around 3:15.
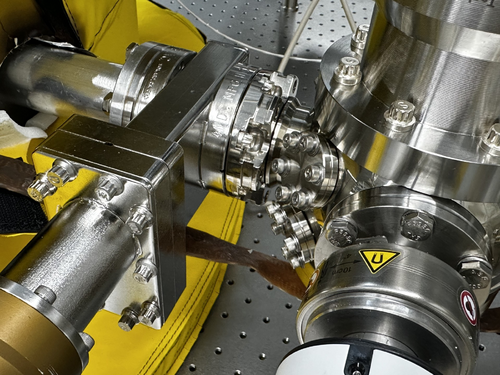
We have not been able to find exactly which flange is leaking, but our guess is on the small blanks and where the cube attaches to the gate valve as seen in the second attachment.
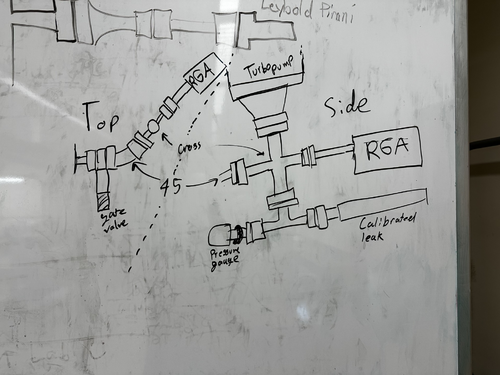
We will try a few more things and if the leak is not found/fixed we are planning on changing the configuration of the RGA line to remove the spherical cube, which we believe to be the problem. See fourth attachment for rough sketch of initial idea.
We have all of the parts required and they are clean and double bagged in 1129. I have not yet made all the measurements to confirm that this design is feasible. |
| Attachment 1: image_2024-06-25_170036021.png
|
|
| Attachment 2: image_2024-06-25_170057738.png
|
|
| Attachment 3: image_2024-06-25_170120030.png
|
|
| Attachment 4: image_2024-06-25_171238788.png
|
|
|
386
|
Wed Jun 26 16:39:34 2024 |
Luke | Update | VAC | Vacuum chamber leak checking |
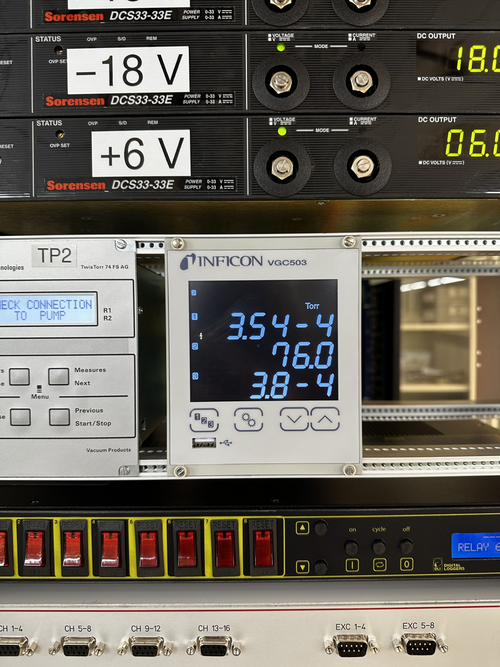
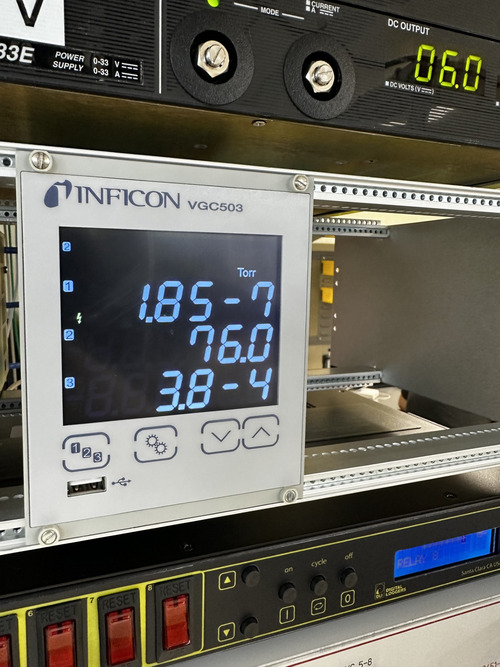
| On Tuesday I had isolated the main volume and let it pump down over-night. Today, Wednesday, I checked it and it had only gone down by a small amount compared to when I left it on Tuesday.
I then proceeded to tighten down the bolts attaching the tubo-pump to the zero-length reducer while it was under vacuum. This caused the pressure to drop down a few orders of magnitude. |
| Attachment 1: image_2024-06-26_162539705.png
|
|
| Attachment 2: image_2024-06-26_162601616.png
|
|
|
390
|
Fri Jun 28 18:15:16 2024 |
Luke | Update | VAC | Vacuum chamber |
We will be configuring the RGA line to remove the spherical cube from the system. Currently our plan for the new design is to connect a 4.5" to 2.75" Reducing Cross to the gate valve on the vacuum system. It will be orientated vertically with the turbo pump on top coming off the end will be a 90 deg elbow. On the bottom there will be a 4.5" to 2.75" Zero length reducer attached to that will be a Tee on one side the pressure sensor and the other the RGA. Connected to the elbow will be the calibrated leak.
The only parts not readily available are the ZLR and the 2.75" gaskets
| Part name |
Count needed |
Status/comment |
| 2.75" Tee |
1 |
In use in current RGA line |
| 4.5" to 2.75" Reducing Cross |
1 |
Needs to be clean and baked |
| 4.5" to 2.75" Zero length reducer |
1 |
To be purchased |
| 2.75" 90 deg elbow |
1 |
Clean needs to be removed from another part |
| 5/16 - 24 X 2.00" Bolts and nuts |
16 |
8 in clean room and plenty in storage they will need to be clean and baked. Plenty of nuts in clean room.
|
| 1/4 - 28 X 1.25" Bolts and nutplates |
24 |
12 in use in RGA line and 12 in storage that will need to be clean and baked. Sufficient nutplates in clean room |
| 1/4 - 28 X 7/8" Bolts |
12 |
Plenty of bolts in clean room |
| 2.75" Copper Gasket |
6 |
5 gaskets in clean room and none in storage. So some will need to be purchased |
| 4.5" Copper Gasket |
2 |
About 10 in clean room |
|
|
400
|
Wed Jul 10 17:31:07 2024 |
Luke | Update | VAC | RGA line disassembly and upgrade |
[ Luke, Cynthia, Michael, Xuesi, Anthony ]
Started work around 12:45
We vented the chamber first and once it reached atmospheric pressure we started taking apart the RGA line.
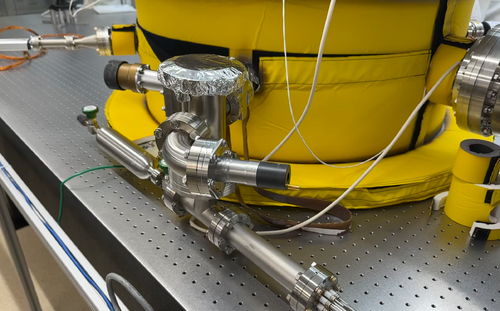
We removed the parts in this order: Calibrated leak, RGA, Pressure gauge, 2.75" Blank on Tee, 2.75" Tee, all 1.33" Blanks on the cube, 4.5" feed through port, and finally the cube. Everything went smoothly after every part was taken off we covered the ends in Aluminum foil to maintain cleanliness.
We then started the assembly of the new line. The parts were added in this order: Reducing cross, ZLR, Tee, Cal leak, RGA, 90 deg Elbow, and Pressure sensor.
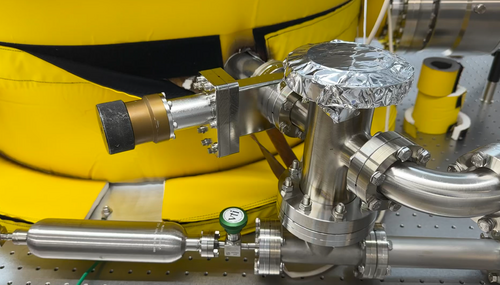
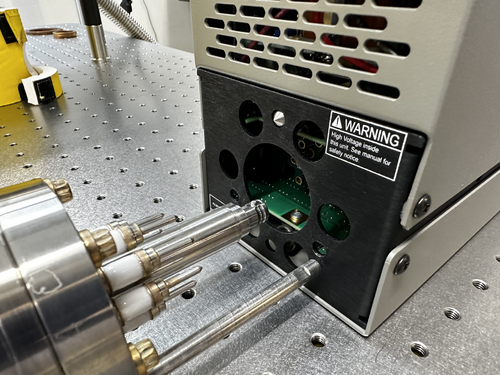
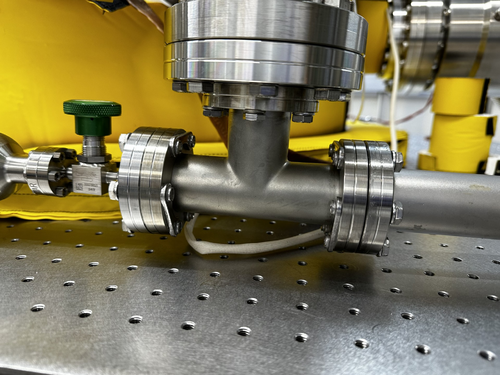
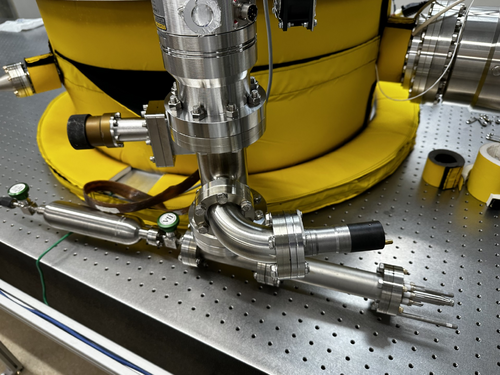
We left off the Turbo pump as of now because we weren't able to find a 1" post not in use and we didn't want to put too much weight on the cross. We also noticed that the RGA might not fit on its probes because of a slight tilt to the cross and by extension the Tee. If this ends up being a problem we might need to remove all the parts connected to the cross so that we can reposition it so that the 2.75" rotating flange is connected to the gate valve.
Ended work around 4:00 |
| Attachment 1: image_2024-07-10_172112210.png
|
|
| Attachment 2: image_2024-07-10_172431863.png
|
|
| Attachment 3: image_2024-07-10_172603090.png
|
|
| Attachment 4: image_2024-07-10_172823966.png
|
|
|
401
|
Thu Jul 11 15:53:39 2024 |
Luke | Update | VAC | RGA line upgrade |
[ Luke, Jon ]
Started work at 11:00
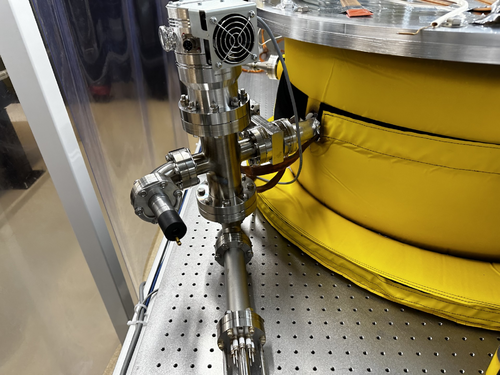
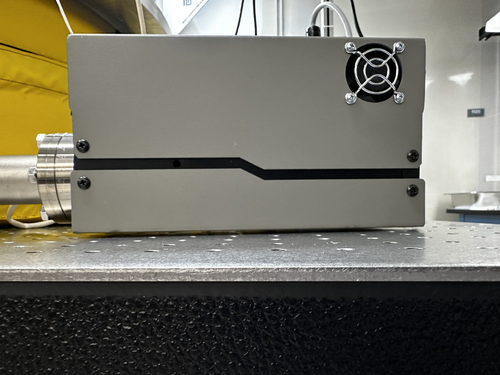
As mentioned in my previous post the RGA was not clearing the table because of a tilt in the cross. So I removed the 90 deg elbow, loosened the bolt securing the Tee to the ZLR, and removed the cross from the gate valve. I then spun around the Tee on the bottom so that the cal leak would be pointing in the right direction and connected the rotating 2.75" flange of the cross to the gate valve. I then added the small turbo pump to the top of the cross.
Then with the help of Dr. Richardson, we made some adjustments to how the Tee was oriented with respect to the cross and how the cross was with respect to the table. So that the cal leak and RGA would fit on the table. After that we made some changes to the bolting of the ZLR to reducing cross replacing the 2.00" bolts and nuts with 1.75" bolts and nut plates. We did face some difficulty with half of the 2.00" bolts which required a bit of torque to get them out.
Finished work at 2:20
Things to do:
Before we start pumping down the system again Dr. Richardson wanted two other changes to be made. To replace the 2.75" to 1.33" conical reducer with a zero length reducer. He also wants the bolts that hold the main turbo pump to be replaced with nut plates.
I plan on starting this work on Friday (7/12) before pumping down over the weekend |
| Attachment 1: image_2024-07-11_154630323.png
|
|
| Attachment 2: image_2024-07-11_154818191.png
|
|
| Attachment 3: image_2024-07-11_154902840.png
|
|
|
403
|
Sat Jul 13 15:09:04 2024 |
Luke | Update | General | Ring heater COMSL model update |
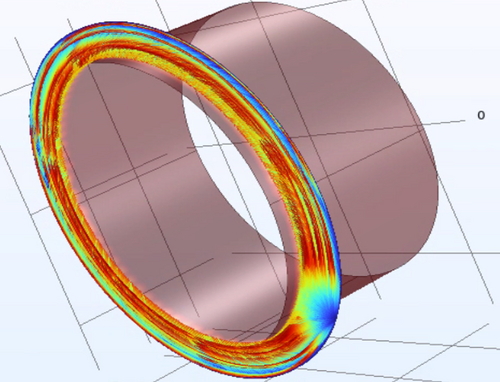
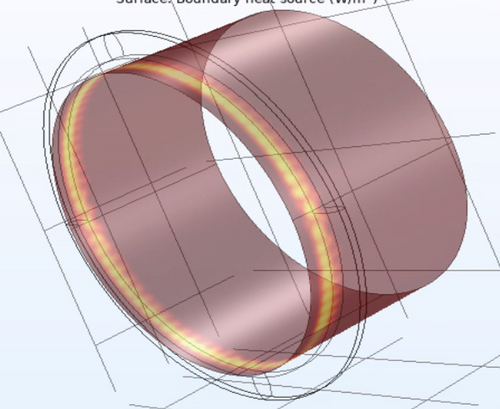
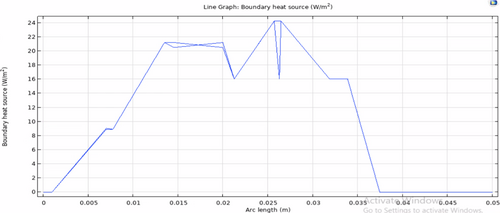
After the feedback from last meeting and Liu's help narrowing down what I should do to improve the model. I made some changes: First with Liu's help I made the proportions of the test mass and ring heater much more reasonable and parametrized by constants. Second from Cao's paper "FROSTI Nonimaging Reflector Design" Liu showed me what I should do to define the elliptical mirrors. Third during Friday's modeling/programming meeting walked me through getting the different irradiance plots to work. |
| Attachment 1: image_2024-07-13_150654436.png
|
|
| Attachment 2: image_2024-07-13_150704735.png
|
|
| Attachment 3: image_2024-07-13_150716079.png
|
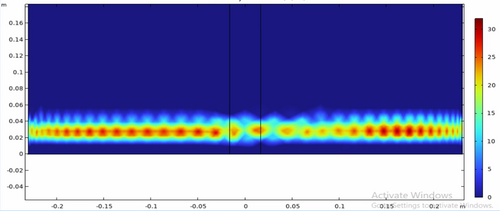
|
| Attachment 4: image_2024-07-13_150726593.png
|
|
|
411
|
Mon Jul 22 18:19:34 2024 |
Luke | Update | VAC | Zero length reducer stuck bolts |
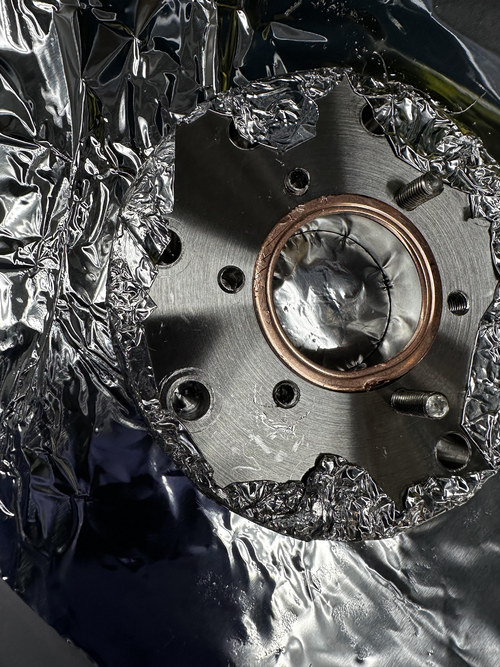
Today, I borrowed a bolt extractor drill bit from the machine shop to remove some stuck bolts from the zlr. Before starting, I laid down a sheet of aluminum foil on the work table and wiped down all the tools I was going to use. I began by drilling a small pilot hole and then enlarged it with a 5/32 drill bit. However, when I attempted to use the bolt extractor, it didn't grip the bolt effectively. Our bolts were too seized, causing the extractor bit to repeatedly slip instead of gaining traction. |
| Attachment 1: image_2024-07-22_181607501.png
|
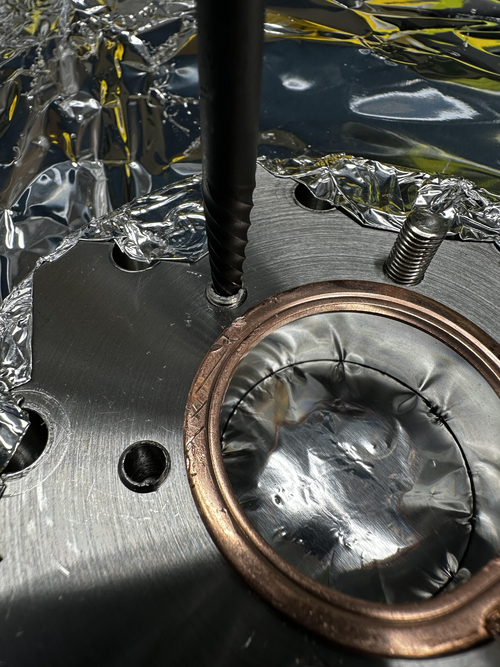
|
| Attachment 2: image_2024-07-22_181632965.png
|
|
|
427
|
Fri Aug 23 16:08:32 2024 |
Luke | Update | VAC | RGA line leak testing |
[Luke, Luis, Jon, Tyler]
On the 22nd Dr. Richardson showed Luis, Tyler and I how to preform a leak test with the RGA. We did the initiall test and found a few leaks two were particuarly bad highlighted in orenge below. To try and remidy this we planned on replacing the copper gaskests on the leaking flanges. We then began taking the two problem flanges off, but seven of the eight bolts holding on the turbo pump were over tightened and had seized. So after we got them off we postponed the rest of the work to the next day.
On the 23nd Luis and I reattached the badly leaking flanges with new copper gaskets. We then preformed the Helium leak test with the RGA. As seen in the table below we weren't able to majorly changed the leaks in the two flanges.
| Connection |
Initial |
After disassembly |
| Tee - RGA |
3.1e-9 -> 2.4e-9 |
9.2e-9 |
| Tee - Cal leak |
Low |
Low |
| Tee - ZLR (2.75"-4.5") |
Low |
9.2e-9 |
| ZLR (2.75"-4.5") - Reducing Cross |
2.1e-8 -> 1.9e-8 |
3.6e-8 -> 9.3e-9 |
| Cross - Elbow |
Low |
1.2e-9 |
| Elbow - Pressure sensor |
Low |
2.9e-9 |
| Cross - Turbo pump (small) |
2.1e-8 -> 3.1e-8 |
6.9e-8 -> 2.2e-8 |
| Cross - Gate valve |
Low |
Low |
| Gate valve - Port |
2.4e-9 -> 2.2e-9 |
1.2e-9 |
| Port - ZLR (6.0"-8") |
1.1e-9 |
N/A |
| ZLR (6.0"-8") - Turbo pump (large) |
Low |
N/A |
| Port - Pressure sensor |
Low |
N/A |
| Port - Up to air valve |
Low |
N/A |
| Port - Blank |
Low |
N/A |
| Port - Feed though port |
Low |
N/A |
| Lid |
Low |
N/A |
|
|
429
|
Tue Aug 27 15:01:26 2024 |
Luke | Update | VAC | RGA line leak testing |
[Luke, Tyler]
On the 27th Tyler and I ran the RGA leak test again with the electron multiplier on. These were the leaks we measured. The chamber's overall pressure was at ~6e-8 torr.
| Connection |
Leak rate (torr) |
| Tee - RGA |
3.92e-11 (very low) |
| Tee - Cal leak |
4.77e-11 (very low) |
| Tee - ZLR (2.75"-4.5") |
4.97e-11 (very low) |
| ZLR (2.75"-4.5") - Reducing Cross |
2.45e-9 (low) |
| Cross - Elbow |
7.36e-11 (very low) |
| Elbow - Pressure sensor |
2.36e-11 (very low) |
| Cross - Turbo pump (small) |
8.07e-9 (lowish) |
| Cross - Gate valve |
4.02e-11 (very low) |
| Gate valve - Port |
2.27e-9 (low) |
| Port - ZLR (6.0"-8") |
1.11e-9 (low) |
| ZLR (6.0"-8") - Turbo pump (large) |
1.00e-10 (very low) |
| Port - Pressure sensor |
1.05e-10 (very low) |
| Port - Up to air valve |
1.08e-11 (very low) |
| Port - Blank |
5.58e-10 (very low) |
| Port - Feed though port |
1.21e-11 (very low) |
| Lid |
1.11e-11 (very low) |
|
|
430
|
Tue Aug 27 18:37:40 2024 |
Luke | Update | Interferometer Simulations | Ringheater model update |
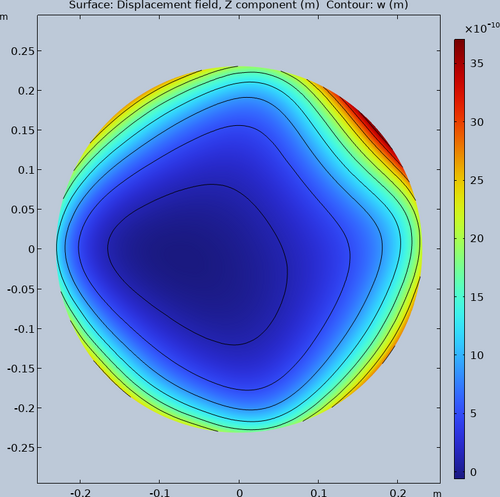
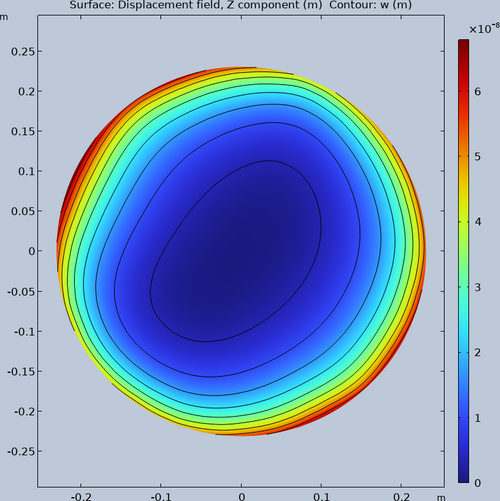
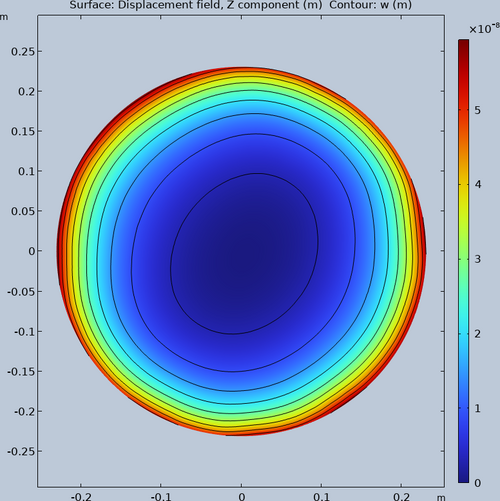
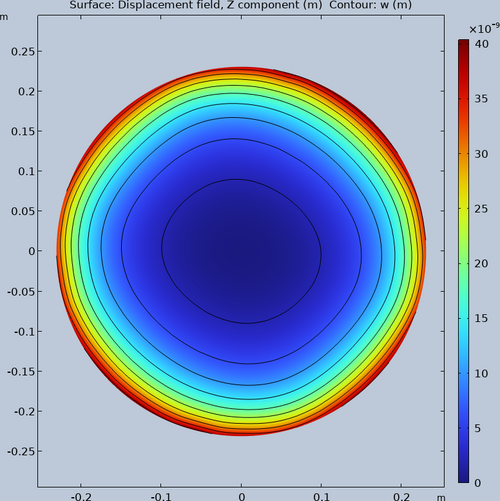
| Updated the model to produce a more circular deformation in the HR surface. The first three attachments are from irradiance patterns gotten from ray tracing. The last is from a pre-defined irradiance pattern. |
| Attachment 1: Initial_1W.png
|
|
| Attachment 2: Increased_rays_100W.png
|
|
| Attachment 3: Increased_rays_more_100W.png
|
|
| Attachment 4: Initial_100W.png
|
|
|
431
|
Thu Aug 29 16:39:34 2024 |
Luke | Update | VAC | Photos of heater tape |
|
| Attachment 1: IMG_2052.jpeg
|
|
| Attachment 2: IMG_2051.jpeg
|
|
| Attachment 3: IMG_2048.jpeg
|
|
| Attachment 4: IMG_2047.jpeg
|
|
| Attachment 5: IMG_2046.jpeg
|
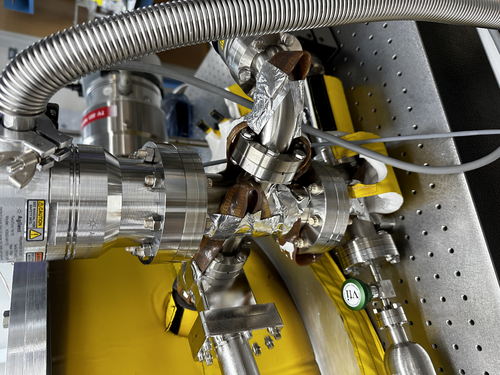
|
| Attachment 6: IMG_2044.jpeg
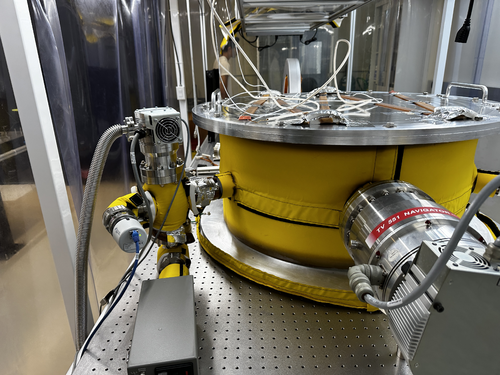
|
|
|
432
|
Sun Sep 1 16:17:40 2024 |
Luke | Update | VAC | Vacuum chamber leak checking and re-applying heating tape |
[Luke, Luis, Cinthia, Michal, Tyler]
On the 26th Cinthia, Michal, and I took off the insolation on the vacuum chamber and re-routed it to include the new RGA volume.
The next day Luis and I finished up the last of the flanges to be attached. We attached the Pirani gauge with a conical reducing nipple to the 2.75" port on the vacuum chamber. We then preformed the Helium leak testing, both flanges were quite low the 2.75" flange had a leak of 1.68e-10 torr and the 1.33" flange of 5.5e-12 torr. The leak on the 1.33" flange was so low it was difficult to know how much of it was real and how much was just noise. |
|
433
|
Tue Sep 3 15:52:56 2024 |
Luke | Update | VAC | Heater tape initilization |
[Luke, Tyler, Jon]
On the 3rd we set up the pid controllers for the heater tapes and after putting on the insulation we started heating them up. We first brought it to ~50C and let it stabilize, there was about a 6-7 degree difference between the RGA and the barrel temperature, with the barrel being higher. We then brought it to 60 then 70C it still maintained the slight difference between the RGA and barrel temperatures.
Here is a table of the temperatures of the flanges connected to electronics as I left it.
| Electronics |
Temperature (C) |
| Pressure gauge (Main volume) |
58 |
| Main turbo pump |
45 |
| RGA |
37 |
| Pressure gauge (RGA volume) |
39 |
| Cal leak |
40 |
| Mini tubo pump |
36 |
| Pirani gauge |
37 |
Notes: I removed the electronics from the pressure gauge (main volume) because while it was below the required threshold it was still quite high compared to the other flanges. |
|
438
|
Mon Sep 9 21:02:37 2024 |
Luke | Update | VAC | Steadystate temperature of flanges |
I measured the temperature of the flanges and reconnected the RGA turning on its filament. I then turned off the PID controllers.
Here is a table that has the temperature of the different parts of the vacuum chamber.
| Electronics |
Temperature (C) |
| Pressure gauge (Main volume) |
81 |
| Main turbo pump |
67 |
| RGA |
53 |
| Pressure gauge (RGA volume) |
60 |
| Cal leak |
48 |
| Mini tubo pump |
46 |
| Pirani gauge (1.33") |
46 |
| conical nipple (2.75") |
82 |
| Lid |
112 |
| Barrel lower |
125 |
| Barrel upper |
122 |
| RGA volume |
125 |
| Bottom of chamber |
117 |
|
|
439
|
Mon Sep 16 07:28:16 2024 |
Luke | Update | Interferometer Simulations | Ring heater update |
|
| Attachment 1: 20240916_Ringheater_updates.pptx
|
|
444
|
Mon Sep 23 08:29:49 2024 |
Luke | Update | Interferometer Simulations | Ringheater update |
|
Ringheater Update
If the link does not work here is the file. |
| Attachment 1: 20240923_Update.pptx
|
|
481
|
Sat Nov 30 12:41:42 2024 |
Luke | Update | VAC | Vacuum bake end |
The vacuum chamber has stopped bakeing.
Current state as of 12:10, 11/30/2024:
The gate valve is open, and the filament of the RGA is on.
The temperatures were steady at:
PID right: barrel upper: 128°C, RGA volume: 125°C
PID left: barrel lower: 125°C, Lid: 113°C
The RGA flange was 38°C
Cleanroom was 26°C |
|
493
|
Thu Dec 19 12:00:44 2024 |
Luke | Update | VAC | End of bake |
The vacuum chamber has stopped baking.
Current state as of 11:40, 12/19/2024:
The gate valve is open, and the filament of the RGA is on.
The temperatures were steady at:
PID right: barrel upper: 129°C, RGA volume: 125°C
PID left: barrel lower: 125°C, Lid: 114°C
The RGA flange was 37°C
Cleanroom was 26°C
Note the upper barrel was very close to the emergency shut off temp of 130°C. In the future we may want to either rewire some of the heating tape or lower the set temperature of the right PID controller.
Luis and I are planning on taking an RGA scan of the MR on Sunday before the campus shuts down for the holidays. |
|
581
|
Mon May 26 11:15:28 2025 |
Luke | Update | Scripts/Programs | Update to optimization plots |
| I have created some new optimization plots. I have also started on a model like the previous Desmos model, but in python.
Slides |
|
268
|
Thu Nov 16 17:12:42 2023 |
Luis, Shane, Mohak | Update | Cleanroom | Cleanroom cleaning and particle count |
|
[Shane, Luis, Mohak]
cleaning cleanroom and particle count
- 3:37 pm: started particle count
- zone 3:
- 0.3 u: 1205
- 0.5 u: 748
- 1.0 u: 249
- zone 4:
- 0.3 u: 1496
- 0.5 u: 748
- 1.0 u: 290
- 3:57 pm: began surface check and wipedown, including softwalls. NOTE: vacuum chamber insulation crumbling at edges, dropping loose flakes. Scatters residue whenever jostled, so wiping it down just releases more. Not enough flakes are being released for it to be a major issue, but definitely something to keep an eye on.
- 4:18 pm: started vacuuming the floor
- 4:29 pm: finished vacuuming the floor
- 4:30 pm: started mopping the floor
- 4:35 pm: finished mopping the floor
- 4:36 pm: started cleaning the buckets
- 4:41 pm: started mopping with IPA wipes
- 4:52 pm: finished mopping with IPA wipes
- 4:52 pm: changed sticky floor mats
- 4:53 pm: started particle count
- zone 3:
- 0.3 u: 3367
- 0.5 u: 1787
- 1.0 u: 914
- zone 4:
- 0.3 u: 1039
- 0.5 u: 498
- 1.0 u: 249
|
|
425
|
Fri Aug 16 12:51:46 2024 |
Luis Martin | Update | VAC | Update on vacuum chamber status |
[Luis, Luke, Tyler]
Vacuum chamber parts were finally received and assembled. After whipping down the parts, the blank was removed from the reducing cross. Then, the zero-length reducer was attached. Lastly, we installed the T that had the argon leak and RGA. The final pump down showed signs of an improved seal since the pressure dropped quite fast. This pressure is well bellow the limit required to use the RGA, argon test leak could be performed some time next week. |
| Attachment 1: IMG_1910.HEIC
|
| Attachment 2: IMG_1911.HEIC
|
| Attachment 3: IMG_1909.HEIC
|
| Attachment 4: IMG_1912.HEIC
|
|
440
|
Mon Sep 16 13:51:23 2024 |
Luis Martin | Update | VAC | RGA Scans |
|
[Luis, Luke}
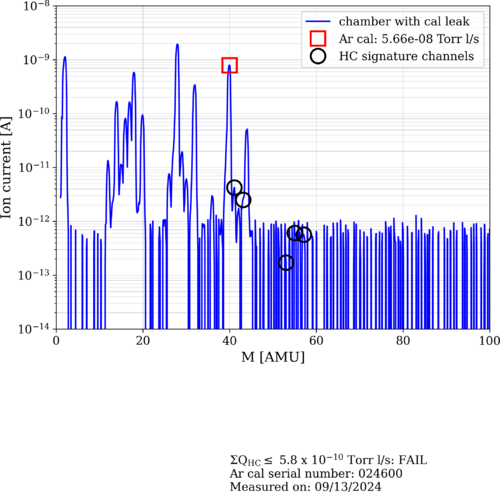
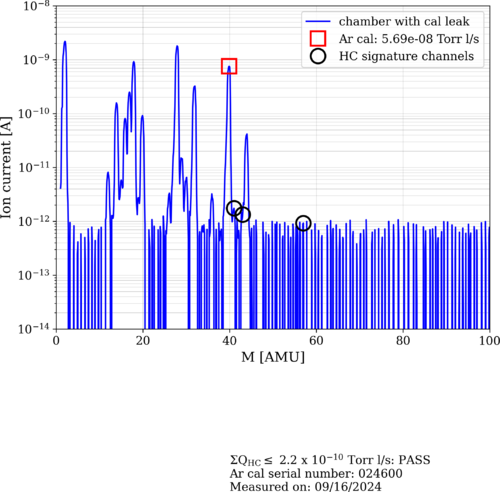
Three RGA scans were taken. The improvement in the amount of HC in the vacuum is visible across the different measurements. Images are attached.
|
| Attachment 1: 2024-09-11_PostBake1_ArO.png
|
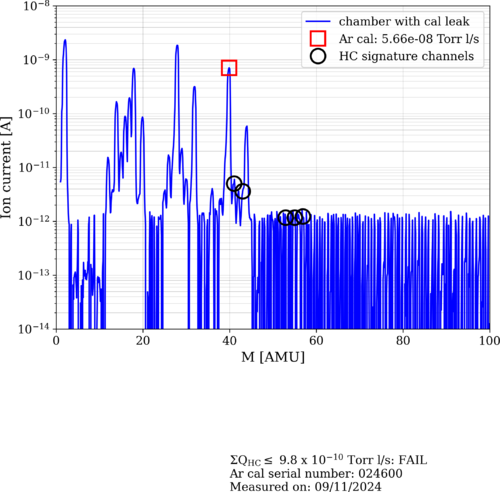
|
| Attachment 2: 2024-09-13_PostBake1_ArO.png
|
|
| Attachment 3: 2024-09-16_PostBake1_ArO.png
|
|
|
448
|
Wed Sep 25 09:06:09 2024 |
Luis Martin | Update | VAC | RGA Scans |
|
RGA Scan Comparison
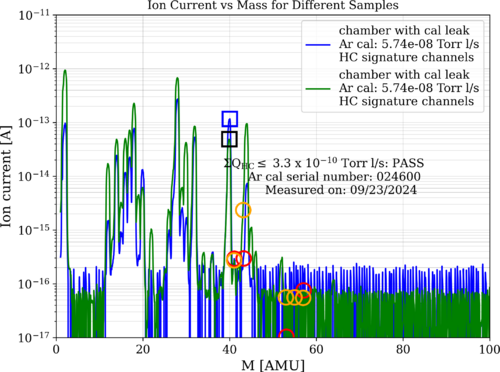
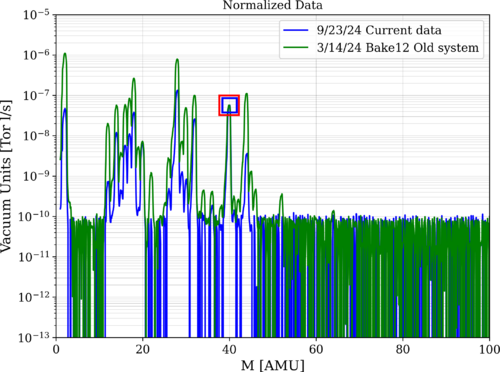
The following images compare the RGA scans from 9/23/24, after the first bake with the new vacuum system, with those from 3/14/24, after bake 12 with the old system.
The first image shows a graph of the raw data and includes the calibrated leak for both curves. As we can see, our new system meets LIGO standards of cleanliness.
The second graph contains the plot of the normalized data.
|
| Attachment 1: 24overlay.png
|
|
| Attachment 2: 24overlayNormalized.png
|
|
|
459
|
Wed Oct 16 13:58:59 2024 |
Luis Martin | Update | VAC | RGA Scan |
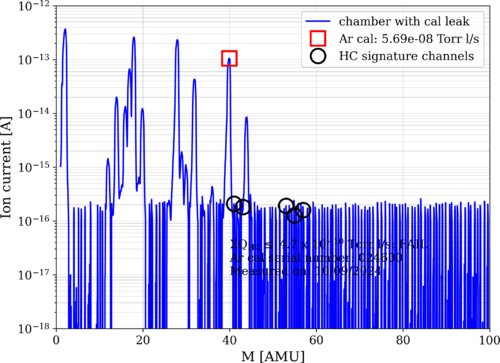
The following figure displays data acquired on 10/09, and it shows that we are no longer below the cleanliness standard. Also, the system's pressure went up to 1.9x10⁻⁸ Torr (approximately 7x10⁻⁹ Torr previously). This might be due to a leak somewhere in the system. More tests will be performed later. |
| Attachment 1: 2024-10-09_PostBake1_ArO.png
|
|
|
462
|
Wed Oct 23 11:48:06 2024 |
Luis Martin | Update | VAC | Leak Test Results |
[Luke, Luis, Mary, Ma]
On 10/22/24 Luke, Ma, Mary and myself ran a leak test, the results are displayed below. The overall pressure of the vacuum was 2.0e-8 and the temperature readings were 26C for the RGA and 25C for the main volume.
| Connection |
Leak rate (torr) |
| Tee - RGA |
9.4e-12 (very low) |
| Tee - Cal leak |
1.58e-11 (very low) |
| Tee - ZLR (2.75"-4.5") |
7.32e-12 (very low) |
| ZLR (2.75"-4.5") - Reducing Cross |
6.9e-11 (low) |
| Cross - Elbow |
2.34e-11 (very low) |
| Elbow - Pressure sensor |
1.96e-11 (very low) |
| Cross - Turbo pump (small) |
1.91e-9 (lowish) |
| Cross - Gate valve |
1.66e-10 (very low) |
| Gate valve - Port |
7.41e-10 (low) |
| Port - ZLR (6.0"-8") |
2.93e-10 (low) |
| ZLR (6.0"-8") - Turbo pump (large) |
6.15e-11 (very low) |
| Port - Pressure sensor |
2.0e-11 (very low) |
| Port - Up to air valve |
1.42e-11 (very low) |
| Port - Blank |
1.27e-11 (very low) |
| Port - Feed through port |
4.59e-12 (very low) |
| Lid - Curtain side |
3.09e-11 (very low) |
| Lid - Wall side |
4.26e-11 (very low) |
|
|
463
|
Wed Oct 23 12:08:36 2024 |
Luis Martin | Update | VAC | RGA Scan |
[Luke, Luis, Mary, Ma]
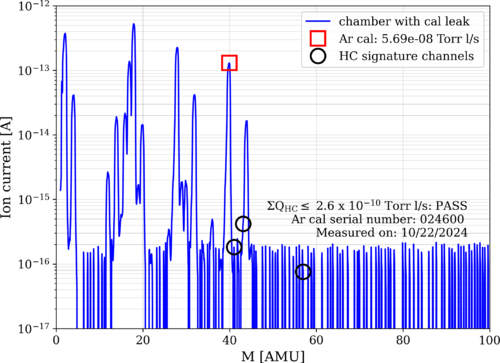
On 10/22/24 Luke, Ma, Mary and myself ran a RGA scan, the results are displayed below. The overall pressure of the vacuum was 2.0e-8 and the temperature readings were 26C for the RGA and 25C for the main volume.
As we can see, the vacuum is passing cleanliness standards again. |
| Attachment 1: 2024-10-22_PostBake1_ArO.png
|
|
|
467
|
Tue Nov 5 09:56:04 2024 |
Luis Martin | Update | Clean & Bake | MR Bake |
| [Luke, Luis]
On Friday, 11/1/24, the MR was unpackaged and cleaned under the flow bench. We noticed an ink stain on one of the corners of the material. After wiping it down with IPA and Vector Alpha wipes, the stain was removed. However, the material showed some wear.
After cleaning, we placed it in the bake station and applied a stainless steel baking protocol. On Tuesday, 11/4/24, the material was removed from the furnace and packaged in a static shielding bag. The MR was wrapped in Vector Alpha wipes.
|
|
468
|
Tue Nov 5 11:08:40 2024 |
Luis Martin | Update | VAC | ISO Test |
|
[Luis, Luke, Ma Michael]
The isolation test was conducted on the vacuum system. Every pump was turned off under vacuum, and pressure measurements were taken every minute for 15 minutes. The results are displayed in the sheet linked at the end of this report. The pressure of the main volume dropped very slowly.
The pressure of the RGA Volume dropped in an exponential manner. The test had to be paused at 11 minutes due to concerns about the pressure exceeding the lowest permitted level for the RGA filament.
After the ISO test was performed, we attempted to tighten the bolts of the small turbo pump on the RGA Volume. However, we noticed that the pressure had increased by nearly an order of magnitude, going from 3.27 × 10⁻⁹ Torr to 1.45 × 10⁻⁸ Torr when both volumes were separated. We conducted a leak test for that particular flange and found a concerning leak of 2.15 × 10⁻⁸ Torr, which had previously been 1.9 × 10⁻⁹ Torr. We believe the copper seal was damaged during the ISO test.
View the results sheet
|
|
485
|
Thu Dec 5 10:31:13 2024 |
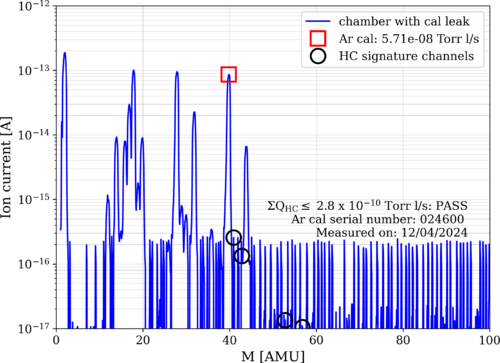
Luis | Update | VAC | RGA Scan and RGA updates |
|
[Luis,Shane]
An RGA scan was taken on Dec 4th. The results are attached at the end of the e-log. As we can see, the scan results are under the allowed limits. After the scan, Shane and I worked on the vacuum connections. The filament was turned off, and the RGA was disconnected from Spica.
After we finished the tests, we reconnected the RGA and attempted to turn the filament back on. However, the program was unable to connect to the instrument. We checked for any loose connections but did not find anything. The RGA connection needs to be troubleshot and fixed.
|
| Attachment 1: 2024-12-04_PostBake2_ArO.png
|
|
|
476
|
Wed Nov 20 12:31:24 2024 |
Luis | Update | VAC | Leak test RGA Scan after vacuum repairs |
[Luke, Luis]
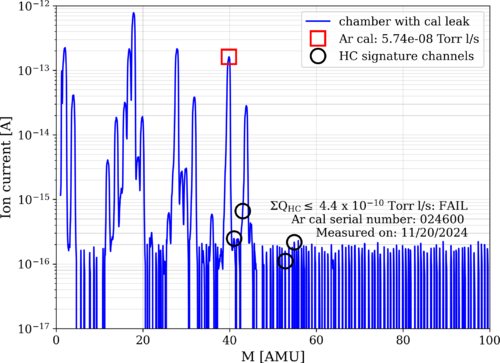
After the gasket replacement performed on Monday (11/18/24) we let the vacuum pump down to UHV pressure for a couple days. Today (11/20/24) we measured the pressure to be 5.30*e^-9 with a temperature of 22C, and we performed a leak test and RGA Scan.
Here are the results:
| Connection |
Leak rate (torr) |
| Reducing Cross - TP Left |
4.5e-9 (lowish) |
| Reducing Cross - TP Right |
6.0e-9 (lowish) |
|
| Attachment 1: 2024-11-20_PostBake1_ArO.png
|
|
|
487
|
Wed Dec 11 16:06:05 2024 |
Luis | Update | VAC | RGA Status |
[Luis]
I rebooted Spica and I was able to connect the RGA again. After Connecting the RGA, I left the filament on. |
|
488
|
Thu Dec 12 13:06:39 2024 |
Luis | Update | VAC | RGA Scan and vacuum system updates |
| [Luis, Luke]
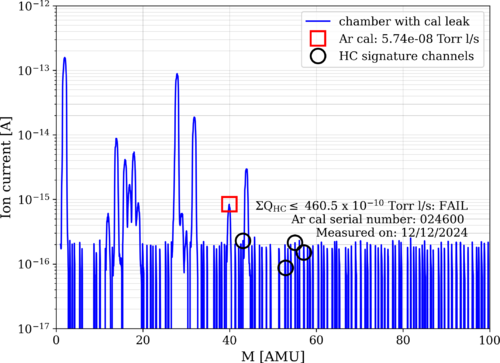
RGA Volume: T = 21°C, P = 1.74e-9 Torr
Main Volume: T = 22°C, P = 5.60e-9 Torr
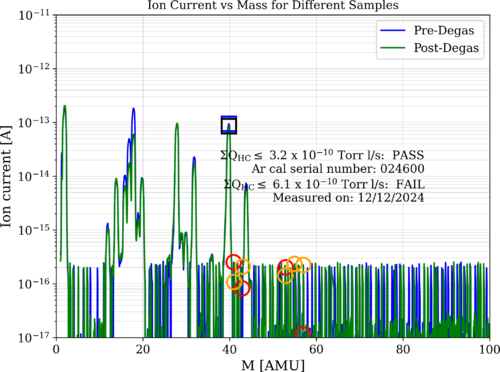
We performed an RGA scan of the system. As we can see, we met cleanliness standards. The S/N ratio was roughly calculated and it is about 100. I will update the code to make this calculation and to have it displayed on the plot in the next scan we perform.
After this, we closed the RGA to the main volume valve, degassed the filament, and after the pressure came down to what it was initially, we reopened the valve. After the degassing, we took another scan. The overlaid plots are attached below.
The noise floor seemed to be about the same. I will take another scan tomorrow to verify whether it was the same or if the system just needed a little more time to be completely clean. |
| Attachment 1: 2024-12-12_PostBake2_ArC.png
|
|
| Attachment 2: 2024-12-12_PostBake2_ArO_overlay.png
|
|
|
489
|
Sat Dec 14 07:58:25 2024 |
Luis | Update | VAC | Vacuum sytem staus and Viton O-rings |
| [Luis]
RGA Volume: T = 23°C, P = 1.71e-9 Torr
Main Volume: T = 22°C, P = 5.71e-9 Torr
On 12/13 I took another RGA scan to verify the state of the vacuum system and to see whether the degassing of the filament had worked. The results of the scan shows that we did get an overall improvement of the noise levels, though we still have some peaks that are higher than the rest.
Also, while I was around, I transferred the Viton O-rings to a bag and labeled it properly. They are ready to be put into the clean room. |
| Attachment 1: 2024-12-12_PostBake2_ArO_overlay.png
|

|