| ID |
Date |
Author |
Type |
Category |
Subject |
|
467
|
Tue Nov 5 09:56:04 2024 |
Luis Martin | Update | Clean & Bake | MR Bake |
| [Luke, Luis]
On Friday, 11/1/24, the MR was unpackaged and cleaned under the flow bench. We noticed an ink stain on one of the corners of the material. After wiping it down with IPA and Vector Alpha wipes, the stain was removed. However, the material showed some wear.
After cleaning, we placed it in the bake station and applied a stainless steel baking protocol. On Tuesday, 11/4/24, the material was removed from the furnace and packaged in a static shielding bag. The MR was wrapped in Vector Alpha wipes.
|
|
329
|
Mon Feb 19 14:40:21 2024 |
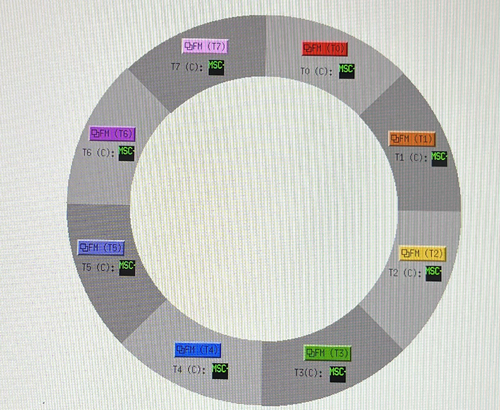
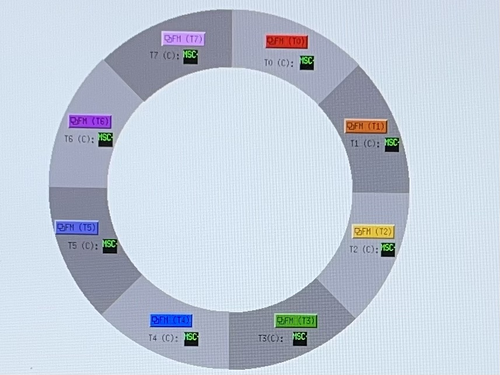
Shane | Update | CDS | MEDM screen for FROSTI temp readouts |
| Here's the latest draft of the MEDM screen for the FROSTI heating elements' temperature readouts. Note that the MEDM screen isn't actually this grainy, this just happens to be a photo of the lab monitor's screen off a phone. |
| Attachment 1: IMG_6094.jpeg
|
|
| Attachment 2: IMG_6092.jpeg
|
|
|
346
|
Thu Feb 29 17:16:48 2024 |
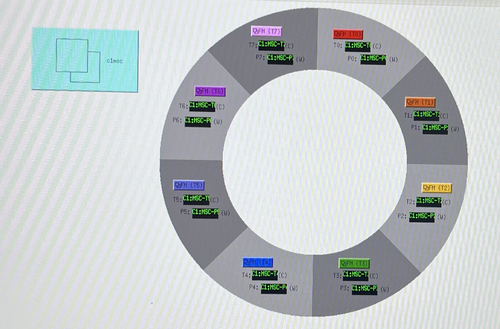
Shane | Update | CDS | MEDM screen for FROSTI T/P readouts |
| Here's the latest draft of the MEDM screen for the FROSTI temp and power readouts, now with a button linking to the c1msc file display. Size/color/label are all changeable, if adjustment is needed. Checked in execute mode as well, and it's working correctly. Also noticed that the MEDM file name has been changed to FROSTI.adl, which I'm noting here for future reference. Still in medm_sandbox directory. |
| Attachment 1: IMG_6259.jpeg
|
|
|
593
|
Wed Jun 11 16:33:45 2025 |
Pooyan | Update | Computers | Luke's ray tracing hosting |
- Hosted Lukes model on Chimay. It's available at https://richardsonlab.ucr.edu/real-time-frosti
- The sourcecode is at Github. It is clones at
/var/www/html/real-time-frosti, and this is the block added to nginx config file at /etc/nginx/sites-available/default :
location /real-time-frosti {
root /var/www/html;
index index.html index.htm index.php;
}
- Also added this line to the crontab, so the code will be checked for updated from the sourcecode every five minutes.
*/5 * * * * cd /var/www/html/real-time-frosti/ && git pull
- TODO: Move the sourcecode from Github to git.ligo.org, and make the repository public.
|
|
334
|
Wed Feb 21 23:15:07 2024 |
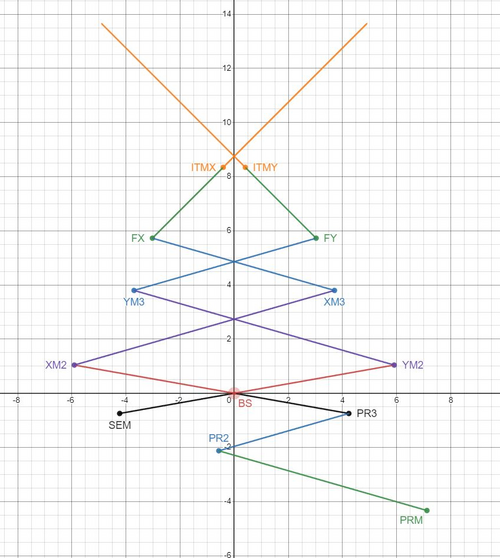
Michael | Update | Interferometer Simulations | Long Shoelaces 1 Layout Created in Gtrace and Fixed Ghosting in Beamsplitter |
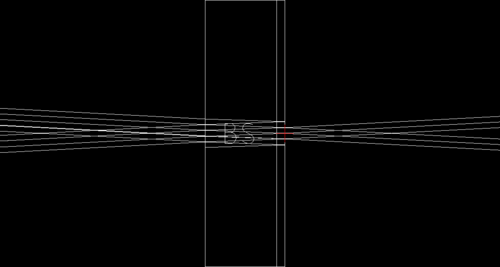
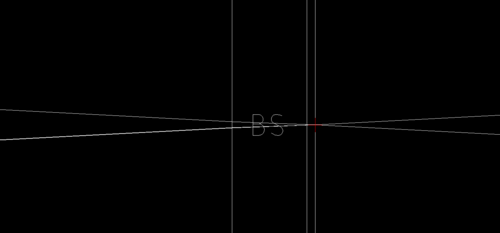
| I have created the long shoelaces 1 layout for cosmic explorer using gtrace, a slight modification from the shoelaces 1 layout design. I also modified the simulation code slightly to remove ghosting effects in the beamsplitter. Originally the python code specified that the HR and AR sides of the beamsplitter both have the same transmission/reflection. I modified this to the ideal case of: Refl_AR = 0, Trans_AR = 1. I have attached two images below to show the before and after effect of this modification. |
| Attachment 1: long_shoelaces1_desmos.JPG
|
|
| Attachment 2: AR_side_with_reflection.PNG
|
|
| Attachment 3: AR_side_without_reflection.PNG
|
|
|
317
|
Tue Feb 6 22:40:25 2024 |
Michael | Update | Scripts/Programs | Long Crab 1 Design Created In Gtrace |
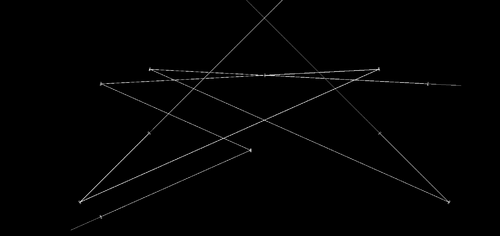
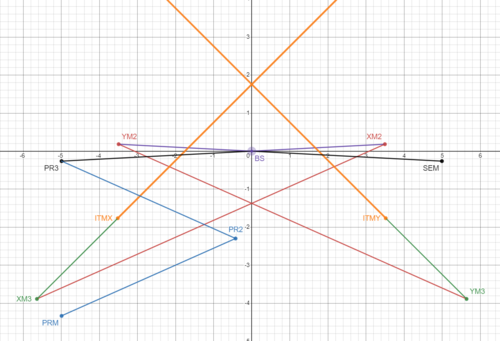
| Worked on and completed the python code for the simulation of the Long Crab 1 layout for Cosmic Explorer basing off of Pooyan's original work with the Crab 1 layout. From here I'll look into creating the shoelaces layouts. |
| Attachment 1: Long_Crab1.png
|
|
| Attachment 2: long_crab_1_desmos.PNG
|
|
|
476
|
Wed Nov 20 12:31:24 2024 |
Luis | Update | VAC | Leak test RGA Scan after vacuum repairs |
[Luke, Luis]
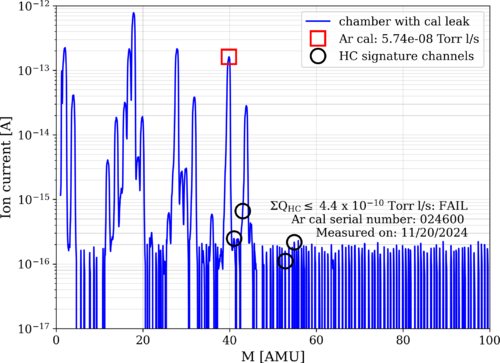
After the gasket replacement performed on Monday (11/18/24) we let the vacuum pump down to UHV pressure for a couple days. Today (11/20/24) we measured the pressure to be 5.30*e^-9 with a temperature of 22C, and we performed a leak test and RGA Scan.
Here are the results:
| Connection |
Leak rate (torr) |
| Reducing Cross - TP Left |
4.5e-9 (lowish) |
| Reducing Cross - TP Right |
6.0e-9 (lowish) |
|
| Attachment 1: 2024-11-20_PostBake1_ArO.png
|
|
|
474
|
Tue Nov 19 17:10:34 2024 |
Luke | Update | VAC | Leak check |
Chamber temperature: 23C
Chamber Initial Pressure: ~1.8e-8 main, ~3.5e-8 rga
Did another leak test after monday's work to check how the seal was holding up initial leak was 5.5e-9. I then tried to tighten the bolts a bit more the leak rose to 1.9e-8 about a factor of 4 change.
I checked another flange to confirm that I was preforming the test properly. I measured the elbow to pressure sensor to be 2.2e-11 aproximatly what it was earlier in the month (1.9e-11).
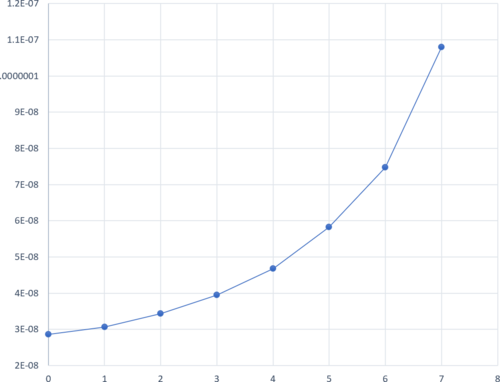
I ran another isolation test. It is still exponetial. Graph attached.
Thoughts:
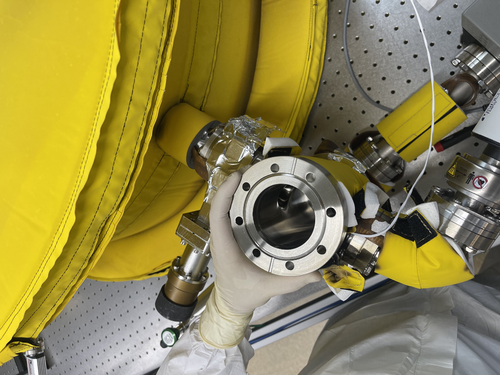
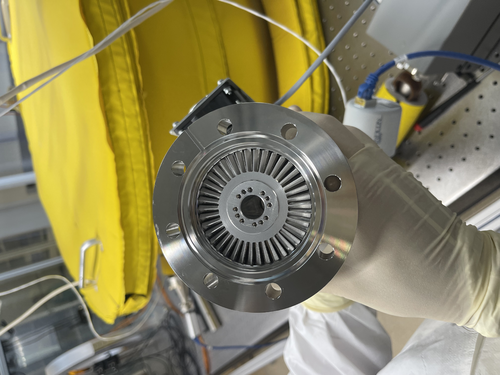
I belive at this point that it is a knife edge issue when replacing the gasket I checked both flanges and the new gasket. The tp knife edge seemed perfectly fine, the gasket had very minor scratches, and the reducing cross had very small imperfections on its edge.
We may want to try and use the liquid sealant or get annealed gaskets for 4.5" |
| Attachment 1: image.png
|
|
| Attachment 2: IMG_5116.jpeg
|
|
| Attachment 3: IMG_5117.jpeg
|
|
|
462
|
Wed Oct 23 11:48:06 2024 |
Luis Martin | Update | VAC | Leak Test Results |
[Luke, Luis, Mary, Ma]
On 10/22/24 Luke, Ma, Mary and myself ran a leak test, the results are displayed below. The overall pressure of the vacuum was 2.0e-8 and the temperature readings were 26C for the RGA and 25C for the main volume.
| Connection |
Leak rate (torr) |
| Tee - RGA |
9.4e-12 (very low) |
| Tee - Cal leak |
1.58e-11 (very low) |
| Tee - ZLR (2.75"-4.5") |
7.32e-12 (very low) |
| ZLR (2.75"-4.5") - Reducing Cross |
6.9e-11 (low) |
| Cross - Elbow |
2.34e-11 (very low) |
| Elbow - Pressure sensor |
1.96e-11 (very low) |
| Cross - Turbo pump (small) |
1.91e-9 (lowish) |
| Cross - Gate valve |
1.66e-10 (very low) |
| Gate valve - Port |
7.41e-10 (low) |
| Port - ZLR (6.0"-8") |
2.93e-10 (low) |
| ZLR (6.0"-8") - Turbo pump (large) |
6.15e-11 (very low) |
| Port - Pressure sensor |
2.0e-11 (very low) |
| Port - Up to air valve |
1.42e-11 (very low) |
| Port - Blank |
1.27e-11 (very low) |
| Port - Feed through port |
4.59e-12 (very low) |
| Lid - Curtain side |
3.09e-11 (very low) |
| Lid - Wall side |
4.26e-11 (very low) |
|
|
273
|
Mon Nov 20 20:45:16 2023 |
Aiden | Update | VAC | Leak Test |
[Aiden, Luis]
Tested every weld and flange to find leaks. Only found that the flange on the turbo pump and reducing nipple was still at 2e-9 torr on the leak. The chamber still rose in pressure when the two gate valves were closed but no noticeable leak could be found on the lid or welds. |
|
116
|
Tue Jun 6 16:15:09 2023 |
Peter | Update | VLC Update | Launch Optics for Visible Light Cavity |
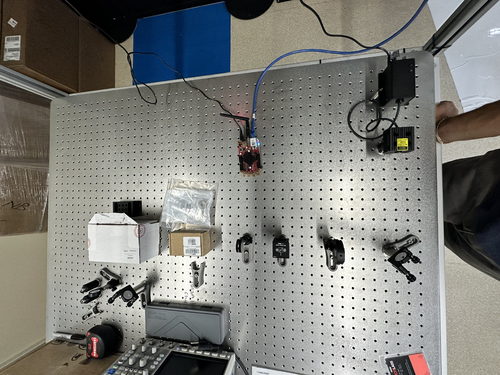
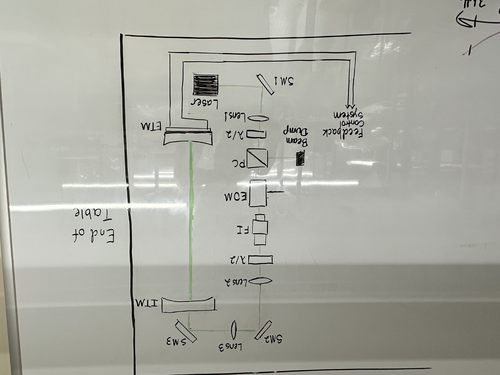
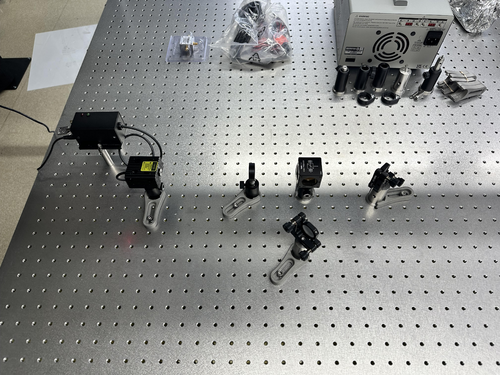
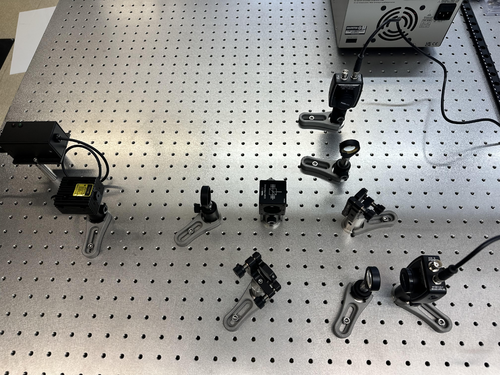
| I assembled the first few components of the launch optics for the visible light cavity. Below is an image of the current table configuration, and the image is how the cavity will be oriented on the table. |
| Attachment 1: IMG-0882.jpg
|
|
| Attachment 2: IMG-0883.jpg
|
|
|
337
|
Fri Feb 23 15:01:48 2024 |
Shane | Update | CDS | Latest draft of MEDM screen for FROSTI readouts |
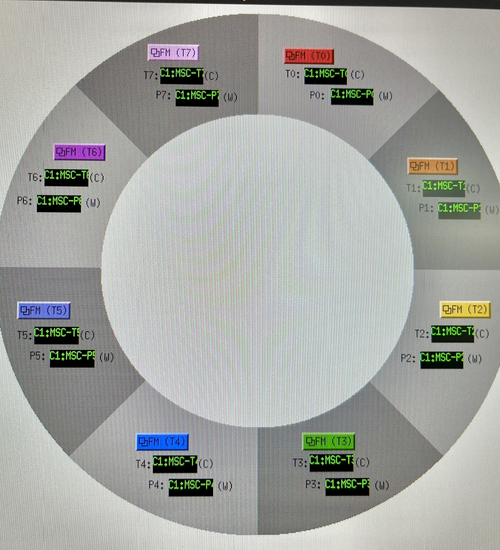
| Here's the latest draft of the MEDM screen for the FrOSTI temp and power readouts. Also, debugged the text readout boxes so they're now correctly reading out the live temperature and power values. |
| Attachment 1: IMG_6128.jpg
|

|
| Attachment 2: 23.jpg
|
|
|
495
|
Mon Dec 23 14:33:36 2024 |
Tyler | Update | TCS | Latest RIN Measurement Results |
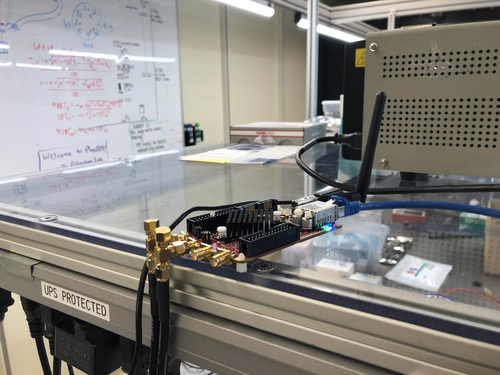
| Attached below are the measurements I took from the FROSTI from 12/18-12/22. |
| Attachment 1: Updated_ASD_plots.pdf
|

|
| Attachment 2: Dark_Noise_Thermal_ASD_plots.pdf
|

|
| Attachment 3: DC_Voltages.pdf
|

|
| Attachment 4: RP-2.jpg
|
|
|
62
|
Tue Apr 4 09:53:37 2023 |
Peter | Update | VLC Update | Laser intensity/polarization drift measurements |
| The set up for the next round of beam characterization measurements has begun. The beam is initially passing through a half waveplate, is split at a polarizing beam splitter, and then stirring mirrors are used to properly aim the beam into photodiodes (not yet installed). This is the current configuration of the set up. |
| Attachment 1: initial_Intens_measure_set_up.jpg
|
|
|
65
|
Thu Apr 6 10:20:43 2023 |
Peter | Update | VLC Update | Laser intensity/polarization drift measurements |
| More optical components were added to the optical set up for laser intensity / polarization drift measurements. Both lenses and both PDs were added to the configuration, as seen in the image below. The beam is already well aligned into the center of both of PDs, and focused nicely by the lens.
Both PD's take BNC connecting cables, and the Red Pitaya takes SMA connecting cables. Since we are currently without a BNC to SMA cable, and we do not want to cut, strip, and crimp what we have, then measurement process cannot proceed until we get the cables. |
| Attachment 1: Optical_Setup_4-6-23.jpg
|
|
|
83
|
Fri Apr 28 11:21:01 2023 |
Peter | Update | VLC Update | Laser intensity/polarization drift measurements |
| The Digi-key cables have arrived, and I have began implementing them in the intensity drift measurements.
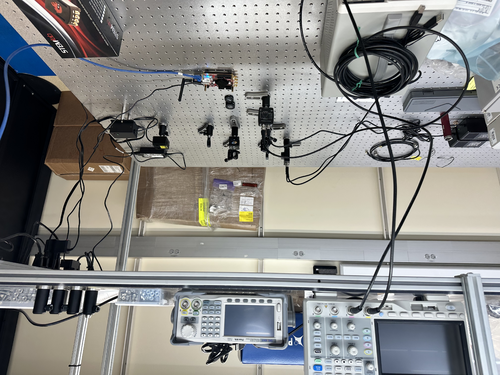
There was a slight problem initially in connecting the SMA to BNC cables from the photodiode to the red pitaya, since the red pitaya was way on the other side of the lab. Cao and I connected the red pitaya to a new ethernet cable that extended far enough for the red pitaya to sit comfortably on the breadboard with the optics.
Right now the PDAs are not connected to the red pitaya. I have connected them to the oscilloscope in order to read out how much voltage they produce upon incidence of 532nm laser light. This was done in order to make sure that they do not surpass the limit of the red pitaya (+-1V). I have not acquired a value for the readout voltage of the PDAs since I had to go to class. I will gather this preliminary data soon. |
| Attachment 1: IMG-0183.jpg
|
|
|
102
|
Mon May 22 16:43:28 2023 |
Peter | Update | VLC Electronics | Laser intensity/polarization drift measurements |
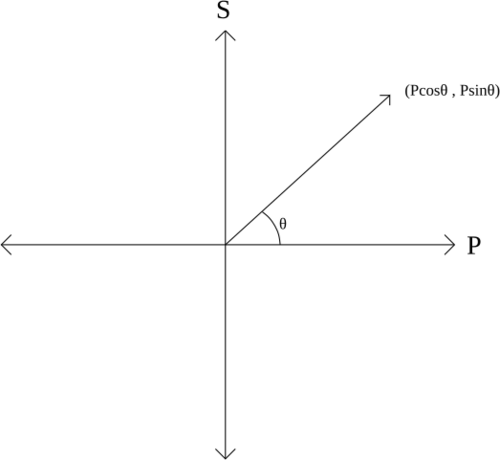
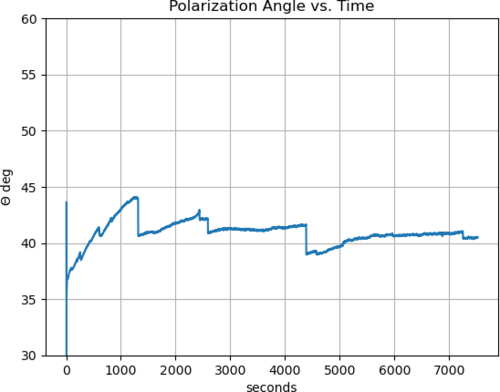
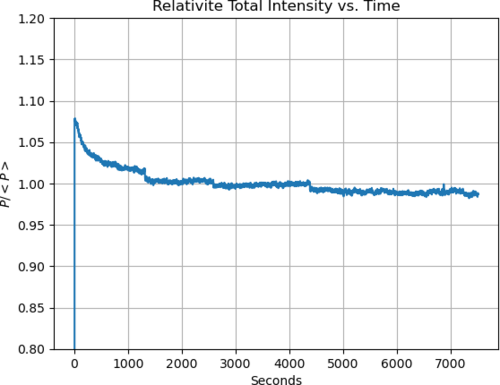
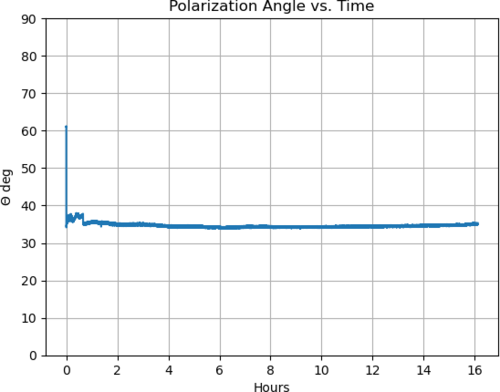
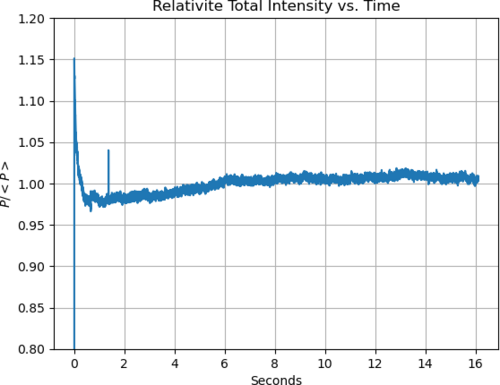
| In order to fully analyze the polarization data taken last Thursday, I needed to convert the signal output (which is in volts) to power (units of watts). I used the power meter to accomplish this. Keeping the exact same configuration of PD's and beam splitting, opened the red pitaya's oscilloscope package. I then took the power meter, and held it in front of the PD to measure the amount of Watts at each PD. I then wrote down the corresponding voltage being seen in the red pitaya. I took 5 sets of measurements for each PD to get experimental accuracy. I then used a simple y = mx + b fit to find out the constant m that converts the input wattage into voltage. For the s polarization, the conversion factor is 0.83. For the p polarization, the conversion factor is 1.12. I then used this data to plot polarization angle as a function of time, and the relative intensity drift as a function of time. The plots are shown below. The physical meaning of the polarization angle is shown in the unit circle diagram below, in which P is the total power. |
| Attachment 1: S-P_Polarization_Diagram.svg
|
|
| Attachment 2: Polar_angle_vs_time.png
|
|
| Attachment 3: Rel_Intens_vs_time.png
|
|
|
107
|
Wed May 24 14:28:26 2023 |
Peter | Update | VLC Electronics | Laser intensity/polarization drift measurements |
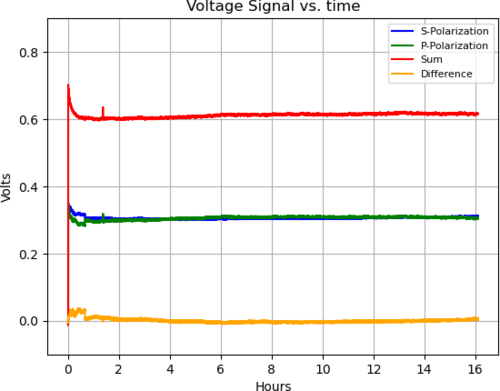
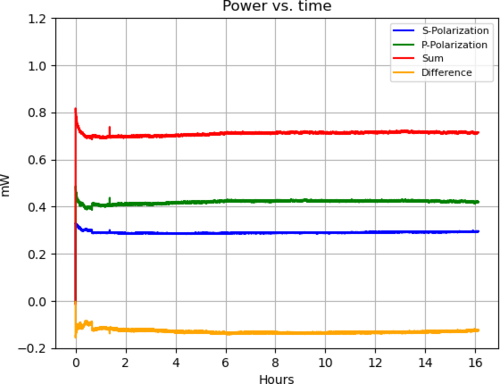
| I went in and took polarization drift data for 16 hours. The run started at 6:08pm and finished at 9:15am the next day. The four plots below are the same plots shown for the 2 hour collection and previous trials, except they extend to 16 hours. The only one that is different is the Power vs. Time graph. This is a graph of the actual incoming power of the laser (as opposed to the signal voltage that the PDA's output into the red pitaya). This was done using the calibration factors of the respective PDA's and as we can see, since there is a difference in the calibration factors between detectors, there is a difference in the power that's coupled into S and P polarization. |
| Attachment 1: Time_Series_Trial_7_16hrs.png
|
|
| Attachment 2: Power_vs_Time_16hrs.png
|
|
| Attachment 3: Polar_angle_vs_time_16hrs.png
|
|
| Attachment 4: Rel_Intens_vs_time_16hrs.png
|
|
|
21
|
Sat Feb 4 17:01:03 2023 |
Peter | Update | VLC Electronics | Laser Data |
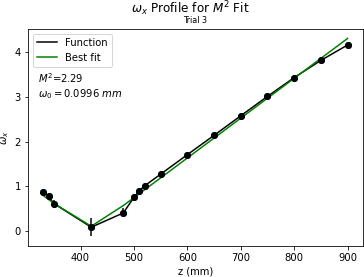
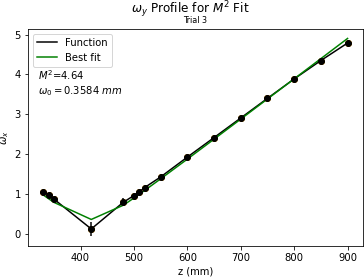
| Peter and Ryan took laser beam data. Configuration: 100mm focal length lens is ~100mm from lens. 150mm focal length lens is ~200mm from first lens. Beam waist is ~420mm from second lens.
Beam waist is very small still. Had to input large amounts of error in data collection. Took width data successively at points near waist and at >= Rayleigh range. Plots are shown below.
Key points:
Took a while to figure out optimum configuration for lenses to be placed so that an accessible beam waist could be obtained.
Beam waist is still very small. May need to do an ABCD calculation to see if there is anything bigger that can be obtained. |
| Attachment 1: OmegaX_M2_Fit_3.png
|
|
| Attachment 2: OmegaY_M2_Fit_3.png
|
|
|
46
|
Wed Mar 8 18:35:52 2023 |
Pamella | Update | | Lab cleaning |
| Today Pamella finished cleaning of the cleanroom, starting with the HEPA vacuuming, mopping and clearing all floor with IPA wipes.
Also Pamella and Julian finished cleaning of lab floor, starting with the HEPA vacuuming and mopping.
Shane and Pamella wiped down every surfaces of the laser table, computer table and the table with the vacuum pieces inside the cleanroom.
Shane, Peter, Tayler, Pamella and Julian then wiped down every surface of the laser table outside the cleanroom. We wiped the main tabletop as well as the legs and all parts for the table. We wiped the computer desk, the boxes, the cabinets and every part outside the cleanroom. For now we finished the lab cleaning. |
|
68
|
Tue Apr 11 17:56:15 2023 |
Pamella | Update | General | Lab cleaning |
| Today Pamella and Julian finished cleaning of the cleanroom, starting with the HEPA vacuuming, mopping and clearing all floor with IPA wipes. Also we wiped down some surfaces of the blue table, computer table and the top of chamber. |
|
605
|
Mon Jul 7 17:44:04 2025 |
Tyler | Update | General | Lab Organization |
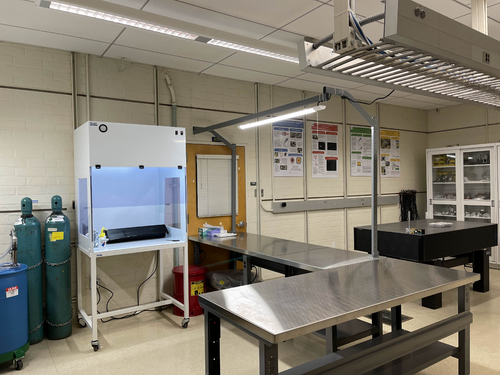
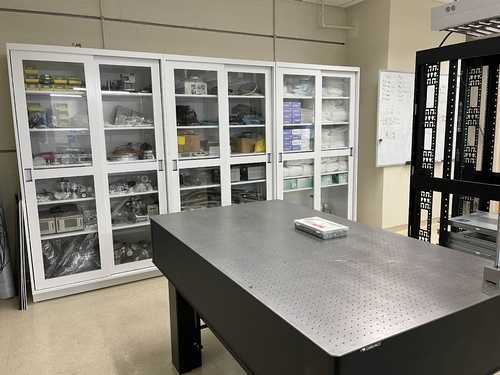
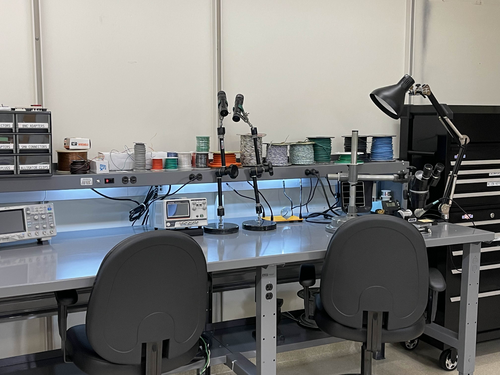
| [Tyler, Pooyan, Ma, Cece, Luke, Luis, Christina, Maple]
After acquiring some new equipment for the labs, a few of us spent time on Thursday and Friday sorting through everything and storing them into their appropriate places. New vacuum parts, power supplies, cables, and much more were included. The rooms are now ready for the lab tours commencing Tuesday afternoon. |
| Attachment 1: IMG_1874.jpg
|
|
| Attachment 2: IMG_1872.jpg
|
|
| Attachment 3: IMG_1871.jpg
|
|
|
257
|
Wed Nov 8 17:55:49 2023 |
Jon | Update | General | Lab Clean-Up Day 1 |
[Jon, Tyler, Shane, Peter, Luis]
Today we completed the first phase of lab clean-up. Activities included:
- CF/KF parts stored under the cleanroom table were removed and transferred to Physics 1129
- Cleanroom workbench cleared, with all FROSTI hardware collected into one of the large SS bins
- High surfaces outside the cleanroom (lights, table enclosure frames, rack, cabinets) wiped down with IPA wipes
- Floor HEPA-vacuumed outside the cleanroom
- Sticky mats changed throughout the lab
Tomorrow, we will complete turn-over of the cleanroom (HEPA vacuuming of floors, mopping of floors, IPA wiping of softwalls and work surfaces). Shane will post a forthcoming measurement of the cleanroom particulate levels, post-turnover. |
|
528
|
Tue Mar 4 03:05:42 2025 |
Xuesi Ma | Update | ELOG | LOG |
1424564097.243212 2025/02/26 00:14:39 UTC Time start
12V 2A right after start all 8 elements
1424564478.079428 2025/02/26 00:21:00 UTC Time stop
12V 1.8A right before stop all 8 elements
1424564832.211584 2025/02/26 00:26:54 UTC Time start
12V 1.9A right after start all 8 elements
1424565208.359935 2025/02/26 00:33:10 UTC Time stop
12V 1.8A right before stop all 8 elements
1424565573.565066 2025/02/26 00:39:15 UTC Time start
12V 1.8A right after start all 8 elements
1424565931.242394 2025/02/26 00:45:13 UTC Time stop
12V 1.7A right before stop all 8 elements
1424566292.67104 2025/02/26 00:51:14 UTC Time start
12V 1.8A right after start all 8 elements
1424566648.619952 2025/02/26 00:57:10 UTC Time stop
12V 1.7A right before stop all 8 elements
1424566996.312246 2025/02/26 01:02:58 UTC Time start
12V 1.8A right after start all 8 elements
1424567381.748943 2025/02/26 01:09:23 UTC Time stop
12V 1.7A right before stop all 8 elements
1424567756.528736 2025/02/26 01:15:38 UTC Time start
12V 1.7A right after start all 8 elements
0.2A right before start
spikes!?
1424643001.864687 2025/02/26 22:09:43 UTC
change c_0(VEXC0 & VCXC0) to 2V (why is it on 5V ?)
2025/02/26 22:18:51 UTC
Main chamber pressure:5.92e-9
RGA chamber pressure:1.98e-9
1424650528.240947 2025/02/27 00:15:10 UTC Time start (increase voltage)
24V 2.1A right after start all 8 elements
disconnect and reconnect (exc 1-4)(out 9-12) & (exc 5-8)(out 13-16)
2025/02/27 19:34:26 UTC
Main chamber pressure:1.34e-8
RGA chamber pressure:4.33e-9
Main chamber temp: 29
RGA chamber temp:29
2025/02/28 18:02:29 UTC
Main chamber pressure:1.05e-8
RGA chamber pressure:3.53e-9
Main chamber temp: 29
RGA chamber temp:30
1424801097.374902 2025/02/28 18:04:39 UTC Time stop
24V 1.8A right before stop all 8 elements
0.1A right after stop
1424827460.71372 2025/03/01 01:24:02 UTC Time start
24V 2.9A right after start all 8 elements
0.1A right before start
2025/03/01 01:25:34 UTC
Main chamber pressure:5.98e-9
RGA chamber pressure:2.06e-9
Main chamber temp:27
RGA chamber temp:27
2025/03/03 20:28:03 UTC
Main chamber pressure:7.8e-9
RGA chamber pressure:2.64e-9
Main chamber temp:27
RGA chamber temp:27 |
|
182
|
Mon Jul 31 12:39:01 2023 |
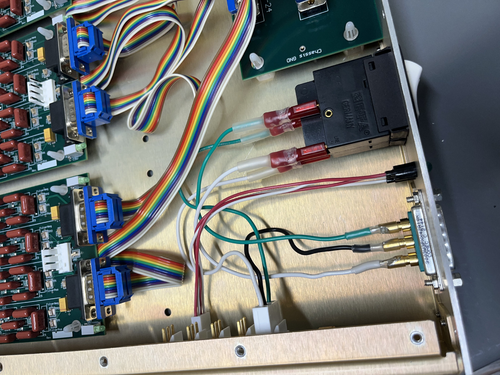
Shane | Update | Electronics | LED cable assemblies installed |
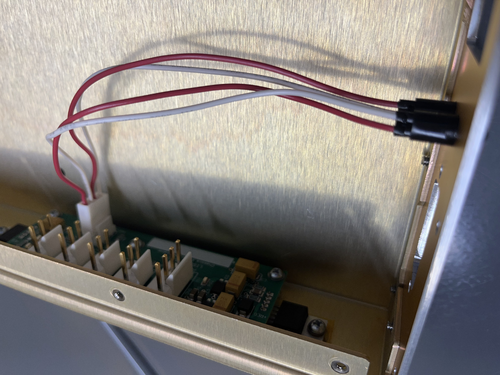
| Today I put together the two LED cable assemblies for the CyMAC and mounted them in the anti-aliasing and anti-imaging chassis. |
| Attachment 1: IMG_8514.jpeg
|
|
| Attachment 2: IMG_8516.jpeg
|
|
|
134
|
Tue Jun 27 14:04:42 2023 |
Sophia A. | Update | Measuring Noise in Interferometer | Interferometer set up and connection to red pitaya |
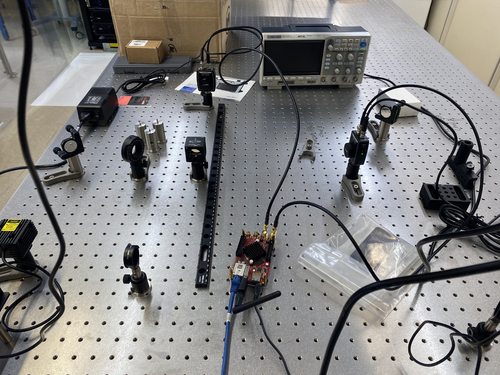
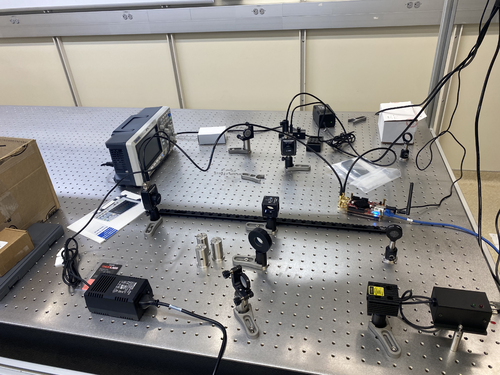
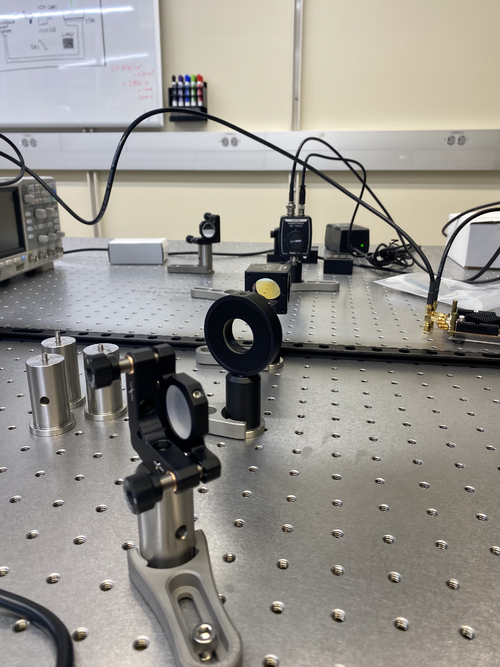
| Today we (Sophia and Tyler) constructed the set-up for the electrical noise calculation that I will be conducting this summer. I have included images of the setup below. Our system is effectively a green laser, that feeds into a type of polarizer, then into a beam splitter which sends the laser light down two arms into detectors. We started by connecting the detectors to an oscilloscope to determine whether the signal will exceed 1V, as the red pitaya (our planned data collection device) cannot receive signals with a higher voltage than 1V. We spent most of our time calibrating the oscilloscope and fine-tuning the set-up so that we would have approximately equal voltages in each arm of the interferometer. Once confirming that the output voltage would not meet or exceed 1V, we switched from an oscilloscope to the red pitaya for our measurements. Now that the system is set up, we will be able to run code in the red pitaya interface that will run an FFT on the signal, and then do noise analysis from there. |
| Attachment 1: IMG_6756.jpg
|
|
| Attachment 2: IMG_6754.jpg
|
|
| Attachment 3: IMG_6755.jpg
|
|
|
81
|
Thu Apr 27 16:23:44 2023 |
Cao, Pamella and Julian | Physics | VAC | Installing vacuum system (cont.) |
[Pamella, Cao and Julian, Shane]
- Particles account
- 10:37 am: Starting the particles account
- Zone 3:
- 0.3u: 1662
- 0.5u: 872
- 1.0u: 415
- Zone 4:
- 0.3u: 831
- 0.5u: 124
- 1.0u: 0
- 11:14 am: Start removal of calibrated leak to install 45 deg elbow
- 11:21 am: Elbow installed, re-install calibrated leak back on
- 11:29 am: Finished re-install calibrated leak, start installing gate valve on pump line
- 11:47 am: Finished installing gate valve, start installing reducing cross onto gate valve
- 12:02 pm: Finished installing reducing cross, start installing 90 deg elbow to reducing cross
- 12:17 pm: Finished installing reducing cross, lunch break
- 01:24 pm: Come back to the lunch break.
- 01:26 pm: Start installing vacuum hose to elbow.
- 01:40 pm: Finished installing vacuum hose.
- 01:43 pm: Start installing turbo pump.
- 02:00 pm: finished installing turbo pump .
- 02:10 pm: Start installing standard wall hose from turbo pump to scroll pump
- 02:21 pm: finished installing hose onto scroll pump, start installing lid. Remove lid from chamber, insert viton O-ring. Place lid back
- 02:30 pm: Secure lids with screw. Start installing turbo pump controller cable: Pass cable from outside (controller) up the top of clean tent and connect to 8 pin connector on turbo pump
- 03:00 pm: Installing air cooling unit for turbo pump, found 8 M3 screws for air cooling unit in the C&B cabinet to install the fan bracket onto the back of turbo pump. Fan control cable is routed up to the top of the cleanroom to the controller
- 03:15 pm: Installing full-range gauge cable to the controller outside cleanroom. Ethernet cables 1 and 2 are used. Cable 1 is used on the RGA line gauge. Cable 2 is connected to the main body gauge. Cable1 and 2 are connected controller's channel 1 and 2 respectively.
- 04:00 pm: Finish installing gauges cables. Cables are routed up along the frame to the controller sitting outside the cleanroom
- 04:15 pm: Finished. End-of-date particle count
- Zone 3:
- 0.3u: 3699
- 0.5u: 1454
- 1.0u: 872
- Zone 4:
- 0.3u: 1662
- 0.5u: 706
- 1.0u: 290
|
| Attachment 1: IMG_0139.png
|
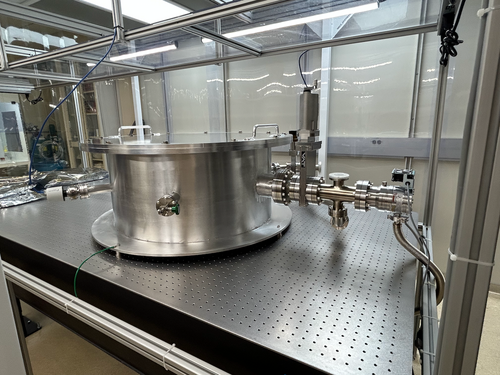
|
| Attachment 2: IMG_0136.png
|
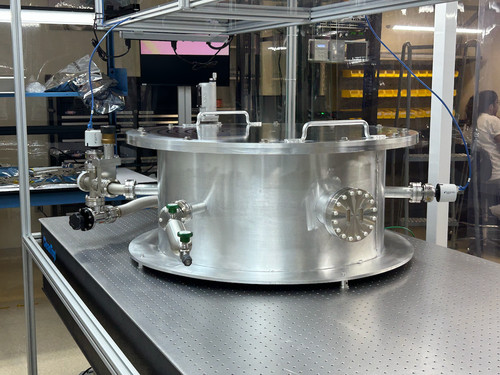
|
|
87
|
Mon May 1 17:10:25 2023 |
Julian, Cao | Physics | VAC | Installing Pirani gauge and RGA probe onto to vacuum chamber |
[Julian, Cao]
- 03:00 pm: Particle count
- : Zone 3
- 0.3 um: 498
- 0.5 um: 124
- 1 um: 124
- : Zone 4
- 0.3 um: 748
- 0.5 um: 457
- 1 um: 374
- 03:32 pm: Installing Pirani gauge onto pump line
- 03:51 pm: Finish installing Pirani gauge, start installing RGA probe
- 04:03 pm: Finish installing PRGA probe, start routing cable from gauge controller to Pirani gauge
- 04:30 pm: All ethernet cables are routed and connected to gauge controllers
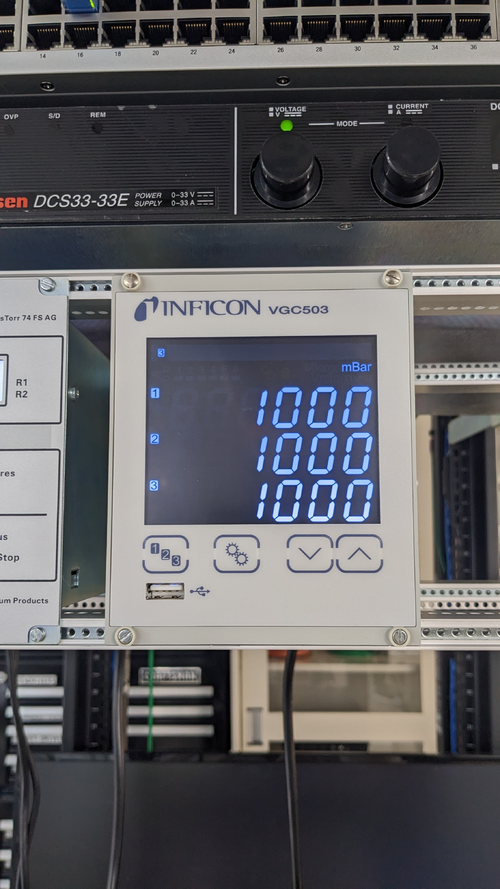
- 04:48 pm: Power gauge controller up, all gauges are recognised and readout shows atmospheric pressure as expected (1000 mbar)
- 04:51 pm: End-of-work particle count
- : Zone 3
- 0.3 um: 1413
- 0.5 um: 872
- 1 um: 623
- : Zone 4
- 0.3 um: 374
- 0.5 um: 166
- 1 um: 166
We also closed all the valves so we can start testing vacuum pump down of isolated volume tomorrow.
|
| Attachment 1: PXL_20230501_225241491.jpg
|
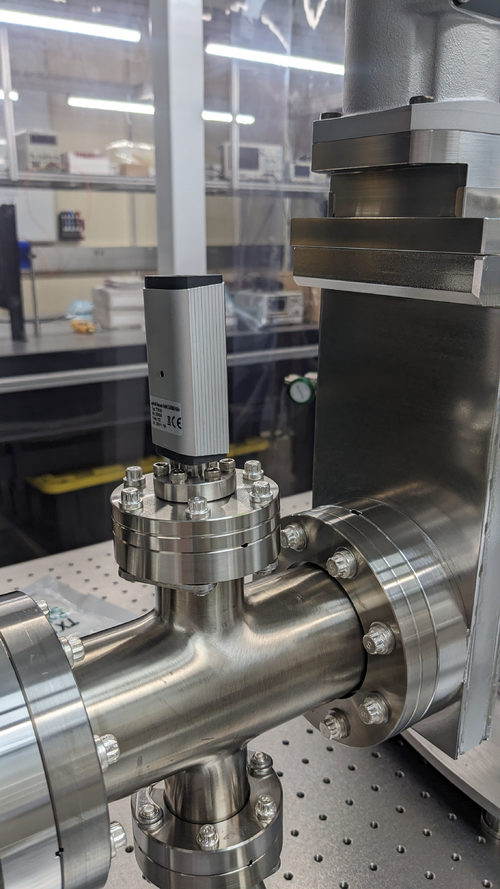
|
| Attachment 2: PXL_20230501_235854958.jpg
|
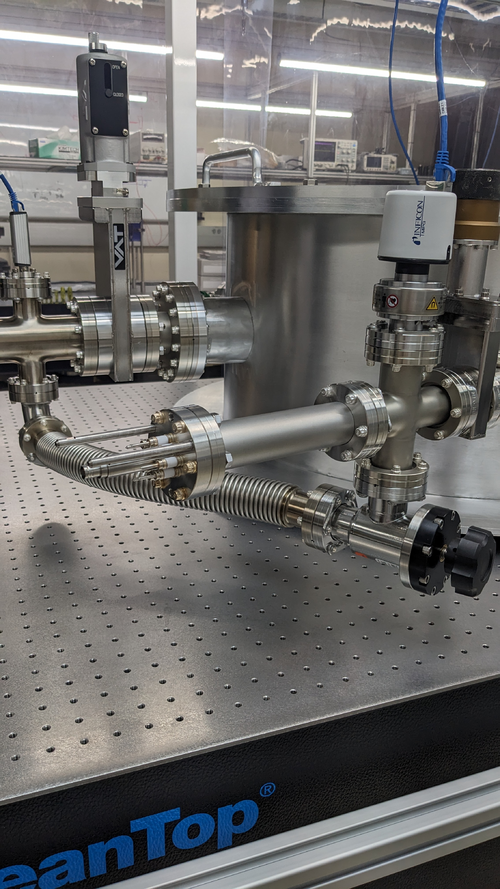
|
| Attachment 3: PXL_20230501_234750795.MP.jpg
|
|
|
11
|
Mon Oct 3 17:21:39 2022 |
Cao | Update | TCS | Inspection of macor parts |
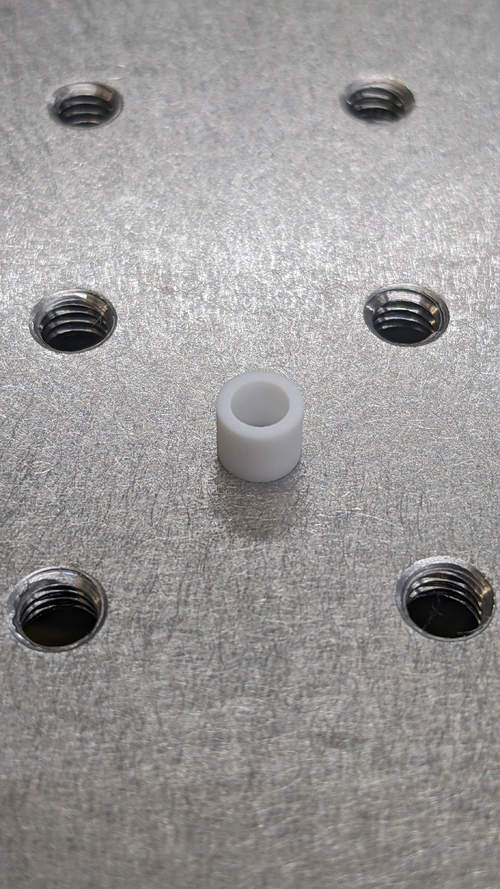
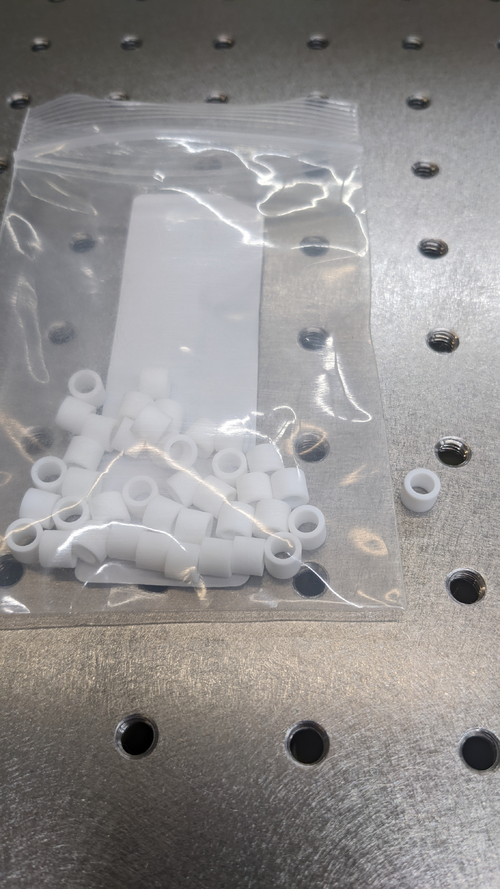
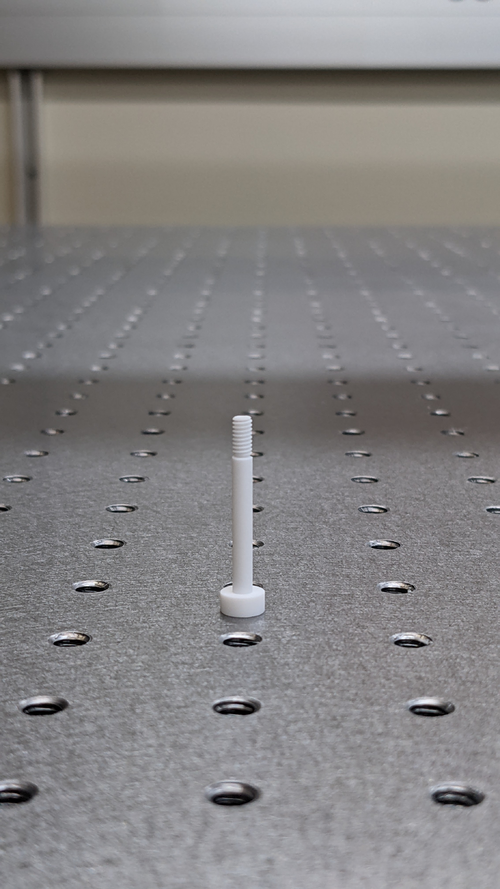
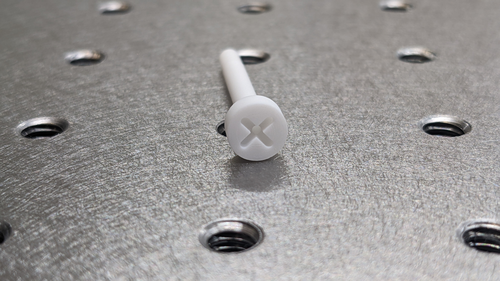
The macor parts arrived and inspected today. These include:
- Macor spacer (drawing:
LIGO_Redesign_Macor_Spacer_Drawing_v4.pdf attached below), quantities: 40
- No defects, damages observed
- Parts are free from grease/ machining fluid
- Wall thickness of 1 mm appear to provide sufficient stiffness to part
- Images of parts:
Macor_spacer_0.jpg, Macor_spacer_1.jpg
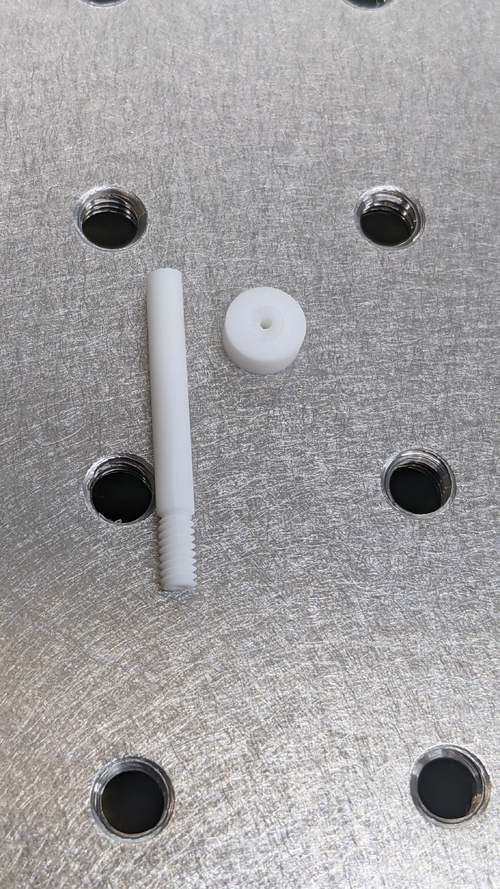
- Macor 5-40 UNC screw (drawing:
LIGO_Redesign_Macor_Screw_Drawing_v6.pdf attached below), quantities: 20
- One screw broke, location of break: should edge between head and shaft (see image
Macor_screw_5.jpg )
- All other screws look ok, no damage observed, clean surface overall
- Images:
Macor_screw_0.jpg , Macor_screw_4.jpg
|
| Attachment 1: LIGO_Redesign_Macor_Spacer_Drawing_v4.pdf
|

|
| Attachment 2: Macor_spacer_0.jpg
|
|
| Attachment 3: Macor_spacer_1.jpg
|
|
| Attachment 4: LIGO_Redesign_Macor_Screw_Drawing_v6.pdf
|

|
| Attachment 5: Macor_screw_5.jpg
|
|
| Attachment 6: Macor_screw_0.jpg
|
|
| Attachment 7: Macor_screw_4.jpg
|
|
|
582
|
Mon May 26 23:24:33 2025 |
Michael | Update | Interferometer Simulations | Initial Monte Carlo Simulations for Toroidal Mirrors Project |
| I've run an initial Monte Carlo simulation for statistical comparison of toroidal mirrors for the dual FROSTI TCS case. Below is the link to the slides.
slideshow |
|
571
|
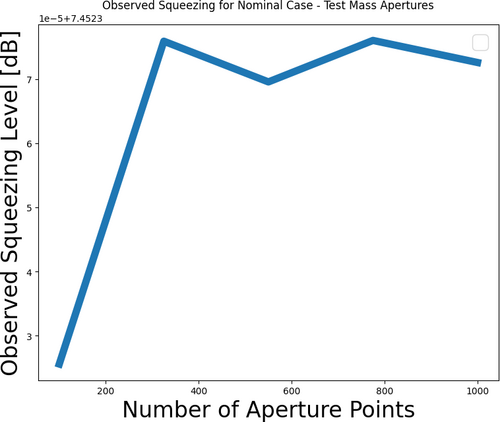
Tue May 6 13:07:34 2025 |
Michael | Update | Interferometer Simulations | Initial Convergence Plots for Toroidal Mirrors Project |
|
| Attachment 1: Convergence_Plots_5_6_25.pdf
|

|
| Attachment 2: Convergence_Plots_5_6_25-1.pdf
|

|
| Attachment 3: aperture_num_points_convergence.png
|
|
|
373
|
Mon Jun 3 14:14:39 2024 |
Tyler | Update | FLIR | Initial CIT FROSTI Analysis |
| [Tyler]
Attached below are the initial results of the CIT FROSTI testing analysis.
|
| Attachment 1: CIT_FROSTI_Analysis_Group_Meeting-2.pdf
|

|
|
323
|
Tue Feb 13 11:54:45 2024 |
Tyler | Configuration | FLIR | In-Air Optical Test Configuration |
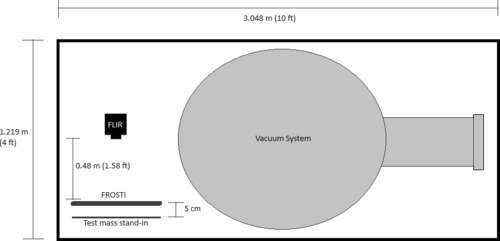
Below is the proposed schematic for FROSTI optical testing, chosen so enough space is allotted for prototype assembly.
Steps to be taken include:
- Reconstruct FLIR staging apparatus
- Move test mass stand-in to cleanroom
- Mark FLIR camera position on cleanroom optical table at correct distance
- Run ethernet cable into cleanroom
- Move FLIR aside to allow for more assembly space
- Upon assembly completion, reposition FLIR onto optical table again
Tentative plan is to begin setup early next week. |
| Attachment 1: In-air_optical_test_sketch.png
|
|
|
349
|
Tue Mar 19 10:55:30 2024 |
Tyler | Update | FLIR | In-Air Optical Test |
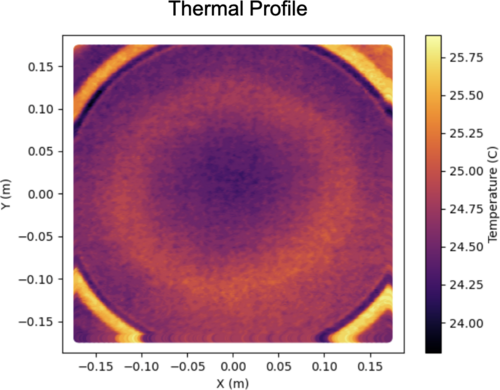
| Below is an image I took using the FLIR just before leaving for the LVK meeting. The profile is roughly what we would expect (annular). Any distortions seen are likely from the screen not being completely parallel to the plane of the FroSTI (i.e. the screen slightly bends in various locations). Next step: In-vacuum test at CIT. |
| Attachment 1: FroSTI_Thermal_Profile.png
|
|
|
468
|
Tue Nov 5 11:08:40 2024 |
Luis Martin | Update | VAC | ISO Test |
|
[Luis, Luke, Ma Michael]
The isolation test was conducted on the vacuum system. Every pump was turned off under vacuum, and pressure measurements were taken every minute for 15 minutes. The results are displayed in the sheet linked at the end of this report. The pressure of the main volume dropped very slowly.
The pressure of the RGA Volume dropped in an exponential manner. The test had to be paused at 11 minutes due to concerns about the pressure exceeding the lowest permitted level for the RGA filament.
After the ISO test was performed, we attempted to tighten the bolts of the small turbo pump on the RGA Volume. However, we noticed that the pressure had increased by nearly an order of magnitude, going from 3.27 × 10⁻⁹ Torr to 1.45 × 10⁻⁸ Torr when both volumes were separated. We conducted a leak test for that particular flange and found a concerning leak of 2.15 × 10⁻⁸ Torr, which had previously been 1.9 × 10⁻⁹ Torr. We believe the copper seal was damaged during the ISO test.
View the results sheet
|
|
6
|
Tue Jun 21 18:31:49 2022 |
Cassidy and Phoebe | Update | Cameras | IR Absorbing Screen and FLIR Camera Setup |
Today we set up the IR absorbing screen and the camera on the optical table, as well as tested that the camera was functioning as expected (picking up heat sources beyond the screen).
Screen Setup
The screen was set up by clamping it between two rectangular posts on each side. First, two posts were set up with 22 in. between them (thus allowing the screen to span a total distance of up to 24 in. when clamped down). To best stabilize the screen and to allow for it to be "pulled" taut by exploiting the give in the L-bracket, the L-bracket was bolted on the outside of the post, along the same axis as the screen itself.
On first attempt, the screen was too thin to be fully clamped between the posts. In order to have it fit snugly, sections of heat shrink tubing was used as a shim at the points where the posts were clamped together. The tubing was slid into the track of one optical post at the desired points. In order to accommodate the shim, the two posts had to be held together, ideally clamped, with the screen and shim in place. Then, the post clamps could be slid into the tracks of the post, moved to the optimal location, and tightened down. This required at least three people: two to tighten one side while the third holds up the screen on the other side. The screen was placed ~1/8" from the edge of the posts and flush with the top.
Camera Stage Setup
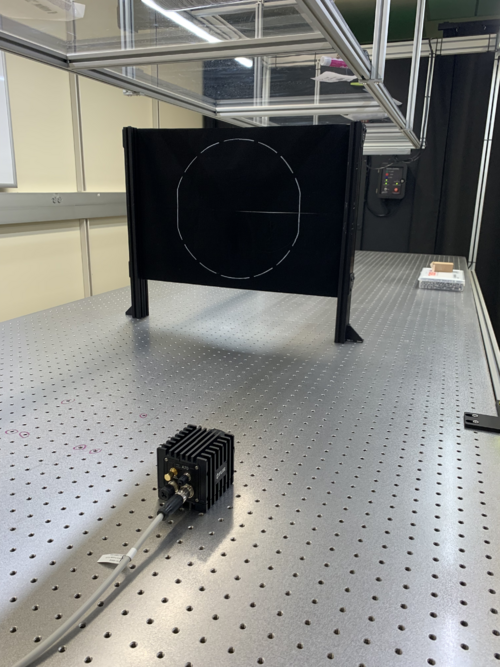
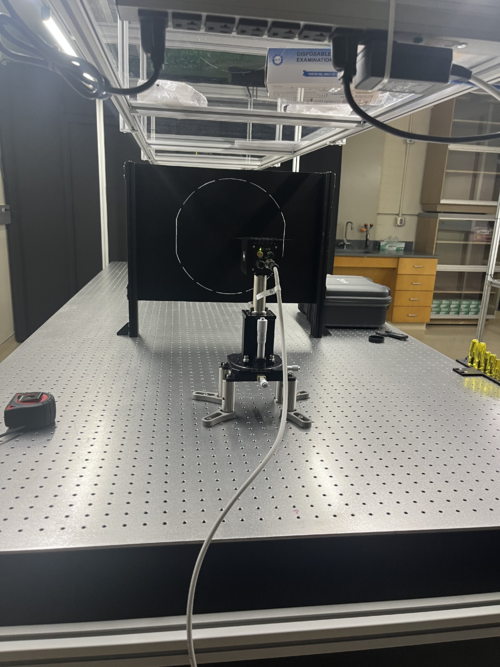
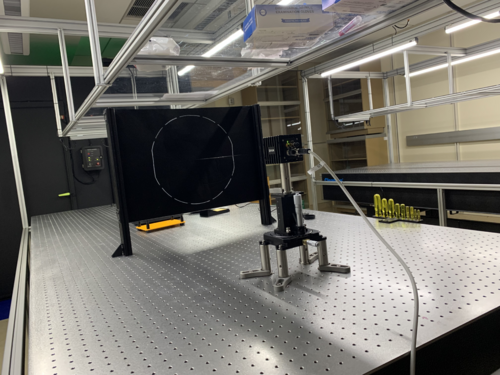
Once the screen was in place, the camera stage was set up by placing the XY-Translational with Rotation stage on four 3" optical posts. Then, the z-axis stage was placed in the center of that, with another 3" optical post on top, which was then topped with the camera. This was set and clamped down ~22.5" from the screen. This was about 1" closer than expected based on our theoretical models.
Fine Alignment
We used the visible camera to fine align the screen and to test the setup. Notably, the visible camera is placed below the infrared and thus requires a calibration in order to ensure the two are aligned on the computer image. This can be set by hand using the FLIR proprietary software (FLIR CamWeb) and adjusting the "MSX alignment". The image mode "Thermal MSX" allows both the visible and IR camera to be displayed at once and the difference in their positioning can be seen. We found an offset of ~0.5m to be nearly accurate (note: using this method, although you can get more accurate than this, the displayed value only has one significant figure).
In order to align the camera, we first used the exposed top edge to judge whether the camera was appropriately centered on the screen. We set the rotation as close as possible to being in line by eye, then adjusted the y-axis until the gap on both corners was a similar size, thus indicating that the rotation and y-position were correctly set. Rotationally, the camera required only a refinement of -1/2 degree. The y-axis is set at 1.25. Then, the camera was pulled as far from the screen as possible using the x-axis to allow the screen to be easily centered using the z-axis. Once the outlined test mass was centered, the x-axis was used to bring the camera close until the screen just barely filled the field of view. The x-axis is at 2.25. The z axis is set to it full dynamic range at 10. Unfortunately, the camera is still slightly too tall for the screen, likely requiring the purchase of a new optical post about 0.5in shorter the current one. This interchange will likely require a new fine alignment after.
Basic Imaging Tests
The camera was also focused on the screen based on the manufacturer's printed distance on the camera itself (using 22.5", or 0.572 m). Using the FLIR proprietary software, the camera appears to be in focus in IR (a hand was used as a good focusing tool for this). Additionally, the camera does pick up heat on the other side of the screen. A hand can be lightly seen warming the screen, as can a soldering iron tip. This was a very imprecise visual tool, but does indicate that the camera and screen are working roughly as expected.
Next Steps
A new optical post that is ~2.5" tall should be ordered to replace the one under the camera currently. The heating system also needs to be ordered and set up. Currently we are debating between a parabolic reflector with a hole in the back, and one without, as each would require a different mounting mechanism for the cartridge heater. |
| Attachment 1: IMG_6751.png
|
|
| Attachment 2: IMG_1146.png
|
|
| Attachment 3: IMG_6756.png
|
|
|
60
|
Mon Apr 3 17:04:05 2023 |
Aiden | Summary | General | IDP Scroll Pump Assembly |
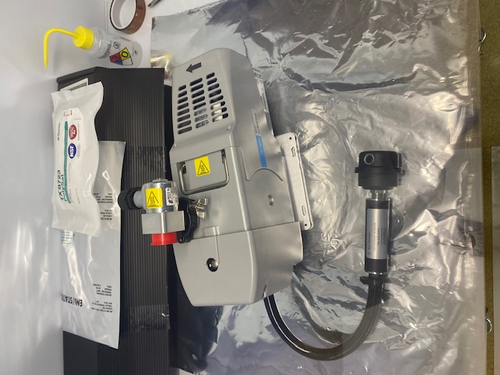
| Aiden installed the isolation valve and the exhaust silencer kits on the IDP-3 Scroll pump. The entire assembly still needs to be wiped down but overall no residue came off when putting on the kits. |
| Attachment 1: IMG_4244.jpg
|
|
|
1
|
Sun Apr 10 15:39:49 2022 |
Rutuja Gurav | HowTo | Computer Scripts/Programs | HowTo: Renew the Let's Encrypt SSL certificate using certbot |
Port 80 is kept closed by default. This might be causing the certbot auto-renewal cronjob to fail. Therefore we must renew the certificate manually.
Step 1: Open port 80. (This is needed as the certificate renewal process runs some tests which requires client communication over port 80)
Step 2: Run the following command
sudo certbot certonly --force-renew -d richardsonlab.ucr.edu
Step 3: Confirm the certificate was renewed by running the following command
sudo certbot certificates
|
|
98
|
Sun May 14 15:50:48 2023 |
Cao | Infrastructure | Computers | High resolution display of logrus machine |
| [Cao]
The display resolution of the logrus has been 1064x768 and has been the only option, which is not great. While remote access to logrus using rdesktop allows rendering a virtual display of user's chosen resolution, it is not fast when using graphic-intensive program. NoMachine allows user to take over and control the machine remotely and thus appears as the same machine. However, NoMachine cannot render a virtual display like rdesktop. This has been limiting the resolution of using logrus via NoMachine.
On Friday, I found that even though we had NVIDIA Quadro P600 graphic card installed, we were not actually using it. The monitor has been connecting to the the integrated VGA display connector. This uses Microsoft Basic Display Adapter which limits the the resolution. Today I got a HDMI to Mini-display cable to connector the monitor to the Nvidia graphic card. Then in Display settings, go to Graphic settings, then enable Hardware-accelerated GPU scheduling. After restarting the machine, the machine recognised the Display 2using the Nvidia Quadro P600. In multiple displays field, selected "Show only on 2" and remove the VGA connection to the monitor. Logrus is now set at Nvidia Qadro P600 native display resolution of 1920x1080. This is now also the display resolution in NoMachine.
|
|
543
|
Mon Mar 31 11:26:45 2025 |
Luke Johnson | Update | Scripts/Programs | Heatmaps of power delivery performance |
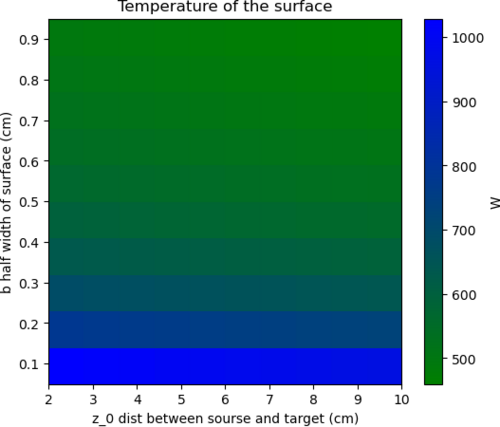
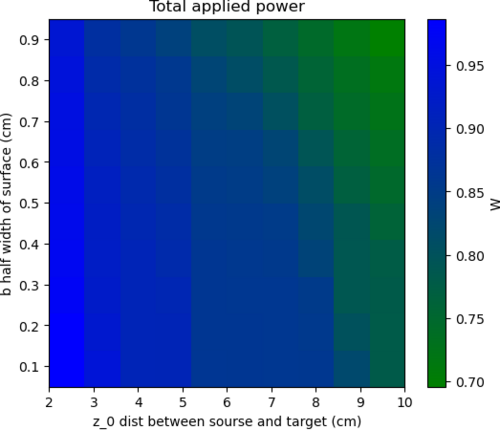
| These plots show the required temperature to release 100W of power and the efficiency of a particular configuration with half-width w and distance away from the barrel z. I want to add to these heat maps a limit line that has restricts the proximity of the reflectors from the barrel. |
| Attachment 1: temp_required.png
|
|
| Attachment 2: efficiency.png
|
|
|
435
|
Fri Sep 6 14:34:52 2024 |
Luke | Update | VAC | Heating tape work |
On the 5th I had tried to start baking the vacuum chamber however certain parts of the chamber were getting too hot and causing the controllers to shut off. So I turned them off so that the next day I could rearrange the temperature probes. I then on the 6th set them up so that instead of overshooting the temperature they would be a little low in places.
After being left over night the cooler parts of the vacuum chamber got much closer to the desired temperature of 120C.
Here is a table of the temperatures of the sections of the chamber. Note: After these measurements were taken the PID controllers were set to 125C.
| Location |
Temperature (C) |
| Lid (PID controller 1 emergency shutoff) |
108 |
| Barrel lower (PID controller 1) |
120 |
| Barrel upper (PID controller 2 emergency shutoff) |
118 |
| RGA volume (PID controller 2) |
120 |
Here is a table of temperature of the flanges that have electronics.
| Electronics |
Temperature (C) |
| Pressure gauge (Main volume) |
79 |
| Main turbo pump |
64 |
| RGA |
51 |
| Pressure gauge (RGA volume) |
55 |
| Cal leak |
47 |
| Mini turbo pump |
50 |
| Pirani gauge |
45 |
Other temperatures of note:
The optical table was about 38C
The cleanroom was around 33C (~91F) |
|
124
|
Wed Jun 14 15:35:36 2023 |
Pamella | Update | VAC | Heating system installation |
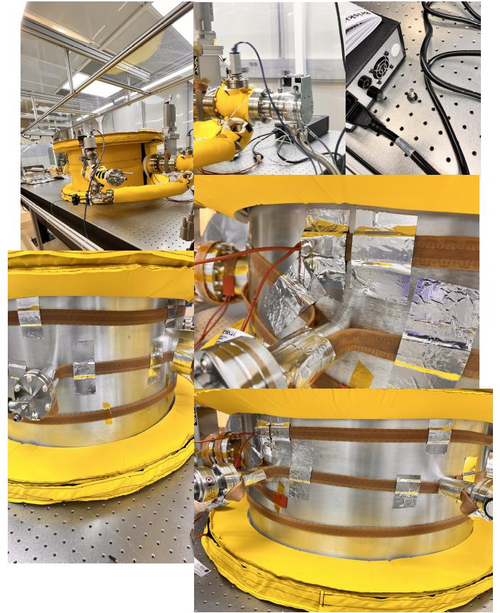
[Pamella and Cao]
Heating system installation - Second day.
- Today we kept installing the equipment for the heating system.
- First: Started installing the two heating cable around the chamber vacuum, the arms and covered it with aluminum tape.
- Second: Started installing the insulation stuff around the vacuum chamber and around the connections points (the arms) in the vacuum chamber.
- Third:Started installing the heater system (electronic device) and tried testing.
-
Note: The around part of the chamber vacuum was difficult to cover, so we spent a little time on. Also one heater system electronic device wasn't working because one fuse is burned so we could not finished this part and we need wait for a new one to replace and working on it.
|
| Attachment 1: heater_equipment_install.jpg
|
|
|
433
|
Tue Sep 3 15:52:56 2024 |
Luke | Update | VAC | Heater tape initilization |
[Luke, Tyler, Jon]
On the 3rd we set up the pid controllers for the heater tapes and after putting on the insulation we started heating them up. We first brought it to ~50C and let it stabilize, there was about a 6-7 degree difference between the RGA and the barrel temperature, with the barrel being higher. We then brought it to 60 then 70C it still maintained the slight difference between the RGA and barrel temperatures.
Here is a table of the temperatures of the flanges connected to electronics as I left it.
| Electronics |
Temperature (C) |
| Pressure gauge (Main volume) |
58 |
| Main turbo pump |
45 |
| RGA |
37 |
| Pressure gauge (RGA volume) |
39 |
| Cal leak |
40 |
| Mini tubo pump |
36 |
| Pirani gauge |
37 |
Notes: I removed the electronics from the pressure gauge (main volume) because while it was below the required threshold it was still quite high compared to the other flanges. |
|
119
|
Mon Jun 12 18:52:00 2023 |
Pamella | Update | General | Heater system parts - Wiped and bagged |
[Pamella]
Cleaning the heater system parts.
- 04:32 pm: Started wiping the heater system parts.
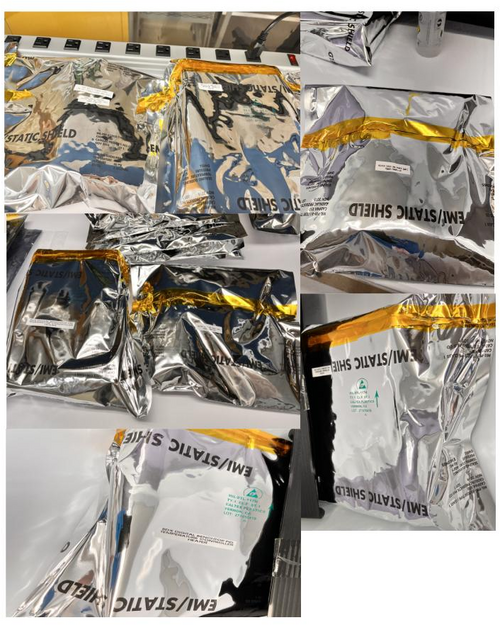
- 06:38 pm: Finished wiping the heater and some parts to the system. I wiped, tagged and bagged the heater system, power cables, adapter cables and power connectors. Also I wiped, bagged and tagged the aluminum foil tape.
- 06:43 pm: I putted all bags inside the cleanroom.
- To do: I started but I was not able to finished wiping the heating and cords for the heater system so I will finished this parts after.
- I attached the photos below.
|
| Attachment 1: heater_equipment_wiped.jpg
|
|
|
128
|
Tue Jun 20 17:28:23 2023 |
Pamella | Update | Electronics | Heater system parts - Wiped |
[Pamella]
Wiping the heater system parts.
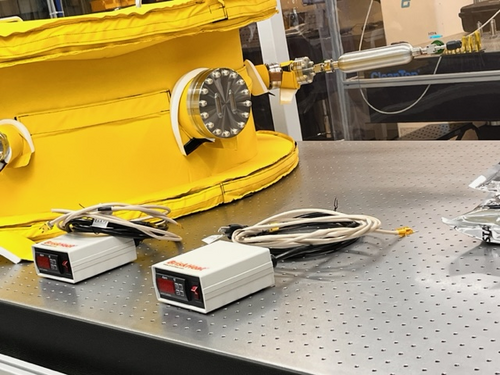
- 04:37 pm: Started wiping the electronic device part for the heater system (HL101 Series Digital Benchtop temperature limit control).
- 05:19 pm: Finished wiping the parts to the heater system (HL101 Series Digital Benchtop temperature limit control). I wiped the HL101 Series Digital Benchtop temperature limit control and I didn't bagged and tagged because we should install that soon.
- 05:23 pm: I putted heater electronic device inside the cleanroom without the bag. Also the electronic device is near to the vacuum chamber and the other parts to heater system.
- I attached the photo below.
|
| Attachment 1: IMG_7696.jpg
|
|
|
122
|
Tue Jun 13 21:08:46 2023 |
Pamella | Infrastructure | VAC | Heater system - Installation |
[Pamella, Cao and Jon]
Heating system installation
- Today we started installing the equipments for the heating system.
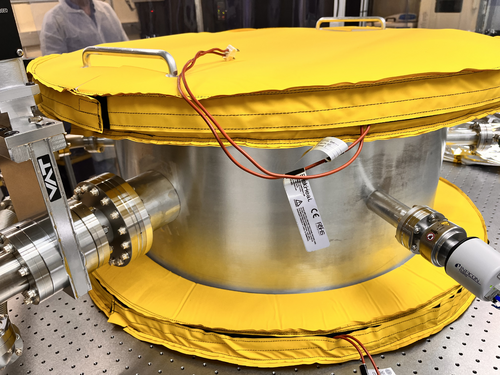
- First: Started installing the heating cable on the top lid and covered it with aluminum tape.
- Second: Started installing the insulation cover on top of the chamber lid.
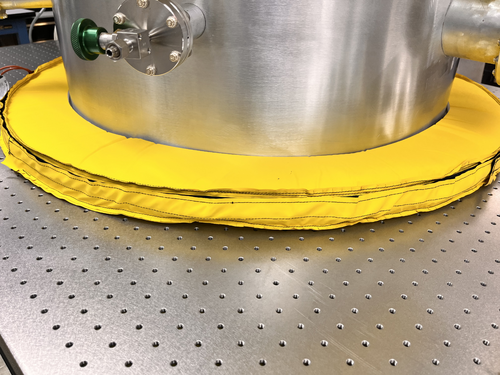
- Third:Started installing the heating cable from under the vacuum chamber and covered with aluminum tape.
- Forth: Started installing the insulation cover under the vacuum chamber
- Note: The under part of the chamber vacuum was very difficult to cover, so we spent a little time on it and we couldn't finish the whole installation today. So tomorrow we should be able to keep doing the installation.
|
| Attachment 1: IMG_7563.jpeg
|
|
| Attachment 2: IMG_7561.jpeg
|
|
|
503
|
Mon Jan 27 11:29:38 2025 |
Xuesi Ma | Update | | Heater Element Test |
[Ma, Cece, Luke, Mary, Shane]
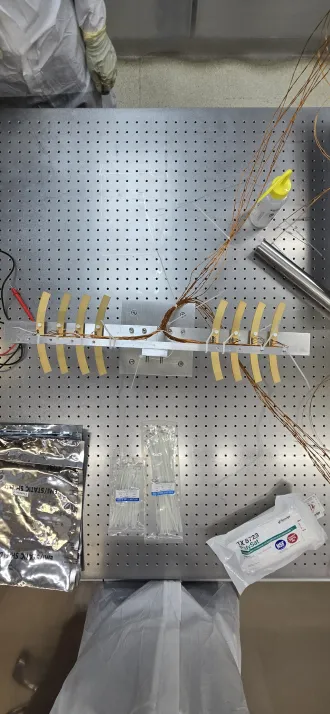
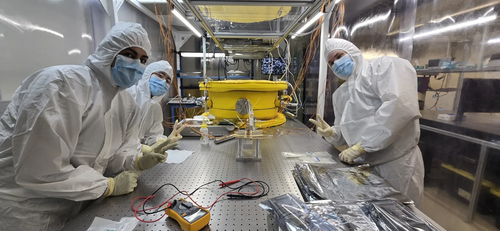
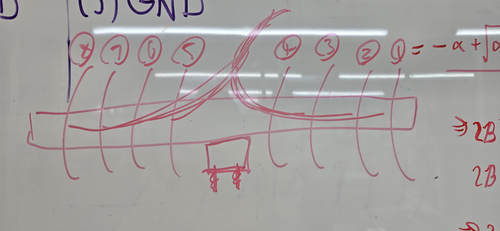
On Friday (Jan 24), we installed the heater elements on the stand. The heater elements are arranged from 1 to 8, oriented from right to left as shown in Attachment 1. Each wire has been labeled according to its corresponding element number and type (e.g., RTD connections, heater connections).
Note: We currently do not have enough PEEK zip ties, so standard zip ties have been used temporarily. These must be replaced with PEEK zip ties before the setup is placed in the vacuum chamber. |
| Attachment 1: 20250124_165434.png
|
|
| Attachment 2: 20250124_165342.png
|
|
| Attachment 3: 20250214_132811.jpg
|
|
|
316
|
Mon Feb 5 14:17:52 2024 |
Aiden | Update | VAC | Heater Element RGA Scan |
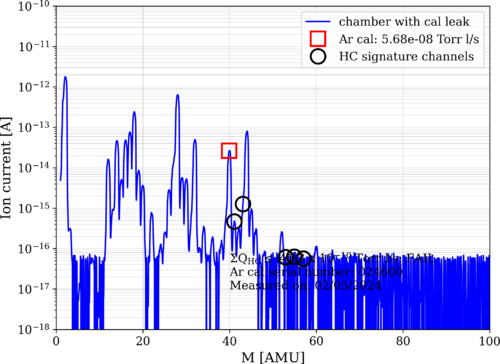
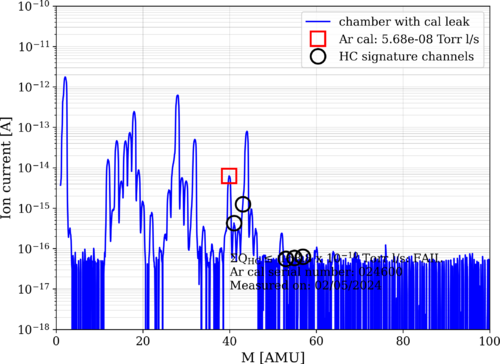
| Here are the new RGA scans for the powered Heater elements. The pressure at the time of taking data was 2.88 e-8 torr. The HC levels are at 40 e-10 torrl/s which is not bad but still higher than the lowest we have recorded. |
| Attachment 1: bake10_240205_Elements_ArO.png
|
|
| Attachment 2: bake10_240205_Elements_ArC.png
|
|
|
319
|
Thu Feb 8 17:37:48 2024 |
Aiden | Update | VAC | Heater Element RGA Scan |
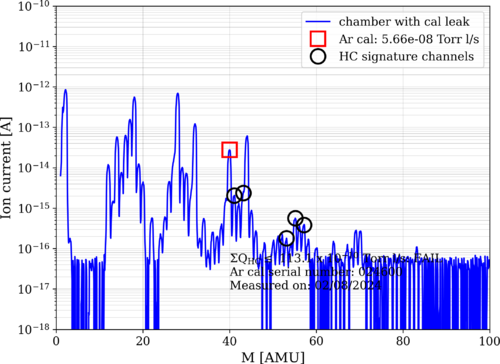
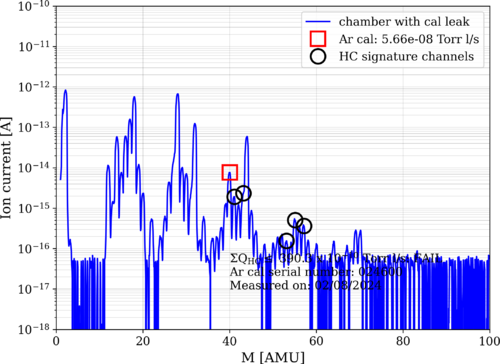
| Took more RGA data now that the heaters are powered by 18V. The pressure of the system during the data taking was 3.8 e-8 torr. The RGA scans seem to have gotten worse as well with this power increase. |
| Attachment 1: bake10_240208_Elements_ArO.png
|
|
| Attachment 2: bake10_240208_Elements_ArC.png
|
|
|
320
|
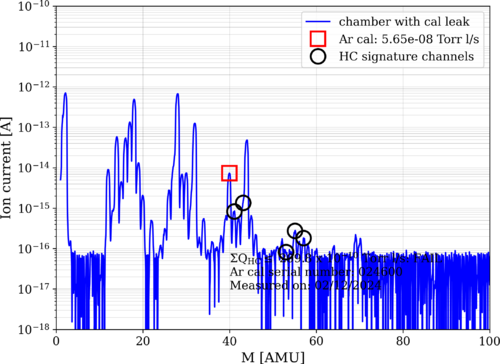
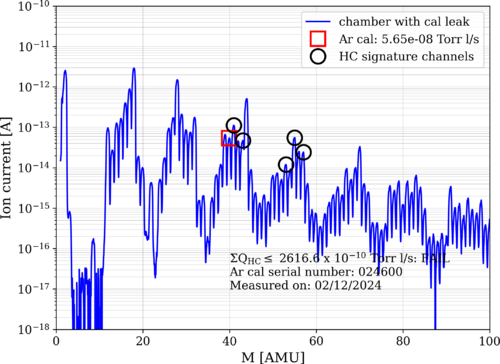
Mon Feb 12 17:35:47 2024 |
Aiden | Update | VAC | Heater Element RGA Scan |
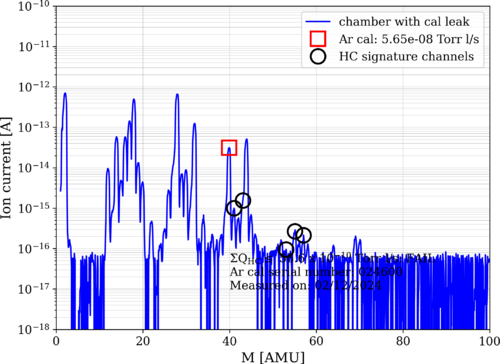
| Took more RGA data before and after increasing the heater elements to 300 degC and before heating them up.
Started Bake 11 as well to hopefully prevent any hydrocarbons from getting captured by the room temperature walls of the chamber. The PID controllers were set to 100C. |
| Attachment 1: bake10_240212_Elements_ArO.png
|
|
| Attachment 2: bake10_240212_Elements_ArC.png
|
|
| Attachment 3: bake10_240212_Elements_300C_ArC.png
|
|