| ID |
Date |
Author |
Type |
Category |
Subject |
|
64
|
Tue Apr 4 16:52:08 2023 |
Jon | Update | Cleanroom | Particle counter docking station |
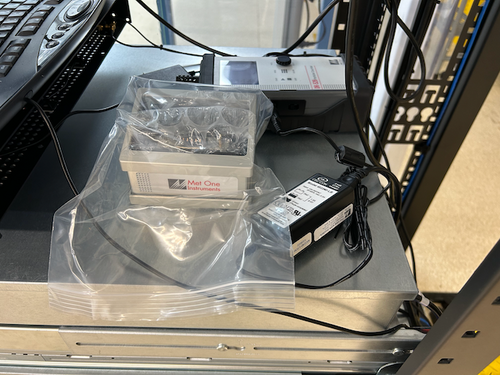
| Due to the problems we have encountered trying to serially communicate directly with the Met One DR-528 particle counter, I went ahead and ordered the add-on communications/charging dock. The dock "ethernetizes" the serial communications by wrapping them in TCP packets and transmitting them over the lab network. This will allow our Python code to communicate using the standard Internet sockets package, rather than PySerial, PyNut, etc.
the docking station arrived today and I delivered it to the lab. I left it laying next to the particle counter in the electronics rack. |
| Attachment 1: Met_One_Dock.png
|
|
|
71
|
Wed Apr 12 16:17:50 2023 |
shane | Update | General | Particle Counter moved |
| With the added height of the new docking station, the particle counter no longer fits under the Windows monitor in the electronics rack and has been moved to the desk in the corner of the lab. |
| Attachment 1: IMG_6693.HEIC
|
|
235
|
Mon Oct 9 11:29:37 2023 |
Tyler | Update | Electronics | PSD/CSD Plot Updates |
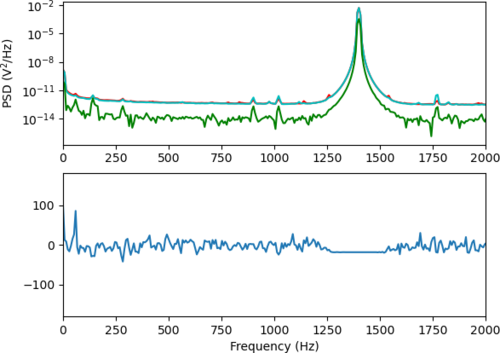
| Continuing from Sophia's SURF Project this summer: Plotting the Power-Spectral Densities (PSDs) and Cross-Spectral Densities of two signals.
A continued issue that has been observed in the plots is the random "jump" of one PSD curves. Below, a 1.4 kHz signal is driven with a magnitude of 0.7 Vpp, and connected to the two output ports of the Red Pitaya via an SMC T-Adapter. At the moment, I anticipate that this bug might have something to do with the Real-Time GUI code being used, since this hasn't been observed when running the calculations without it (see below). |
| Attachment 1: Screenshot_2023-10-09_at_11.20.25_AM.png
|

|
| Attachment 2: welch_csd-2.png
|
|
|
536
|
Mon Mar 10 21:13:12 2025 |
Nathan | Update | VLC Update | PDH Lock Progress and Next Steps |
| Progress update: Photodiode is set up, need to set up DC bias tee, EOM has 400-600nm wavelength range with a resonance frequency of 0.1-100MHz. Additionally need to connect the DC bias to SR560, put it in low pass, then connect to the function generator and connect it to oscilloscope to observe. Once everything looks good and working, need to connect the driver and we can start actuating on the cavity ETM. |
| Attachment 1: thumbnail_(2).jfif
|
| Attachment 2: thumbnail_(4).jfif
|
| Attachment 3: thumbnail_(5).jfif
|
| Attachment 4: Visible_Light_Optical_Cavity_(2).pdf
|
.png)
|
|
551
|
Tue Apr 8 20:04:35 2025 |
Nathan | Update | VLC Update | PDH Lock Progress |
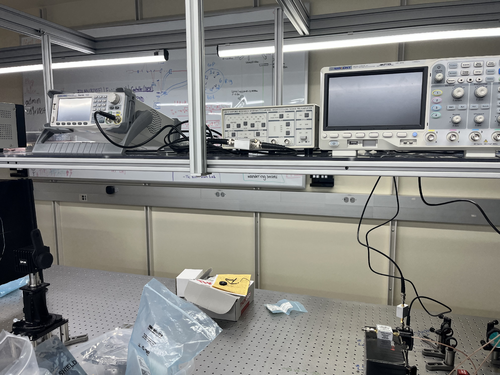
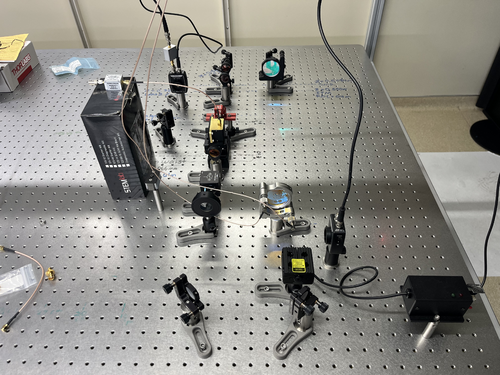
| Connected the DC bias and mixer. Need to connect signal generator now to RF Amp and mixer, and also need to connect power supply. After that will see if I can get a detection on the oscilloscope and if so will set up the driver. [Photos attached] |
| Attachment 1: IMG_5450.jpeg
|
|
| Attachment 2: IMG_5449.jpeg
|
|
|
39
|
Wed Mar 1 21:27:20 2023 |
Jon | Infrastructure | Cleanroom | Over-table shelf height raised |
Jon, Cao
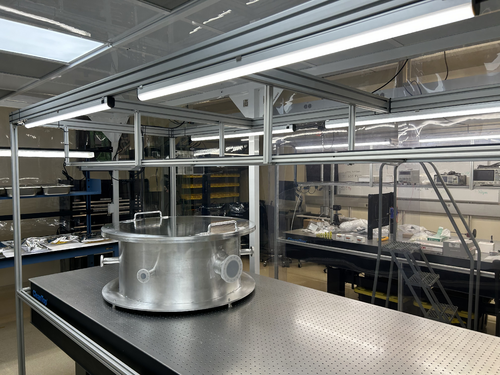
Today we raised the height of the shelf overhanging the cleanroom laser table by 8 inches. This was done to create more vertical clearance between the top-loading vacuum chamber and the bottom of the shelf. The added clearance should make both removing the chamber lid and inserting large parts easier.
The procedure required unmounting the shelf and removing all eight vertical support posts (1" x 1" x 18.5" pieces of 80/20 unistrut). The support posts were taken to the machine shop and cut, retapped, and cleaned (coarsely, with IPA wipes) prior to reinstallation. We took care to minimize the contamination introduced into the cleanroom, but some amount of particulate from disturbing the shelf was unavoidable.
This work is completed, and the cleanroom is now ready for final cleaning (HEPA vac, mopping, and wiping down of all surfaces including the softwalls). |
| Attachment 1: cleanroom-shelf.jpg
|
|
|
16
|
Mon Jan 23 17:26:15 2023 |
Peter Carney | Update | General | Oven cleaning |
| Aiden and Cao
Turned on the oven to 120 deg C for 12 hours. After 12 hours, put it at 200 deg C for 48 hours. |
|
17
|
Thu Jan 26 18:58:25 2023 |
Aiden | Update | General | Oven Heating |
| Aiden cleaned the oven with methanol again and set the oven to 260 degC for 12 hours. |
|
338
|
Fri Feb 23 18:03:27 2024 |
Tyler | Update | FLIR | Optical Test Setup in Cleanroom |
| [Tyler, Xuesi]
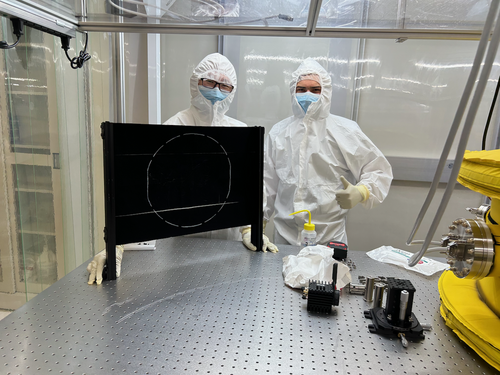
The FLIR and test mass stand-in have been transferred into the cleanroom. A software test will be run as soon as we get an ethernet cable long enough to reach into the cleanroom where the camera is set up. Once this is finished, the FLIR will be moved aside for construction of the FROSTI! When completed, the camera will be placed back into position for in-air optical testing.
|
| Attachment 1: IMG_0941.png
|
|
|
9
|
Tue Jul 26 14:10:35 2022 |
Cassidy | Update | Cameras | Optical Post Replacement and Realignment |
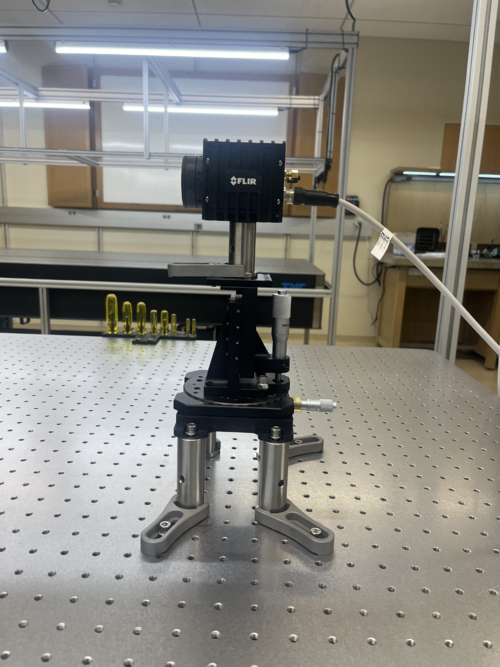
| Today I replaced the 3" optical post that the camera rests on with a 2" optical post in order for the screen to correctly fill out the camera's FOV. The 3" post is now in the glass optics cabinet next to the FLIR camera configuration box, wrapped in the protective materials from the 2" post for safekeeping.
There were no issues with the physical replacement of the post, except that the fork clamp on the post needs to be on one of the perpendicular, not diagonal, axes in order to be secure. I chose the front axis (towards the screen) as before in order to easily access the alignment knobs.
To align, I followed the same process as last time except for a more purposeful original rough alignment. For alignment purposes, the visual camera was used. For the first rough alignment, I pulled the camera as far back as possible on the x axis (with the z axis roughly centered), then moved the entire stage setup back until I could just see both the top and bottom edge of the screen. Then, I set the z-axis to an extreme in order to use the edge of the screen to align the rotational and y-axis pieces for the fine alignment.
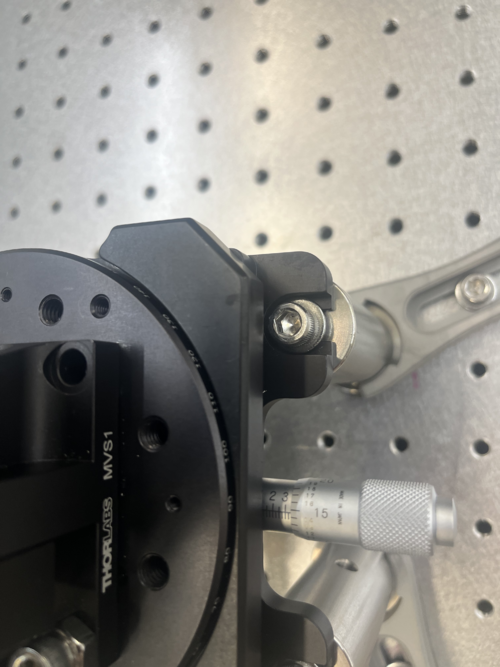
For the fine alignment, starting with the z and x axis at extremes, I began by aligning the rotational axis. To do this, I used the gaps between the top of the screen and the camera window on the far left and right of the image. When these gaps were equal I knew the rotation was adequately set. Then, I set the y-axis so that the pattern was centered. If the gaps were no longer even, I redid the rotation alignment and ditto with the y axis until both were set. This resulted in a rotation of about two degrees and a y axis at just under 3.5.
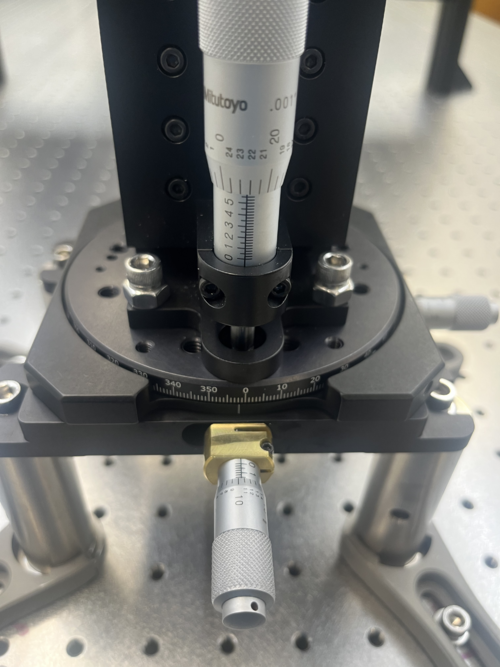
To set the z and x axis, I centered the z-axis using the top and bottom of the screen, which should both be visible if the rough alignment was done correctly. Then, I adjusted the x axis by pushing it forward until the top and bottom of the screen were just out of the frame. As with the rotational and y-axis, I iteratively fine tuned the x and z axis until both the image was centered in the z axis and only the screen was in view. This resulted in a z-axis value of just over 5.5 and an x axis value of nearly 1.75.
Pictures are included of all alignment knobs and the new post/stage setup! |
| Attachment 1: YAxisAlignment.png
|
|
| Attachment 2: XRotZAlignment.png
|
|
| Attachment 3: NewOpticalPost.png
|
|
|
527
|
Thu Feb 27 18:22:21 2025 |
Shane | Update | CDS | Ongoing work in server rack and desk area (1119) |
| As part of the vacuum communications debugging process, there is ongoing work in the server rack and desk area in 1119. Please be careful not to move any of the materials left out in the server rack or on the work bench. |
|
650
|
Tue Sep 30 12:51:23 2025 |
Tyler | Update | TCS | O6 RH Update 09/30/2025 |
| Slides |
|
636
|
Tue Aug 26 13:09:03 2025 |
Tyler | Update | TCS | O6 RH Update |
| [Tyler]
Below are slides giving an update on RH O6 design progress.
Slides |
|
424
|
Mon Aug 12 17:09:04 2024 |
Cynthia | Update | Interferometer Simulations | O4 vs O5 cavity scans with ITM plume guess or ETM |
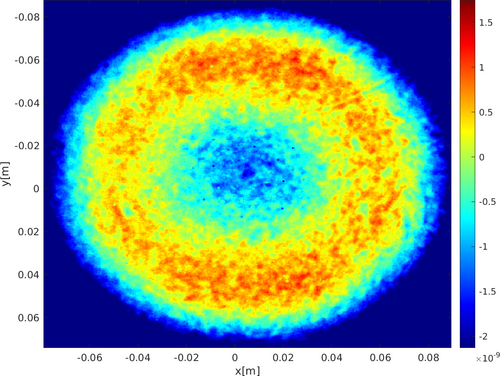
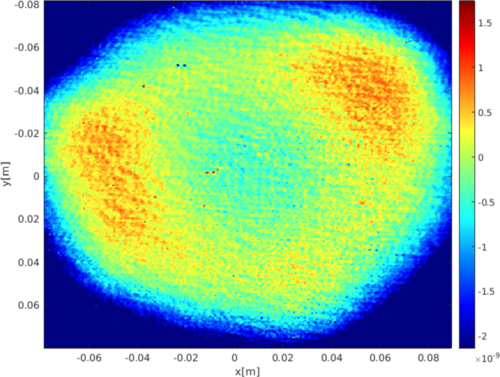
| So far the proposed solution for what to use for O5 ITM mirror for SIS simulations is either the plume guess file or using the O5 ETM mirror for ITM. I had ran a cavity scan for both of these possibilities and it seems like the results produced are fairly different. The next step is most likely moving on to adding the Frosti effects including both of the proposed possibilities, and before this, a few confirmations and verifications are needed using similar previous studies to make sure my code produce the right result. |
| Attachment 1: O5_plots_and_tables.pdf
|

|
| Attachment 2: O4_plots_and_tables.pdf
|

|
| Attachment 3: ETM12mapO5.png
|
|
| Attachment 4: Screenshot_2024-08-12_at_5.05.31_PM.png
|
|
|
392
|
Mon Jul 1 15:19:42 2024 |
Cynthia | Update | Interferometer Simulations | O4 and O5 mirror cavity scans with thermal effect |
|
| Attachment 1: cavityScan_07_01.pdf
|

|
|
578
|
Thu May 15 12:03:41 2025 |
Xuesi Ma | Infrastructure | Electronics | Notice |
All Sorensen power supplies are turned off. The Cymac system is down (All Chassis are down)
If you need more information or if you need to turn them back on please contact Xuesi Ma. |
|
67
|
Tue Apr 11 13:15:40 2023 |
Cao | Infrastructure | Clean & Bake | Nitrogen gas tank replaced |
| The nitrogen gas tank has been replaced with a new unit. The new tank is ultra pure nitrogen (>99.9% nitrogen).
The new tank has been placed and secured to the rack where the old one is; cap is removed and regulator is reinstalled onto the new tank. |
|
26
|
Fri Feb 10 16:34:45 2023 |
Huy Tuong Cao | Infrastructure | Clean & Bake | Nitrogen gas tank ready to use |
| Cao,
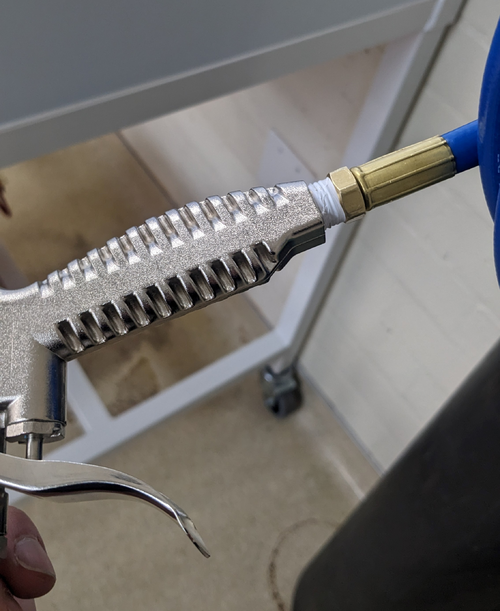
Today I fixed the final bit related to the nitrogen gas tank, which is to apply sealing tape to M-NPT connector of the hose to prevent
leakage (file: AirGunSealed.jpg)
After application of the tape, no audible leak can be heard from connection between the hose and the air gun.
The general operating procedure for the gas tank is as following:
- Turn the regulator (blue handle) anti-clockwise still it's loose
- Turn the valve on nitrogen as tank anti-clockwise, immediately the RHS meter of the regulator would jump to approx 2000 psi. This is the standard pressure for high pressure gas tank
- Turn the regulator clock-wise slowly until the pressure one the LHS meter face reads approx 60 psi. This is sufficient for drying parts with. At this point, the flow pressure still should register zero
- Press the trigger on the air gun, a high pressure air flow should come out and the flow meter should increase
- When finished, close the gas tank valve, turn the regulator anti-clockwise, then press the air gun trigger to release gas left in the hose/gun
|
| Attachment 1: AirGunSealed.jpg
|
|
|
412
|
Fri Jul 26 17:25:42 2024 |
Jon | Infrastructure | Computers | New workstation ws4 installed in 1129 |
Today I installed the second desktop workstation in 1129. The new machine is an Intel NUC13ANHi5, with a 12-Core Intel i5-1340P CPU, 32GB DDR4 RAM, and a 1TB SSD.
I loaded it with a fresh installation of Debian 12 and installed the LIGO CDS workstation (control room) tools. It is assigned the hostname ws4 and and the static IP address 192.168.1.19 on the local lab network. Like the other CDS workstations, there is just one user account accessible with the usual credentials.
The machine is fully set up and ready for use. |
| Attachment 1: ws4.jpg
|
|
|
379
|
Thu Jun 20 18:01:11 2024 |
Jon | Infrastructure | Computers | New workstation ws3 in 1129 |
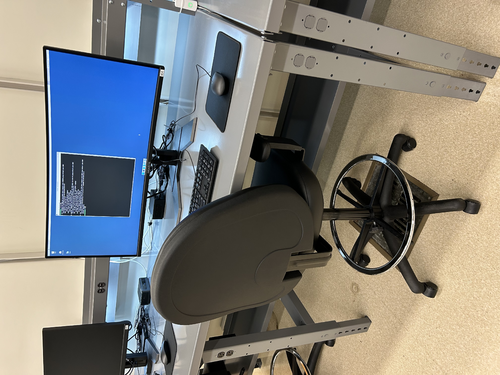
| I have repurposed a spare Intel NUC to serve as the first of two planned workstations in 1129. Today I set it up with a fresh installation of Debian 12.5, assigned it the static IP address 192.168.1.15, and installed the LIGO CDS workstation packages. It is assigned the host name ws3.
Temporarily, the mouse is borrowed from ws1 in 1119. We need to order another mouse as well as a 25-ft Ethernet cable for connecting the workstation to the 1129 switch, via the ceiling. |
|
385
|
Wed Jun 26 15:33:41 2024 |
Jon | Infrastructure | Computers | New workstation ws3 in 1129 |
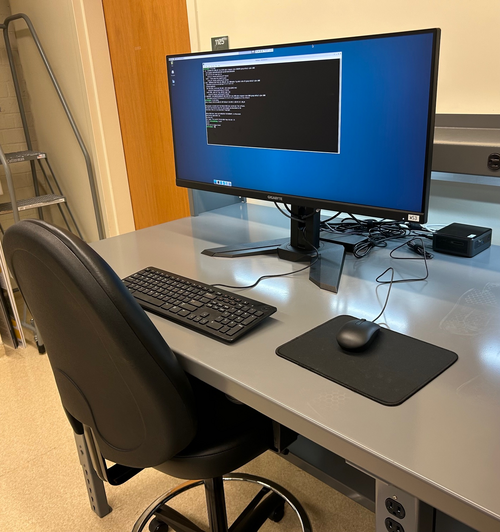
Set-up of the first CDS workstation for 1129, ws3, is complete and the machine is ready for use. The login credentials are the same as the other lab machines.
All that now remains is to install a permanent cable tray for running the new Ethernet cables between the electronics rack and bench (they are currently dangling from the suspended lights).
| Quote: |
| I have repurposed a spare Intel NUC to serve as the first of two planned workstations in 1129. Today I set it up with a fresh installation of Debian 12.5, assigned it the static IP address 192.168.1.15, and installed the LIGO CDS workstation packages. It is assigned the host name ws3.
Temporarily, the mouse is borrowed from ws1 in 1119. We need to order another mouse as well as a 25-ft Ethernet cable for connecting the workstation to the 1129 switch, via the ceiling. |
|
| Attachment 1: IMG_1368.jpg
|
|
|
198
|
Wed Aug 9 11:32:56 2023 |
Jon | Infrastructure | General | New power cables |
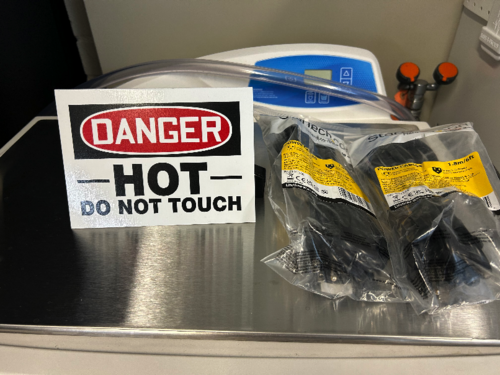
I delivered new NEMA 5-15 (120V / 15 A) power cables to the lab for the following items:
- WS2 (cleanroom) cart - 10ft cable
- Electronics workbench overhead LED - 10ft cable
- Both PI heater controller sets - (2) 6ft cables
I installed the new cables on the WS2 cart and the workbench myself, and left the two 6ft cables (as pictured below) for Aiden to install on the PID controllers after the current bake is finished. |
| Attachment 1: IMG_0299.jpg
|
|
|
562
|
Fri Apr 25 19:18:10 2025 |
Luke | Update | Scripts/Programs | New optimization plots |
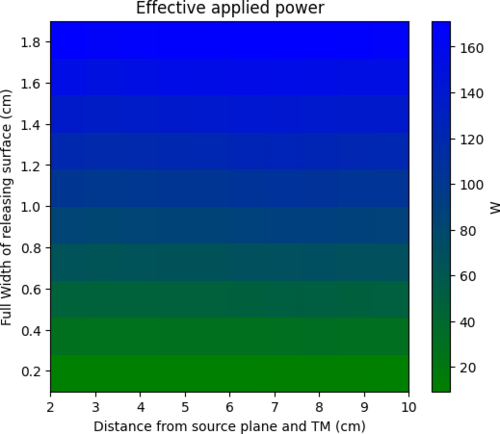
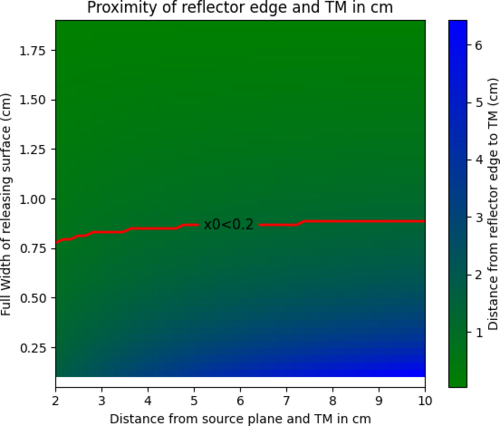
I have created two more plots. One on the transmitted power for a specific configuration. This was done by taking the product of the efficiency and the power released by surface area of the source plane for a configuration assuming it is at 300C. The second is a plot of how close the reflector is to the test mass I have included a contour line at 2mm the nominal proximity constraint. Both of these plots are generated for a 2cm wide target plane.
Somethings of note: Because the proximity requires no modeling and can be determined purely mathematically it is easy to re-generate this plot of other target widths. If you increase the target width the proximity contour moves upward and downwards if reduced. |
| Attachment 1: effective_power.png
|
|
| Attachment 2: proximity.png
|
|
|
575
|
Sun May 11 19:36:42 2025 |
Luke | Update | Scripts/Programs | New optimization plots |
Slides
I have re-run the optimization plots with the changes mentioned last week.
I have added the heat maps of the HOM scattering from HR deformation and the HOM scattering due to the OPD difference as well as the curvature actuation of the surface. |
|
640
|
Tue Sep 2 18:33:38 2025 |
Liu | Infrastructure | General | New lab room 1125 layout and measurement |
Action items for facilities
- Ceiling lights replacement
- Fume hood cleaned and refurbished
- Sink countertop cleaning
- Floor cleaned and waxed
-
|
| Attachment 1: 1125.pdf
|

|
|
135
|
Tue Jun 27 15:18:26 2023 |
Pamella | Update | FLIR | New data collection |
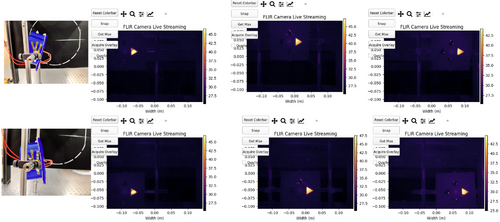
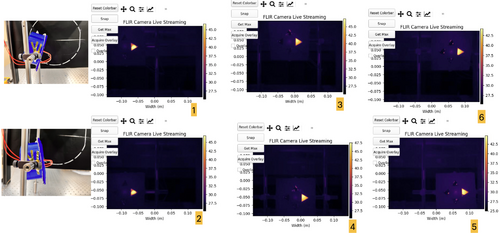
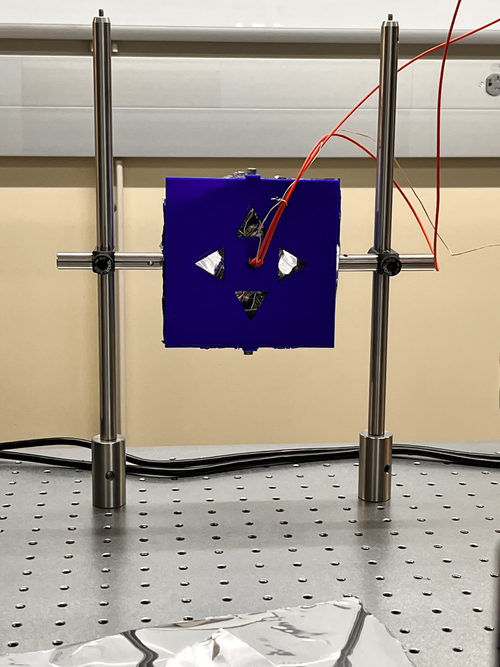
Yesterday, I did a new data collection. I could get a better data in this time and I realized than I need use some angle on the reflector for got a better shot. I need do that because the FLIR camera just is able to get the triangle shape for complete if I keep exactly in same line for center point on the camera but for the data now I need move the refletor to go up and go down. So wasn't working very well if I keep the reflector without angle.
Now I am using the refletor with a angle. In the more high part I turn the mask for look the table and in the lower part I turn the mask to look up. I attached a photo below for this configuration.
Also the processes to get the data was the same than I using last time, the only diference is now I just moved the pillar after get data for high position and lower position for the same reference point on the triangle shape.
Note: In most data it is impossible to keep the same parameter for current, voltage and temperature. Most have a small variation but not a big difference. For example: I got the temperature in the first position 46.8 °C and in the second position I got 47.1 °C, it's just an example. It's just so we know that we don't have the exact same parameters all the time. In my opinion this is not a problem because it is just a small variation.
- 09:35 am: Turned on the device (current on). I wanted for 30 minutes before start get data.
- 10:05 am: Started taking snap on position one (Reference point: -0.10, 0.050). Parameters:0.11A,1.7V,46.8°C
- I took four snap on the same position for compare after on data analyzes. I just wanted one minute break between the snaps. I did the same for every position.
- 10:15 am: Started taking snap on position two (Reference point:-0.10,-0.050 ). Parameters: 0.11A,1.7V,47.1° C
- 10:22 am: Started taking snap on position three (Reference point:0.00 ,0.050). Parameters: 0.11A,1.6V,48.1°C
- 10:26 am: Started taking snap on position four (Reference point: 0.00,-0.050). Parameters:0.11A,1.6V,48 °C
- 10:32 am: Started taking snap on position five (Reference point: 0.05,-0.050). Parameters:0.11A, 1.6V, 48°C
- 10:37 am: Started taking snap on position six (Reference point: 0.05,0.050). Parameters: 0.11A,1.7V,47.6 °C
- We can see in the photos attached below every position also I am working in the analyzes.
|
| Attachment 1: FLIR_data.002.jpeg
|
|
| Attachment 2: FLIR_data_2.002.jpeg
|
|
|
123
|
Tue Jun 13 21:33:46 2023 |
Pamella | Update | General | New cabinet for PPI |
[Pamella and Dr.Richardson]
Dr. Richardson installed the new cabinet outside the room for the PPI equipments, and then I wiped all surfaces inside and outside of the new cabinet.
Dr.Richardson and I have finished organizing the PPI within the new cabinet. Also we have new supplies of gloves, and will likely have more supplies for other PPIs soon. |
|
157
|
Fri Jul 14 16:49:42 2023 |
Pamella | Update | FLIR | New bridge and calibration data |
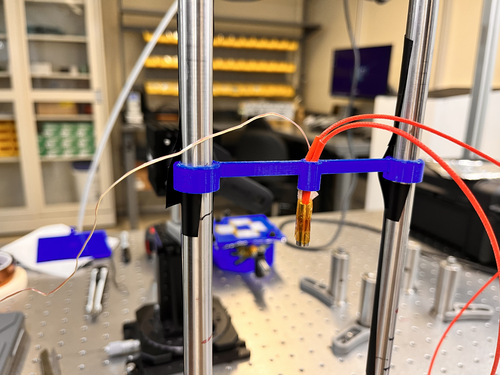
[Pamella]
Aiden 3D printed a new bridge for the heater and I installed the new bridge yesterday.
I started collecting data to plot a calibration with the heater. I'm doing measurements with current and the thermocouple (thermometer) to compare with FLIR measurements and have a good calibration. |
| Attachment 1: IMG_8606.jpeg
|
|
|
367
|
Mon May 13 14:48:27 2024 |
Aiden | Update | VAC | New Vacuum Chamber Design |
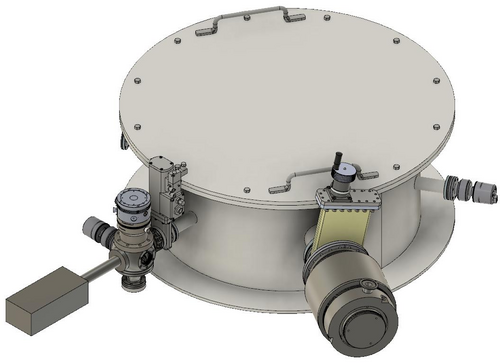
| I created a new model for the vacuum chamber based on the ideas from last week's meeting.
It should be noted that we can not have the zero length reducer and the gate valve on the same arm as they both have blind tapped holes. We need to decide if we want the gate valve or not as if we do, we will need to use the 3 inch long reducer.
Important Measurements:
From the back of the flange to the back of the RGA: 25.25 in
Height from bottom of the blank to the bottom of the chamber: 2.75 in |
| Attachment 1: VaccumChamberAssembly__Redesign_v5.jpg
|
|
|
398
|
Mon Jul 8 17:01:45 2024 |
Shane | Update | CDS | New CyMAC internal layout |
| [Jon, Shane]
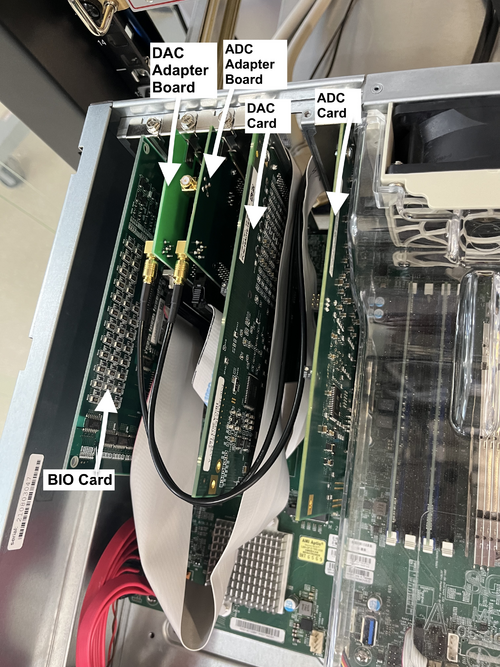
Internal layout of CyMAC has been updated (labeled image attached) to accommodate the replacement of the two ribbon cables. Looking down on the chassis from the front, and going from left to right, the new placement is as follows: BIO card, DAC adapter board, ADC adapter board, DAC card, ADC card. NOTE: As part of ADC-DAC loopback testing, we're disconnecting from the FROSTI readout chassis and using the cables to connect directly from ADC input channels to DAC output channels . Initial testing confirmed functionalility of all 32 ADC input channels and the first 8 DAC output channels. |
| Attachment 1: updated_cymac.jpeg
|
|
|
108
|
Tue May 30 14:51:27 2023 |
Pamella | Update | FLIR | New 3D mask - Bigger triangles shapes. |
[Pamella]
Change the 3D mask
- Started removing the old mask in the reflector.
- Started cutting the new aluminum lid for the new 3D mask and assembling in the 3D mask.
- Started doing the new cable connections for the light.
- Started testing the resistance in the new cable connections. The multimeter show us 14.2 Ω.
- Started attaching the mask with the light and the thermometer sensor.
- Started assembling the 3D mask in the reflector.
- Started the initial tests.
- 2:00 pm: Started testing the new mask. Parameters: 1.4 V 0.1A and 27 C
- 2:38 pm: Started taking snap. Final parameters:1.4 V 0.1A and Temperature: 39.9 C
- Started doing some adjustments in the triangles shapes for the futures tests.
|
| Attachment 1: AcquisitionImage(May-30-2023_14_38).jpg
|
.jpg.png)
|
| Attachment 2: thumbnail_IMG-7303.jpg
|
|
|
643
|
Tue Sep 9 12:13:38 2025 |
Liu | Update | Interferometer Simulations | Multi-ring FROSTI optimization for A# with grid search |
| Multi-ring FROSTI optimization based on IFO metrics for A# with grid search |
| Attachment 1: Update.pdf
|

|
|
616
|
Tue Jul 29 11:27:57 2025 |
Liu | Update | Interferometer Simulations | Multi-ring FROSTI optimization for A# |
|
| Attachment 1: Update.pdf
|

|
| Attachment 2: scene-export-temp.html
|
| Attachment 3: scene-export-deformation.html
|
|
625
|
Tue Aug 12 12:16:21 2025 |
Liu | Update | Interferometer Simulations | Multi-ring FROSTI optimization for A# |
| Multi-ring FROSTI optimization for A# with static polishing |
| Attachment 1: Update.pdf
|

|
|
647
|
Tue Sep 23 12:39:29 2025 |
Liu | Update | Interferometer Simulations | Multi-ring FROSTI optimization for A# |
|
| Attachment 1: Update.pdf
|

|
|
652
|
Thu Oct 9 12:18:14 2025 |
Liu | Update | Interferometer Simulations | Multi-ring FROSTI optimization for A# |
|
| Attachment 1: Update.pdf
|

|
|
654
|
Thu Oct 16 10:31:20 2025 |
Liu | Update | Interferometer Simulations | Multi-ring FROSTI optimization for A# |
| Two-ring FROSTI grid search with 4D parameter space search and visualization |
| Attachment 1: interactive_plot_dropdown.html
|
| Attachment 2: Update.pdf
|

|
|
655
|
Thu Oct 23 10:07:51 2025 |
Liu | Update | Interferometer Simulations | Multi-ring FROSTI optimization for A# |
| 4D parameter space visualization and dimensionality reduction for better optimization |
| Attachment 1: loss_embedding.html
|
| Attachment 2: Update.pdf
|

|
|
658
|
Thu Oct 30 11:45:44 2025 |
Liu | Update | Interferometer Simulations | Multi-ring FROSTI optimization for A# |
| Multi-ring FROSTI optimization for A#: dimensionality reduction with PCA vs. t-SNE |
| Attachment 1: Update.pdf
|

|
|
633
|
Tue Aug 26 12:14:24 2025 |
Liu | Update | Interferometer Simulations | Multi-ring FROSTI design for A# with ring heater optimization |
| Multi-ring FROSTI design for A# with ring heater optimization |
| Attachment 1: Update_(1).pdf
|
.png)
|
|
639
|
Tue Sep 2 12:41:33 2025 |
Liu | Update | Interferometer Simulations | Multi-ring FROSTI design for A# with ring heater optimization |
| [Tyler, Liu]
Ring heater optimization, continued |
| Attachment 1: Update.pdf
|

|
|
172
|
Tue Jul 25 15:35:14 2023 |
Shane | Update | Electronics | More chassis moved |
| Finished basic assembly of binary input and output chassis today, and moved one to top shelf of work bench. The other is in corner of work bench (image attached). They are delicate, so please do not move them or place anything on top of them. |
| Attachment 1: IMG_8409.HEIC
|
|
91
|
Wed May 3 19:03:47 2023 |
Julian,Pamella and Cao | Physics | VAC | Modify vacuum asssembly and install RGA |
[Pamella, Julian, Cao]
Today we started re-configuring the vacuum chamber components.
Particle count
- 10:45 am : Starting the particle count in the clean room.
- 11:13 am : Finished the particle count in the clean room.
- Zone 3 :
- 0.3 u: 2535
- 0.5 u: 1413
- 1.0 u: 789
- Zone 4 :
- 0.3 u: 457
- 0.5 u: 290
- 1.0 u: 207
Starting the reconfiguration.
- 11:21 am: Started removing up-to-air valve
- 11:30 am: Finished removing up-to-air valve.
- 11:33 am: Started removing calibrated Ar Leak and the elbow.
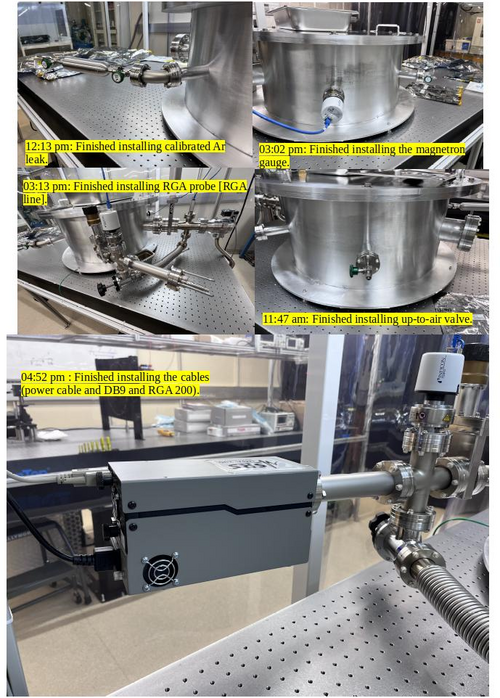
- 11:35 am: Finished removing calibrated Ar Leak and started assembling the up-to-air valve.
- 11:47 am: Finished assembling up-to-air valve.
- 11:48 am: Started removing magnetron gauge.
- 11:55 am: Finished removing magnetron gauge.
- 11:57 am: Started installing the elbow and calibrated Ar Leak and started removing the RGA probe
- 12:13 pm: Finished installing the elbow and calibrated Ar Leak.
- 12:20 pm: Break for lunch.
- 01:25 pm: Come back from lunch break.
- 01:30 pm: Started removing RGA line.
- 01:39 pm: Finished removing RGA line.
- 01:39 pm: Started removing gate valve [RGA line] and finished removing gate valve.
- 02:00 pm: Started installing gate valve in the new position.
- 02:08 pm: Fished installing gate valve [RGA line].
- 02:09 pm: Checked the screws in the elbow to gate valve. [RGA line].
- 02:28 pm: Finished checking the screws in the elbow to gate valve [RGA line].
- 02:29 pm: Started installing RGA line.
- 02:39 pm: Finished installing RGA line.
- 02:50 pm: Started installing magnetron gauge.(In this part we assembled gauge with the used gasket)
- 03:02 pm: Finished installing magnetron gauge.
- 03:04 pm: Started installing RGA probe [RGA line].
- 03:13 pm: Finished installing RGA probe [RGA line].
- 03:15 pm: Connected the cables to the magnetron gauge.
- 03:20 pm: Started the testing in the vacuum chamber.
- 04:30 pm: Started installing the RGA 200 and connected the cables (power cable and DB9 cable).
- 04:52 pm: Finished installing the RGA 200 and connected the cables (power cable and DB9 cable).
- 04:53 pm: Started testing the RGA connections. Logrus is able to recognize and connect to RGA unit. We are leaving the turbo pump on for a few hours before checking back for pressure readouts.
- 05:00 pm : Starting the particle count in the clean room.
- Zone 3 :
- 0.3 u: 2244
- 0.5 u: 997
- 1.0 u: 207
- Zone 4 :
- 0.3 u: 2993
- 0.5 u: 1579
- 1.0 u: 498
- 05:30 pm : Finished the particle count in the clean room.
- 05:34 pm: Test pressure readout from the gauges.
- Channel 1 : 1.06E-5 mbar
- Channel 2 :8.89E-6 mbar
- Channel 3 :5.0E-4 mbar
- 05:59 pm: Test pressure readout from the gauges.
- Channel 1: 9.09E-6 mbar
- Channel 2: 7.75E-6 mbar
- Channel 3: 5.0E-4 mbar
|
| Attachment 1: vaccum_chamber_re-configuration.jpg
|
|
|
111
|
Wed May 31 16:18:41 2023 |
Aiden | Summary | General | Mock FROSTI |
| Finished assembly on the Mock FROSTI so it is ready for the fit test at LIGO lab. |
| Attachment 1: IMG_4394.jpg
|
|
|
397
|
Mon Jul 8 12:26:10 2024 |
Michael | Update | Interferometer Simulations | Minimizing Astigmatic Effects in the SRC of LIGO |
| This is the first look and analysis of the effects of astigmatism in the aLIGO optical layout which can lead to mode mismatch and therefore increased losses into higher order modes. Specifically I am currently looking at measuring the effect of changing the radii of curvature of the SRC mirrors https://docs.google.com/presentation/d/1qhIehqyNukg4g8S2fqfQZz83yr9aB76tEa6fn2J-TrM/edit?usp=sharing |
|
617
|
Tue Jul 29 11:45:19 2025 |
Maple | Update | TCS | Meeting update |
|
| Attachment 1: Maple_TCS_update_jul_29.pdf
|

|
|
339
|
Sat Feb 24 08:53:38 2024 |
Jon | Infrastructure | Computers | Matlab upgraded to 2023b on Chimay |
| I upgraded Matlab on chimay to the latest stable release, 2023b. From some quick tests, it appears to be in working order. Let me know of any issues. |
|
496
|
Thu Jan 2 17:52:58 2025 |
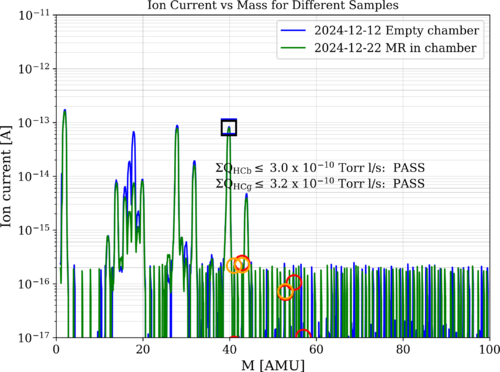
Luis | Update | VAC | MR Testing Continuation |
[Luis, Luke]
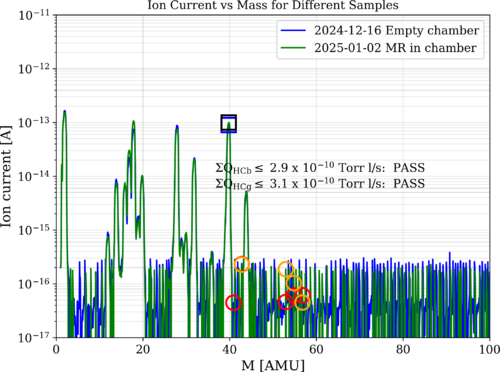
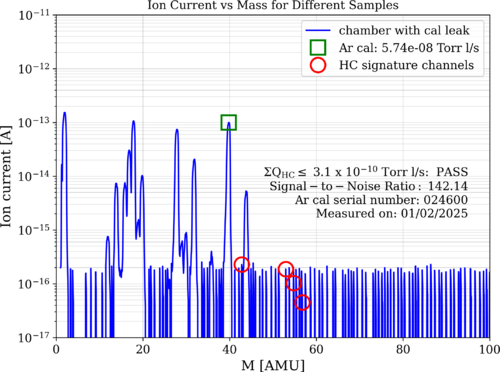
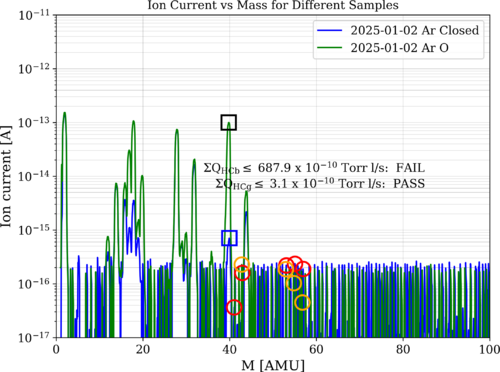
RGA Volume: T = 22°C, P = 2.10e-9 Torr
Main Volume: T = 21°C, P = 5.71e-9 Torr
Measurements of the current state of the vacuum systems were taken today, now that the system had reached UHV status, the results are attached bellow. The first plot overlays the data of the empty chamber taken on 12/16/24 before inserting the MR material, and the data of the system today, with the MR inside. The second plot displays the S/N Ratio of the system. The last plot displays the data of the system with the Ar leak open and closed. Notice that it is common for the Ar leak close data to fail due to the calculation of the gas flux per unit ion current, which is dependent on the Ar peak.
|
| Attachment 1: 2024-12-16_PostBake2_ArO_overlay.png
|
|
| Attachment 2: 2025-1-2_MR-Bake1_ArO.png
|
|
| Attachment 3: 2025-1-2_MR-Bake1_ArC_overlay.png
|
|
|
490
|
Mon Dec 16 21:32:21 2024 |
Luis | Update | VAC | MR Testing |
[Luis, Luke]
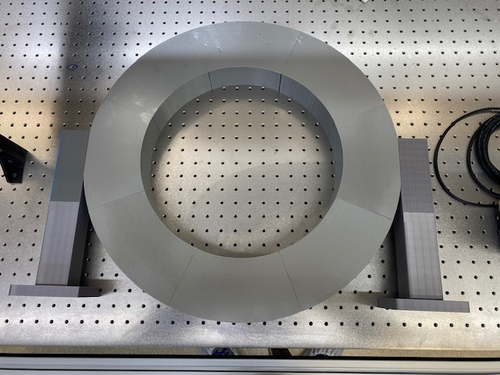
The MR material was placed in the vacuum chamber following standard procedures to ensure the vacuum remained as clean as possible. During this process, we only opened the main
volume while keeping the gate valve between the two volumes closed to maintain the UHV in the RGA section.
An RGA scan was taken before this process, this will be used to compare the state of the vacuum with the sample inside to determine whether the MR material is vacuum compatible. |
| Attachment 1: IMG_6011.HEIC
|
|
494
|
Sun Dec 22 20:43:35 2024 |
Luis | Update | VAC | MR Testing |
[Luis, Luke]
RGA Volume: T = 23°C, P = 3.0e-9 Torr
Main Volume: T = 22°C, P = 9.90e-9 Torr
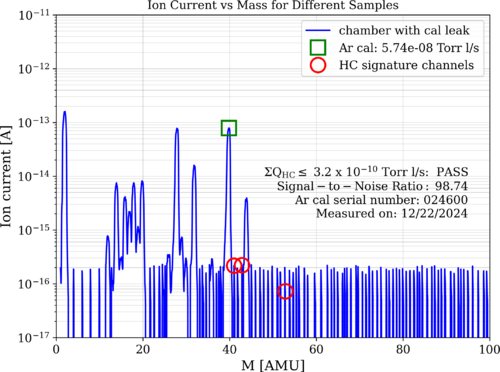
After letting the vacuum cool down for a couple days, we reattached the magnets and sensors, then we performed a RGA scan of the vacuum system, now containing the MR sample. The results are attached below. Something to notice is that we are technically not under UHV, though Luke and I believe the reading of the sensor is not completely accurate since it was still coming to a steady state, further test will be performed when the physics building is open again.
|
| Attachment 1: 2024-12-13_PostBake2_ArO_Degas_overlay.png
|
|
| Attachment 2: 2024-12-22_MR-Bake1_ArO.png
|
|