| ID |
Date |
Author |
Type |
Category |
Subject |
|
534
|
Wed Mar 5 18:13:20 2025 |
Shane | Update | CDS | vac system comms |
|
[Shane, Jon]
Update on the serial interfacing with the Inficon VGC503 pressure gauge: We began setup of the Inficon pressure gauge today. We configured the ethernet setting via USB and assigned it a static IP address of 192.168.1.30, which is listed in the network table on the lab wiki. It is showing up on the network successfully, and is responding to pings. Will attempt communication via code next.
|
|
236
|
Mon Oct 9 16:59:21 2023 |
Shane, Jon | Update | CDS | timing chassis power cable and AI chassis testing for CyMAC |
[Shane, Jon]
Today's CyMAC work:
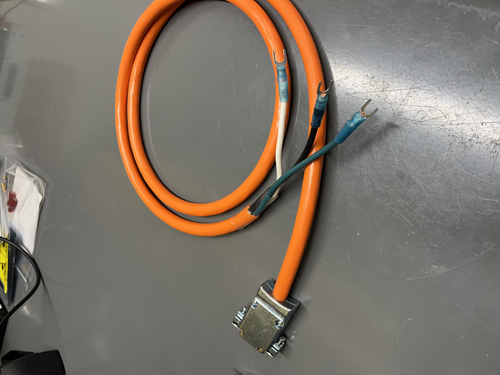
- Finished assembling external power supply cable for the timing chassis (see attached image)
- Also did some debugging of AA and AI chassis re: power issues. After testing voltages at various test points on the power regulator board (TP1-TP6) in the AA chassis, it seems like it's the source of the problem. Used bench DC power supply to test, running 15V, and the correct voltage is coming in to the board but something significantly smaller is being output. We're also getting unexpected negative signs on voltage at certain test points, with leads in correct positions
- Upon further examination, it looks like the lights on the filter boards are actually turning on (in both the AA and AI chassis), though it's only 2/4 lights on each board and they are very faint
- Corrected DC on/off switch spade lug orientation in AI chassis.
- Tested AI chassis power regulator board to see if the problem was the same, and found again that voltage coming in was correct, and voltage going out was not.
- In case of interest in exact numbers, results were as follows:
- Voltage difference between TP1(+Vin) and TP6(-Vin) is ~30V
- Voltage difference between grounded chassis wall and TP1 (+Vin) is ~15V
- Voltage difference between grounded chassis wall and TP6(-Vin) is ~-15 V
- voltage difference between TP2(+Vout) and TP5(-Vout) is ~3V
- Voltage difference between TP3 (gnd) and TP2(+Vout) is -0.065V
- Voltage difference between TP5(-Vout) and ground is ~3V
|
| Attachment 1: IMG_1457.jpeg
|
|
|
361
|
Mon Apr 15 15:25:10 2024 |
Cynthia | Update | Interferometer Simulations | progress on simulation so far |
|
| Attachment 1: LIGO_update_week3_(2).pdf
|
.png)
|
|
621
|
Tue Aug 5 11:25:17 2025 |
Mary | Update | | point absorber and coated aperture in A# |
Simulating how point absorber defects on Advanced LIGO mirrors affect cavity performance by modeling a 4km LIGO-like arm cavity with a point absorber fixed at 5cm off-center on the ITM. In this simulation, displaced the laser beam across a 21×21 grid while calculating the deformation, then measuring the resulting power loss in the cavity (~283W circulating power). |
| Attachment 1: point_absorber_A#.pdf
|

|
|
630
|
Tue Aug 12 13:49:24 2025 |
Mary | Update | | point absorber and coated aperture in A# |
|
| Attachment 1: Aug12.pdf
|

|
|
408
|
Mon Jul 15 15:44:52 2024 |
Cynthia | Update | Interferometer Simulations | performed cavity scans with thermal effects and ring heater |
|
| Attachment 1: cavity_scan_07_15.pdf
|

|
|
359
|
Mon Apr 8 14:57:41 2024 |
Cynthia, Pooyan | Update | Interferometer Simulations | performed cavity scans for O4 O5, and coupled cavity |
|
| Attachment 1: LIGO_update_week1.pdf
|

|
|
312
|
Wed Jan 31 14:37:26 2024 |
Shane | Summary | CDS | path directions for CyMAC model and parts library |
| Path to cds parts library in Matlab simulink: /usr/share/advligorts/src/src/epics/simLink. File name CDS_PARTS.mdl
Path to user models: /opt/rtcds/usercode/models, using file name c1msc.mdl |
|
262
|
Fri Nov 10 14:16:04 2023 |
shane | Update | Cleanroom | new cleanroom zone diagram |
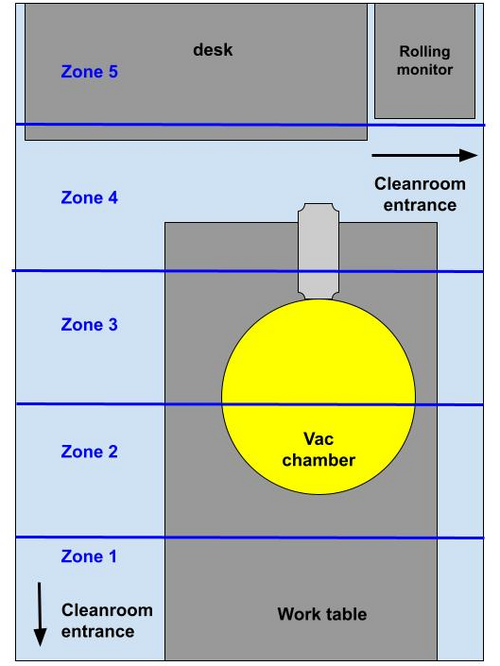
| since the vac system has been moved and made permanent, here's a new diagram of the cleanroom zones. The zones themselves haven't moved, but the diagram has been updated to reflect the new set up of the cleanroom. |
| Attachment 1: cleanroom_zones_nov2023.jpg
|
|
|
526
|
Tue Feb 25 10:56:25 2025 |
Cynthia | Update | Interferometer Simulations | mirror coating added for simulation rerun |
| I have tried to rerun the simulation on finesse after adding the mirror coating. The result has a large fluctuation in required input power vs arm power that is concerning. I am currently working on potentially resolve this issue and get a reasonable graph before I proceed to optimizing the thermal maps. |
| Attachment 1: updats_(3).pdf
|
.png)
|
|
193
|
Mon Aug 7 13:58:46 2023 |
shane | Update | CDS | internal power supply cables done for AI chassis |
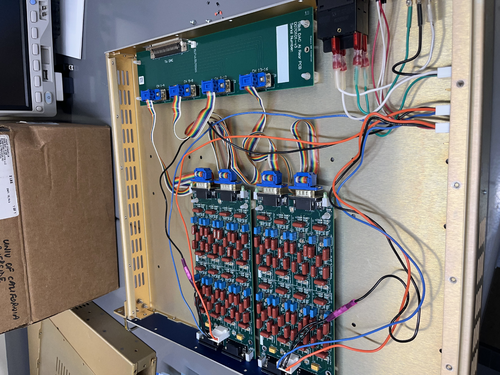
| Finished assembling and installing the aLigo chassis internal power supply cables in the anti-imaging chassis today. Tested for continuity and everything looked good. Chassis lid still secured with two temporary screws because I'm not sure what the correct size is. |
| Attachment 1: IMG_8674.jpeg
|
|
|
178
|
Fri Jul 28 13:39:39 2023 |
shane | Update | Cleanroom | full 5 zone cleanroom particle count |
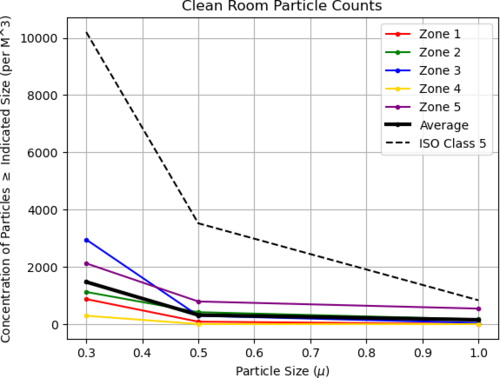
| Here's the 5 zone cleanroom measurement from today. |
| Attachment 1: download.png
|
|
|
365
|
Tue May 7 20:34:31 2024 |
shane | Update | CDS | frosti MEDM screen update |
| [Luis, Shane]
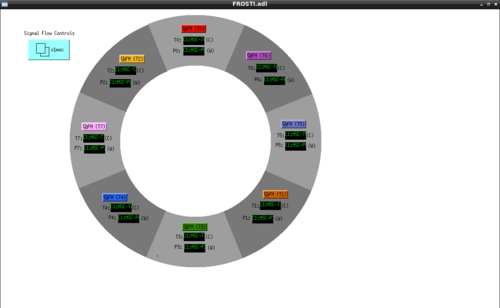
Here is the updated MEDM screen, with new orientation and updated labeling to reflect the actual positions of the heater elements. Note that indices start at T0 to be consistent with simulink model, though in the previous elog for the FROSTI layout the heater elements are labeled 1-8.
Also, we finally learned how to take a screenshot on debian. |
| Attachment 1: FROSTIMEDMMay7.2024.png
|
|
|
540
|
Tue Mar 11 11:28:52 2025 |
Cynthia | Update | Interferometer Simulations | flattening mirror to study power discrepency |
|
| Attachment 1: updates_3_11_(1).pdf
|
.png)
|
|
210
|
Wed Aug 16 16:55:40 2023 |
Shane, Jon | Update | CDS | external power supply cables finished |
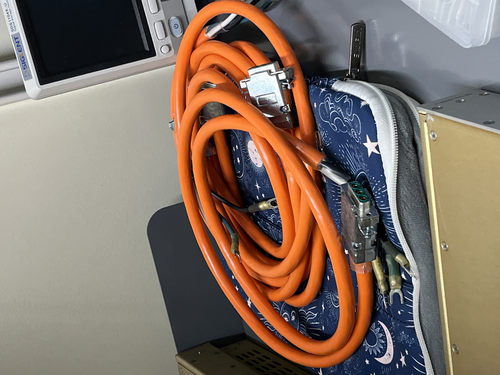
| All four external power supply cables for the CyMAC chassis are now assembled. Using them now to test if chassis power up correctly. |
| Attachment 1: IMG_9251.jpeg
|
|
|
428
|
Mon Aug 26 14:42:04 2024 |
Cynthia | Update | Interferometer Simulations | current status on cavity scan with effects of FROSTI |
| I used the code and arm cavity model used for previous O5 study on mirrors and HOM (the pdf of the study and the result can be found at https://dcc.ligo.org/LIGO-G2100878), but it seems like the result I obtained is different from the study result. Since my cavity scans codes have a large portion of it relying on this code, I will have to go over the study result and the code to make sure there is no issue with that code itself first. There are also some other updates or issued encountered when I tried to plot the mirror maps with effects of FROSTI. |
| Attachment 1: LIGO_updates_8_26.pdf
|

|
|
446
|
Mon Sep 23 15:00:41 2024 |
Cynthia | Update | Interferometer Simulations | corrections on assumption for O5 coating |
| The document recording ETM07 and ETM08 coating (T2300093) was discussed:
the current plume files are not necessarily correct in a way that LIGO lab have tried to add it on uncoated ETM such as ETM07 and it does not match what the coated ETM07 would look like.
the plume should be added on top of the uncoated ETM instead of assuming an ideal ETM. According to Garilynn, the imperfection on uncoated ETM matters.
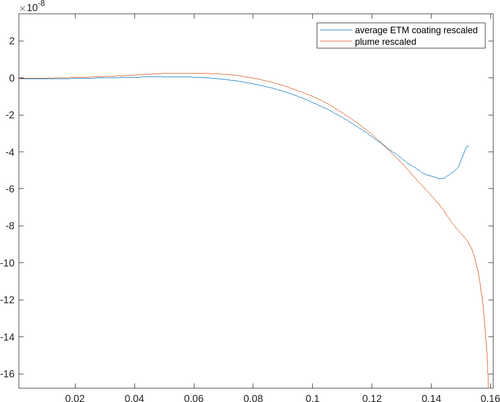
So far the possible ETM data used for O5, ETM 11,14,19, and 20 are all uncoated, and different ways could be used to predict the plume, including the plume data on LIGO dcc or subtract the uncoated data from the coated for O4 ETM and use that as another guessed plume. |
| Attachment 1: Uncoated_S1_ETM07-v2.pdf
|

|
|
79
|
Wed Apr 26 18:05:41 2023 |
Pamella, Julian, Shane | Update | Cleanroom | cleanroom particle counts and cleaning log |
- pre-cleaning particle counts:
- zone 3
- 0.3 mu: 2494
- 0.5 mu: 748
- 1.0 mu 124
- zone 4
- 0.3 mu: 374
- 0.5 mu: 41
- 1.0 mu: 0
- 3:45 pm: Started wiping the surfaces(laser table,chamber, computer) inside the cleaning room.
- 4:05 pm: Finished wiped the surfaces
- 4:08 pm: Began vacuuming cleanroom floor
- 4:28 pm: Finished vacuuming cleanroom floor.
- 4:29 pm: Began mopping the cleanroom floor.
- 5:15 pm: Finished cleanroom clean.
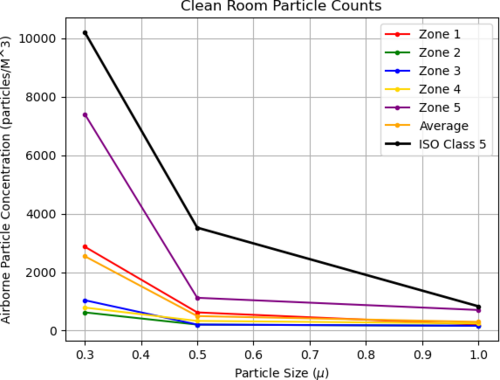
- 6:00 pm: post-cleaning particle counts (full 5 zone measurement) attached below
|
| Attachment 1: counts4_26_23.png
|
|
|
110
|
Wed May 31 12:16:28 2023 |
Shane | Update | Cleanroom | cleanroom particle counts (full 5 zone measurement) |
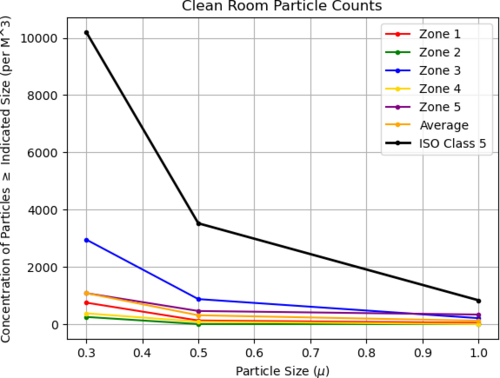
| Attached is the full 5 zone particle measurement for the cleanroom after this week's cleaning, 5/31/23. |
| Attachment 1: 23.png
|
|
|
318
|
Wed Feb 7 12:43:22 2024 |
shane | Update | Cleanroom | cleanroom particle counts (full 5 zone measurement) |
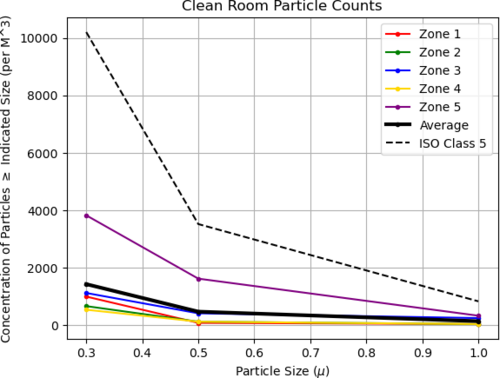
| Here's today's full 5 zone measurement of the cleanroom. Everything is back under the requirement. |
| Attachment 1: 24.png
|
|
|
177
|
Fri Jul 28 13:07:39 2023 |
Shane, Aiden | Update | Cleanroom | cleanroom cleaning and particle count |
|
[Aiden, Shane]
cleaning cleanroom and particle count
- 11:08 am: started particle count
- zone 3:
- 0.3 u: 4198
- 0.5 u: 1080
- 1.0 u: 581
- zone 4:
- 0.3 u: 1247
- 0.5 u: 623
- 1.0 u: 415
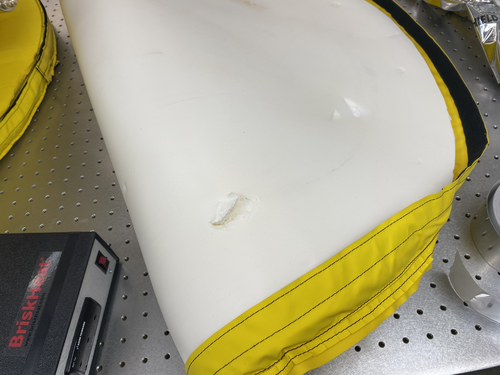
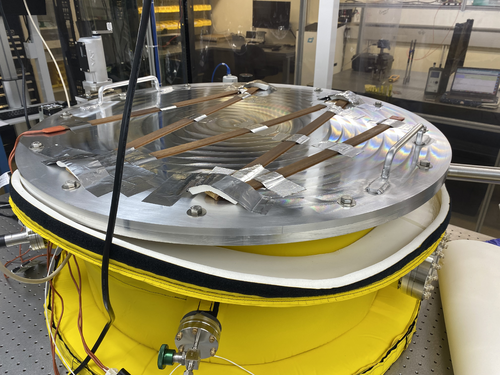
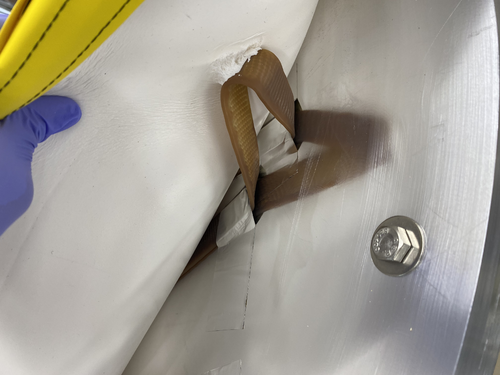
- 11:24 am: break for removal of vac chamber insulation (pictures attached), with counts before removal as seen above, and counts after removal/replacement for zone 3 as follows:
- zone 3:
- 0.3 u: 2993
- 0.5 u: 415
- 1.0 u: 207
- 12:02 pm: began surface check and wipedown
- 12:13 pm: started vacuuming the floor
- 12:25 pm: finished vacuuming the floor
- 12:26 pm: started mopping the floor
- 12:32 pm: finished mopping the floor
- 12:32 pm: started cleaning the buckets
- 12:37 pm: started mopping with IPA wipes
- 12:43 pm: finished mopping with IPA wipes
- 12:45 pm: changed sticky floor mats
- 12:47 pm: started particle count
- zone 3:
- 0.3 u: 2951
- 0.5 u: 290
- 1.0 u: 41
- zone 4:
- 0.3 u: 290
- 0.5 u: 0
- 1.0 u: 0
|
| Attachment 1: image_50412289.JPG
|
|
| Attachment 2: image_50432769.JPG
|
|
| Attachment 3: image_67126017.JPG
|
|
| Attachment 4: image_67163137.JPG
|
|
| Attachment 5: image_67168001.JPG
|
|
| Attachment 6: IMG_8427.jpeg
|
|
|
259
|
Thu Nov 9 13:57:58 2023 |
Shane, Luis, Aiden, Tyler | Update | Cleanroom | cleanroom cleaning and particle count |
|
[Aiden, Shane, Luis, Tyler]
cleaning cleanroom and particle count
- 12:30 pm: Tyler and Aiden started organizing cables in cleanroom
- 12:35 pm: started particle count in flow bench
- 0.3 u: 11681
- 0.5 u: 3284
- 1.0 u: 1039
- 12:50 pm: started cleanroom particle count
- zone 3:
- 0.3 u: 14549
- 0.5 u: 10351
- 1.0 u: 6194
- zone 4:
- 0.3 u: 10808
- 0.5 u: 4655
- 1.0 u: 1953
- 1:07 pm: began surface check and wipedown, including softwalls
- 1:19 pm: started vacuuming the floor
- 1:28 pm: finished vacuuming the floor
- 1:29 pm: started mopping the floor
- 1:33 pm: finished mopping the floor
- 1:34 pm: started cleaning the buckets
- 1:37 pm: started mopping with IPA wipes
- 1:39 pm: finished mopping with IPA wipes
- 1:40 pm: changed sticky floor mats
- 1:41 pm: started particle count
- zone 3:
- 0.3 u: 8397
- 0.5 u: 5071
- 1.0 u: 2618
- zone 4:
- 0.3 u: 6651
- 0.5 u: 4323
- 1.0 u: 2120
|
|
287
|
Thu Dec 7 14:13:15 2023 |
Shane | Update | Cleanroom | cleanroom cleaning and particle count |
|
[Aiden, Shane, Michael, Luke, Cynthia]
cleaning cleanroom and particle count
- 12:30 pm: ran zero count test on particle counter
- 12:32 pm: started particle count.
- zone 3:
- 0.3 u: 59,488
- 0.5 u: 9561
- 1.0 u: 706
- zone 4:
- 0.3 u: 7732
- 0.5 u: 1912
- 1.0 u: 290
NOTE: Frame ceiling tile collapsed in cleanroom, explaining insanely high 0.3 u particle count in zone 3 (nearly 6 times above limit). Wiped down tile and put it back in ceiling frame.
- 12:56 pm: began surface check and wipedown, including softwalls
- 1:16 pm: started vacuuming the floor
- 1:32 pm: finished vacuuming the floor
- 1:33 pm: started mopping the floor
- 1:47 pm: finished mopping the floor
- 1:48 pm: started cleaning the buckets
- 1:53 pm: started mopping with IPA wipes
- 2:05 pm: finished mopping with IPA wipes
- 2:06 pm: changed sticky floor mats
- 1:53 pm: started particle count
- zone 3:
- 0.3 u: 6401
- 0.5 u: 3450
- 1.0 u: 1787
- zone 4:
- 0.3 u: 4073
- 0.5 u: 2452
- 1.0 u: 1039
|
|
302
|
Wed Jan 10 15:27:18 2024 |
Shane | Update | Cleanroom | cleanroom cleaning and particle count |
|
[Aiden, Shane]
cleaning cleanroom and particle count
- 2:03 pm: changed sticky floor mats
- 2:05 pm: started particle count
- zone 3:
- 0.3 u: 4863
- 0.5 u: 1205
- 1.0 u: 872
- zone 4:
- 0.3 u: 1953
- 0.5 u: 789
- 1.0 u: 457
- 2:35 pm: began surface check and wipedown, including softwalls and ceiling tiles
- 2:45 pm: started vacuuming the floor
- 2:56 pm: finished vacuuming the floor
- 2:57 pm: started mopping the floor
- 3:01 pm: finished mopping the floor
- 3:02 pm: started cleaning the buckets
- 3:05 pm: started mopping with IPA wipes
- 3:08 pm: finished mopping with IPA wipes
- 3:09 pm: started particle count
- zone 3:
- 0.3 u: 5528
- 0.5 u: 2203
- 1.0 u: 1662
- zone 4:
- 0.3 u: 1080
- 0.5 u: 415
- 1.0 u: 332
|
|
315
|
Fri Feb 2 19:18:24 2024 |
shane | Update | Cleanroom | cleanroom cleaning and particle count |
|
[Aiden, Shane, Luis, Luke]
cleaning cleanroom and particle count
|
|
333
|
Wed Feb 21 11:58:30 2024 |
Shane | Update | Cleanroom | cleanroom cleaning and particle count |
|
[Luke, Shane, Tyler]
cleaning cleanroom and particle count
- 11:50 am: ran zero count test on particle counter
- 11:55 am: started particle count
- zone 3:
- 0.3 u: 1787
- 0.5 u: 581
- 1.0 u: 166
- zone 4:
- 0.3 u: 623
- 0.5 u: 290
- 1.0 u: 124
- 12:17 pm: began surface check and wipedown, including softwalls
- 12:25 pm: started vacuuming the floor
- 12:36 pm: finished vacuuming the floor
- 12:44 pm: started mopping the floor
- 12:57 pm: finished mopping the floor
- 12:58 pm: started cleaning the buckets
- 12:59 pm: started mopping with IPA wipes
- 1:05 pm: finished mopping with IPA wipes
- 1:06 pm: changed sticky floor mats
- 1:08 pm: started particle count
- zone 3:
- 0.3 u: 1621
- 0.5 u: 581
- 1.0 u: 332
- zone 4:
- 0.3 u: 1080
- 0.5 u: 457
- 1.0 u: 249
|
|
383
|
Tue Jun 25 12:34:18 2024 |
Shane | Update | Cleanroom | cleanroom cleaning and particle count |
|
[Luke, Shane, Xuejun, Mohak, Michael, Tyler, Cynthia]
cleaning cleanroom and particle count
- 10:45 am: ran zero count test on particle counter
- 11:02 am: started particle count
- zone 3:
- 0.3 u: 3284
- 0.5 u: 1247
- 1.0 u:332
- zone 4:
- 0.3 u: 1829
- 0.5 u: 581
- 1.0 u: 207
- 11:15 am: began hepavac of rest of lab
- 11:19 am: began surface check and wipedown, including softwalls
- 11:32 am: finished hepavac of rest of lab
- 11:35 am: started vacuuming the cleanroom floor
- 11:45 am: finished vacuuming the floor
- 11:47 am: started mopping the floor
- 11:55 am: finished mopping the floor
- 11:56 am: started cleaning the buckets
- 11:57 am: started mopping with IPA wipes
- 12:02 pm: finished mopping with IPA wipes
- 12:03 pm: changed sticky floor mats
- 12:04 pm: started particle count
- zone 3:
- 0.3 u: 3117
- 0.5 u: 374
- 1.0 u: 124
- zone 4:
- 0.3 u: 4531
- 0.5 u: 540
- 1.0 u: 0
|
|
133
|
Tue Jun 27 12:09:37 2023 |
Shane | Update | Cleanroom | cleanroom 5 zone particle count measurement |
| Attached is 5 zone measurement for cleanroom particulate count. Zone 3 (in front of vacuum chamber) higher than usual, likely due to recent vac work. Slightly above ISO class 5 standard in 1.0 micron range, measuring 997 particles/cubic meter while ISO standard is 832 particles/cubic meter in this range.
Zero count test on particle counter performed prior to today's measurement. |
| Attachment 1: 23.png
|

|
|
309
|
Thu Jan 18 18:06:49 2024 |
shane | Update | Cleanroom | cleanroom 5 zone particle count measurement |
| Here's today's full five zone measurement of the cleanroom |
| Attachment 1: 24.png
|

|
|
388
|
Thu Jun 27 13:42:02 2024 |
Shane | Update | Cleanroom | cleanroom 5 zone particle count measurement |
| Here's today's 5 zone measurement of the cleanroom. We're above the limit by a bit in zone three (all three size ranges), likely as a result of the recent work installing FROSTI, so it could probably use another focused cleaning. Everything else is below the limit. |
| Attachment 1: 24.png
|

|
|
147
|
Thu Jul 6 13:34:48 2023 |
Pamella, Shane, Julian, Aiden | Update | Cleanroom | cleaning and particle count |
|
[Pamella, Julian, Aiden, and Shane]
|
|
166
|
Wed Jul 19 14:39:19 2023 |
Pamella, Shane, Aiden | Update | Cleanroom | cleaning and particle count |
|
[Pamella, Shane, Aiden]
cleaning cleanroom and particle count
- 1:10 pm: started particle count
- 1:30 pm: began surface check and wipedown
- 1:41 pm: started vacuuming the floor
- 1:55 pm: finished vacuuming the floor
- 1:57 pm: started mopping the floor
- 2:01 pm: finished mopping the floor
- 2:02 pm: started cleaning the buckets
- 2:08 pm: started mopping with IPA wipes
- 2:17 pm: finished mopping with IPA wipes
- 2:18 pm: changed sticky floor mats
- 2:19 pm: started particle count
|
|
228
|
Fri Sep 29 11:22:33 2023 |
Shane, Aiden | Update | Cleanroom | cleaning and particle count |
|
[Aiden, Shane]
cleaning cleanroom and particle count
- 10:06 am: ran zero count test on particle counter
- 10:07 am: started particle count
- zone 3:
- 0.3 u: 2203
- 0.5 u: 831
- 1.0 u: 540
- zone 4:
- 0.3 u: 374
- 0.5 u: 124
- 1.0 u: 124
- 10:25 am: began surface check and wipedown
- 10:34 am: started vacuuming the floor
- 10:44 am: finished vacuuming the floor
- 10:45 am: started mopping the floor
- 10:49 am: finished mopping the floor
- 10:50 am: started cleaning the buckets
- 10:57 am: started mopping with IPA wipes
- 11:01 am: finished mopping with IPA wipes
- 11:02 am: changed sticky floor mats
- 11:03 am: started particle count
- zone 3:
- 0.3 u: 2535
- 0.5 u: 374
- 1.0 u: 166
- zone 4:
- 0.3 u: 581
- 0.5 u: 41
- 1.0 u: 0
|
|
28
|
Sat Feb 11 17:09:29 2023 |
Shane | Update | General | clean room particle counts 2/10/23 |
| Took a round of clean room counts after the latest clean of vacuum chamber on Feb 10. Used 60 second sample time, 5 samples for each of the 5 zones. Plots attached for both occupied clean room (one person inside, attachment 1) and unoccupied clean room (empty attachment 2), as well as the raw data from the particle counter (attachment 3). |
| Attachment 1: occupied2.10.23.pdf
|

|
| Attachment 2: unoccupied2.10.23.pdf
|

|
| Attachment 3: particlecounts2.10.23.PDF
|

|
|
19
|
Fri Feb 3 13:04:04 2023 |
shane | Summary | General | clean room particle counts 1/25/23 |
| Clean room count graphs for each zone (as of January 25, 2023) attached |
| Attachment 1: cleanroomcountsJan25.pdf
|

|
|
426
|
Mon Aug 19 07:11:55 2024 |
Cynthia | Update | Interferometer Simulations | cavity scans with FROSTI effects |
|
| Attachment 1: LIGO_update_8_19.pdf
|

|
|
343
|
Tue Feb 27 09:06:29 2024 |
Cynthia | Update | Interferometer Simulations | cavity scan with higher order input laser |
| I performed a few cavity scan with the inputing laser with a different mode (not pure 00). For each laser I included a graph for just plotting the order with highest power (for example 1st order laser input the first plot only scanned for 1st order in that cavity), and I have also included a graph scanning for order 1-10. |
| Attachment 1: ligoPre_2_27.pdf
|

|
|
454
|
Wed Oct 2 13:38:00 2024 |
Cynthia | Update | Interferometer Simulations | cavity scan with averaged O4 ETM coating as plume |
|
| Attachment 1: O5plumevsCoating.png
|
|
| Attachment 2: O5CoatAvgpt5.png
|
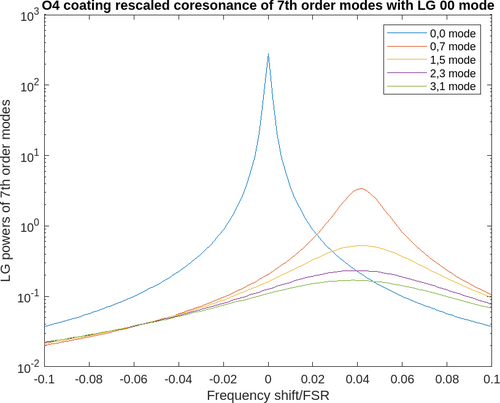
|
| Attachment 3: O5AVgcoatingFROSTIpt5.PNG
|
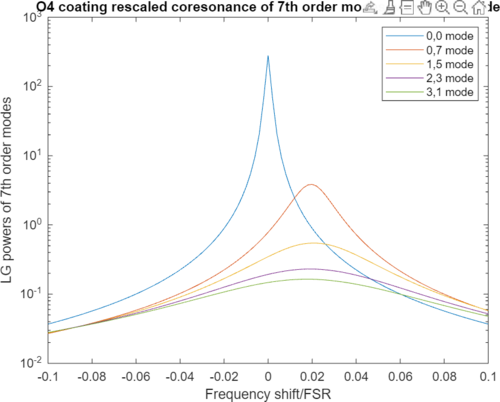
|
|
363
|
Mon Apr 22 15:06:33 2024 |
Cynthia | Update | Interferometer Simulations | cavity scan update |
| [Cynthia,Pooyan]
Completed some simulations injecting 0-10th order modes. Some graphs will be used for the poster after some further titles, axis, and range adjustments. |
| Attachment 1: LIGO_4_22.pdf
|

|
|
530
|
Tue Mar 4 10:18:43 2025 |
Cynthia | Update | Interferometer Simulations | attempted to remove curvature and tilt for the coating |
|
| Attachment 1: 3_4_updates.pdf
|

|
|
406
|
Mon Jul 15 14:28:32 2024 |
Pooyan | Update | Interferometer Simulations | aLIGO test mass surface profiles |
Created a Google Slides presentation to summarize all the mirror surface map information that we use for simulating interferometers.
A+ expected maps are based on correspondence with G. Billingsley. The estimate for the A+ ITMs will be to take the “as polished” data and add coating non-uniformity to it. (T2000398) Neither of these are scaled for the precise thickness of the Ti:Ge coatings.
Google Slides link: https://docs.google.com/presentation/d/1ge-ciAiEdNyyTvSShYdZz2JpACFRY2W3JDpxHRqMnOQ/edit?usp=sharing
|
|
409
|
Mon Jul 15 15:52:40 2024 |
Michael | Update | Interferometer Simulations | aLIGO locking with varying SRC mirrors and measuring mode mismatch |
|
| Attachment 1: SRC_Astigmatism_Analysis_7_15_24.pdf
|

|
|
443
|
Mon Sep 16 15:18:59 2024 |
Cynthia | Update | Interferometer Simulations | a breakdown of FROSTI and thermal effects and the resulting cavity scan |
|
| Attachment 1: ligo_update_9_16_(1).pdf
|
.png)
|
|
411
|
Mon Jul 22 18:19:34 2024 |
Luke | Update | VAC | Zero length reducer stuck bolts |
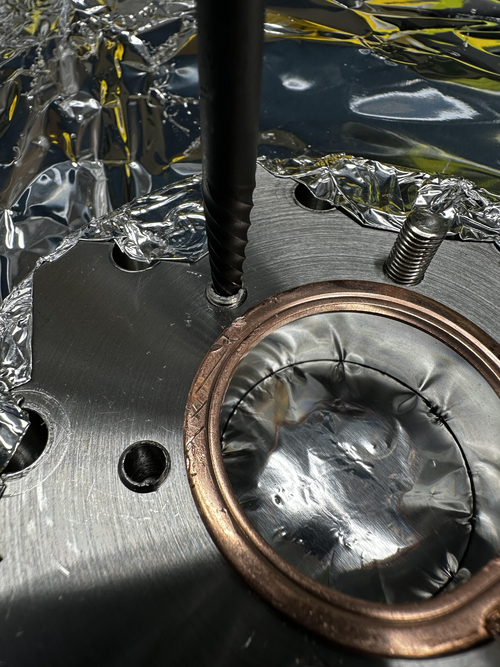
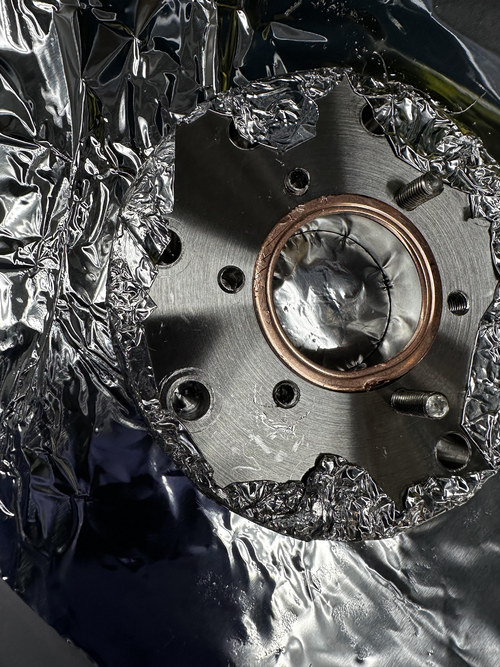
Today, I borrowed a bolt extractor drill bit from the machine shop to remove some stuck bolts from the zlr. Before starting, I laid down a sheet of aluminum foil on the work table and wiped down all the tools I was going to use. I began by drilling a small pilot hole and then enlarged it with a 5/32 drill bit. However, when I attempted to use the bolt extractor, it didn't grip the bolt effectively. Our bolts were too seized, causing the extractor bit to repeatedly slip instead of gaining traction. |
| Attachment 1: image_2024-07-22_181607501.png
|
|
| Attachment 2: image_2024-07-22_181632965.png
|
|
|
Draft
|
Wed Oct 23 12:33:54 2024 |
Luke | Update | | Zernike calculation update |
PowerPoint slides new
PowerPoint slides older |
|
40
|
Wed Mar 1 21:50:46 2023 |
Jon | Infrastructure | Computers | Workstation 2 (ws2) mounted on cleanroom cart |
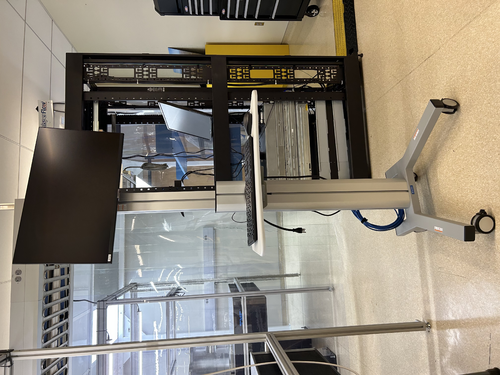
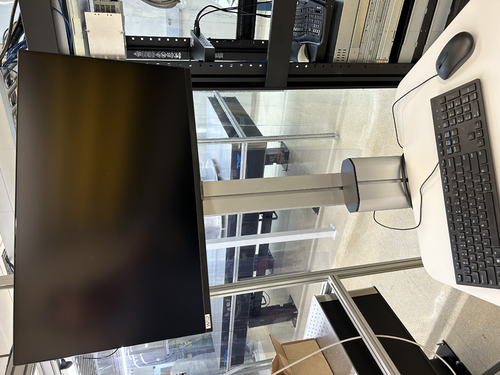
The Linux workstation (ws2) that used to sit on the blue workbench (now inside the cleanroom) has been mounted on a mobile cart, as pictured below. This is intended to be a clean cart that will be housed inside the cleanroom.
The cart is currently dirty and will need to be throughly wiped down (along with the computer monitor and peripherals) prior to being moved into the cleanroom. Once the cleaned cart has been moved inside, it should never be brought back outside the cleanroom and should never be touched with ungloved hands.
I also upgraded the OS to Debian 11.6 and upgraded the CDS workstation tools. |
| Attachment 1: ws2_cart-1.jpeg
|
|
| Attachment 2: ws2_cart-2.jpeg
|
|
|
56
|
Fri Mar 24 07:14:38 2023 |
Jon | Infrastructure | Computers | Workstation 2 (ws2) mounted on cleanroom cart |
| The ws2 cart has been thoroughly wiped down with IPA wipes and moved inside the cleanroom. I have reconnected it to power and Ethernet (cables bundled and ran to the server rack just outside the cleanroom). It is ready for use.
| Quote: |
The Linux workstation (ws2) that used to sit on the blue workbench (now inside the cleanroom) has been mounted on a mobile cart, as pictured below. This is intended to be a clean cart that will be housed inside the cleanroom.
The cart is currently dirty and will need to be throughly wiped down (along with the computer monitor and peripherals) prior to being moved into the cleanroom. Once the cleaned cart has been moved inside, it should never be brought back outside the cleanroom and should never be touched with ungloved hands.
I also upgraded the OS to Debian 11.6 and upgraded the CDS workstation tools. |
|
|
24
|
Tue Feb 7 17:44:17 2023 |
Jon | Infrastructure | Computers | Workstation 1 (ws1) set up |
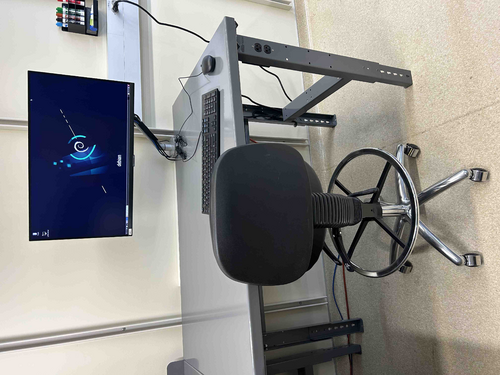
| The Linux workstation (ws1) that used to sit on the old workbench has been mounted on the new electronics bench and is now ready for use again. I upgraded the OS to Debian 11.6 and also upgraded the CDS workstation tools. |
| Attachment 1: ws1.jpg
|
|
|
281
|
Thu Nov 30 13:50:32 2023 |
Tyler | Update | Lore | Workbench Assembly Completed |
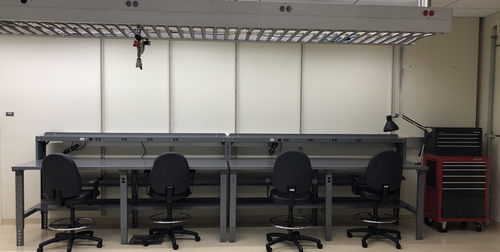
| [Tyler, Luke, Aiden]
The workbenches are now completely assembled and put into their final places. Additionally, the tool chest has been moved.
|
| Attachment 1: IMG_7686.jpg
|
|
|
120
|
Tue Jun 13 10:28:50 2023 |
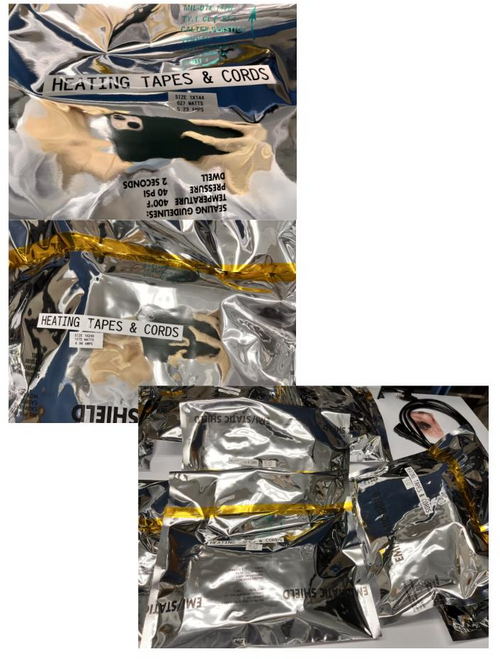
Pamella | Update | General | Wiped and bagged the heating and cords. |
[Pamella]
- Cleaning the heater system parts.
- 09:13 am: Started wiping the last parts for the heater system (heating and cords).
- 10:18 am: Finished wiping the parts to the heater system (heating and cords). I wiped, tagged and bagged the heating and cords.
- Note: In some parts looks like the silicone insulation material is having some sort of residue on the wipe so I wiped very careful this part and just for a few minutes.
- 10:23 am: I putted all bags inside the cleanroom.
I attached the photos below. |
| Attachment 1: heater_cords_wiped.jpg
|
|