| ID |
Date |
Author |
Type |
Category |
Subject |
|
88
|
Mon May 1 18:56:57 2023 |
Peter | Update | VLC Electronics | 532nm Intensity Measurement |
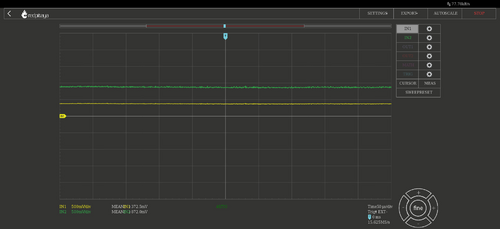
| I've configured the two PDA's to the Red Pitaya. I put a 50 ohm resistor connector to each red pitaya input port. This was because the oscilloscope showed that the voltage reading from the P polarization PDA was almost at 1V, which was the limit of the red pitaya. Once both S and P polarization PDA's were connected, I opened the red pitaya's oscilloscope. A screenshot of the voltage readings is shared below. Channel 1 (Yellow) is for S polarization. Channel 2 (Green) is for P polarization. It would seem that there is a significant amount of polarization in the P direction as opposed to the S direction.
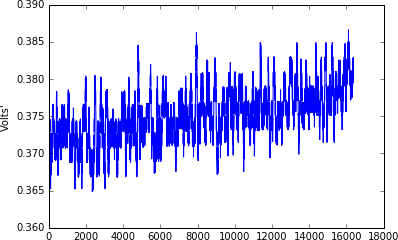
I then tried running the template time series measurement within the python notebook from channel 1 only. The python notebook graph is shown below. I have not figured out what are the units of time on the x axis, and I have not figured out how to change the amount of time that the red pitaya takes data. A plot of the time series measurement is shown below. |
| Attachment 1: graphs.jpg
|
|
| Attachment 2: Time_Series_Trial_1.png
|
|
|
89
|
Tue May 2 15:55:33 2023 |
Peter | Update | VLC Electronics | 532nm Intensity Measurement |
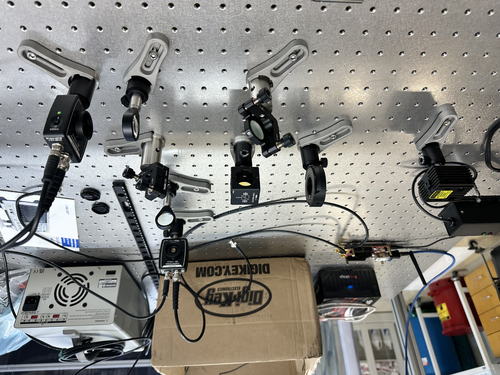
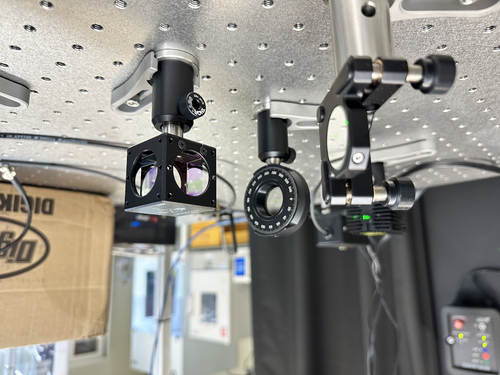
| I changed the 1/2 wave plate from the lens mount to the rotational optic mount. This allowed me to rotate the 1/2 wave plate, which changed the respective polarization power transmitting through S and P polarization. Initially, more power was coupled into the P polarization. Now, with the 1/2 plate rotated, both channels are experiencing the same voltage reading. Before feeding the PDA signals into the red pitaya, a 50 ohm terminator had to be placed at the SMA connection port so that the input power into the red pitaya did not exceed 1V. With this configuration, both channels experience about 0.35mV. (See attached)
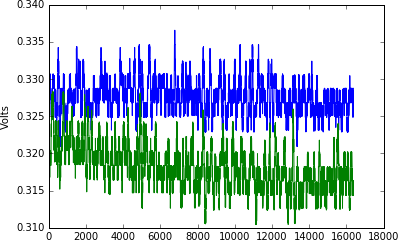
I then opened the Jupyter notebook, and ran a demo time series measurement from the red pitaya. This time, I was able to get a plot featuring both channels (green is P polarization. Blue is S polarization). The plots are consistent with what is shown in the red pitaya oscilloscope. However, the time collection (I'm assuming) only runs for about 0.018s. I will have to write some of my own code to loop over this measurement, and collect more data. |
| Attachment 1: IMG-0221.jpg
|
|
| Attachment 2: IMG-0222.jpg
|
|
| Attachment 3: graphs(1).jpg
|
.jpg.png)
|
| Attachment 4: Time_Series_Trial_2.png
|
|
|
92
|
Thu May 4 14:01:10 2023 |
Peter | Update | VLC Electronics | 532nm Intensity Measurement |
| I adjusted the rotational mount of the wave plate to see if the power can be 100% coupled into either S or P polarization. The images shown below of the oscilloscope indicate that this is not possible. The minimum transmitted power we can obtain in either S or P polarization is 75mV. The maximum voltage we obtain in either S or P polarization is ~ 740mV. This means that at a maximum, we can obtain ~ 90% polarization in either direction, indicating that our laser has a slightly elliptical polarization. |
| Attachment 1: graphs(3).jpg
|
.jpg.png)
|
| Attachment 2: graphs(2).jpg
|
.jpg.png)
|
|
99
|
Tue May 16 11:56:33 2023 |
Peter | Update | VLC Electronics | 532nm Intensity Measurement |
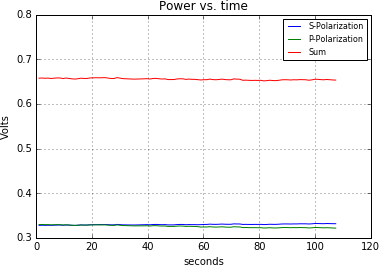
| With the configuration the exact same as before, I used the Jupyter notebook in the red pitaya's development package to collect data from both input channels. Last week, I was able to take data, yet only for a very short period of time, and I did not know how to change it. I went online to the red pitaya's user manual to figure out how to change the sampling period for longer. The link to the page is here: https://redpitaya.readthedocs.io/en/latest/appsFeatures/examples/acqRF-samp-and-dec.html#s-rate-and-dec Though I now know how to change the period of time for which data is taken, the maximum amount of time is still only about 8 seconds. So with help from Cao, we looped over the data taking samples, and got a mean value for each iteration. We then put all those mean values in an array, and plotted it. Below, we see a plot of both the S and P polarizations, and a sum of both of them. As seen in the graph, I have set the time to be able to take data for almost 2 minutes. There is some slight drift in the respective intensities. The next steps I believe are to convert the units into watts, and take data for longer periods of time. |
| Attachment 1: Time_Series_Trial_3.png
|
|
|
101
|
Thu May 18 14:07:08 2023 |
Peter | Update | VLC Update | 532nm Intensity Measurement |
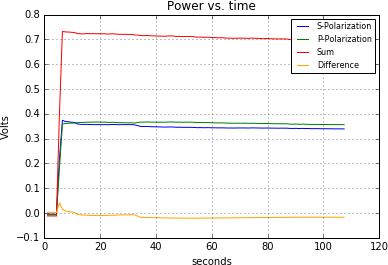
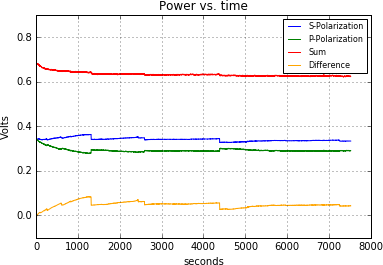
| I figured out a method in which to capture power measurements including the initial seconds in which the beam is first turned on. I first clear and restart the kernel of the python notebook. Then I run the command to connect the red pitaya oscilloscope package to the input data being taken in both channels. To my understanding, this allows for data acquisition as the code compiles. I then started looping the 1.074s trigger bunches, and then roughly 2 seconds after I ran that command, I went and turned on the laser. The first plot shown is a 2 minute practice trial of me trying this technique to make sure that the python package was correctly registering the input of the red pitaya. It is clear that initially the laser is off, and then as I turned it on, the voltage in each channel spikes, which is compelling evidence that the code is working. I then set the data collection to be 7518 seconds (7000 loops), which is about 2 hours and 5 minutes. I repeated the same technique as for the first plot, only changing the amount of time I collected data. The second plot shown here is the voltage being read in each channel as a function of time. As we can see, over a period of hours, the intensity drifts quite dramatically for the first several minutes, and then begins to stabilize slightly. However, there are still some strong sudden fluctuations in each channel. |
| Attachment 1: Time_Series_Trial_4.png
|
|
| Attachment 2: Time_Series_Trial_5_2hrs.png
|
|
|
36
|
Tue Feb 28 19:31:05 2023 |
Peter | Update | VLC Electronics | 532 M2 Measurements |
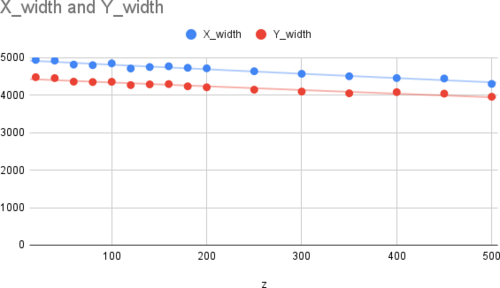
| Took M2 measurements today. Configuration: Lens 1 (f = 50mm) at 0mm. Lens 2 (f = 150mm) at 200mm, camera at 350mm. The laser beam was being moved in -z direction on track (so further away from the first lens). Quick data shown in the sheets plot. Not a real fit. I was trying to see where the beam waist was if there even was one. Seems that it is much further than we have room for on the track. Will need to come back and take more data.
I suggest maybe Dr. Richardson or Cao come and see the configuration in person and how the beam diverges for themselves on the detector card. Maybe they can offer pointers to make this go smoother. |
| Attachment 1: X_width_and_Y_width.png
|
|
|
37
|
Tue Feb 28 19:33:51 2023 |
Peter | Update | | 532 M2 Measurements |
| Y axis of plot in units of micrometers. X axis in units of millimeters. |
|
48
|
Thu Mar 9 12:03:59 2023 |
Peter | Update | VLC Electronics | 532 M2 Measurements |
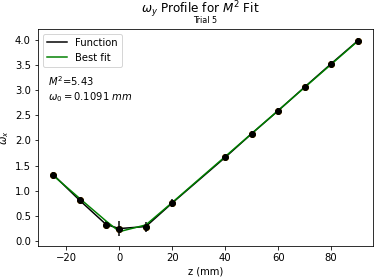
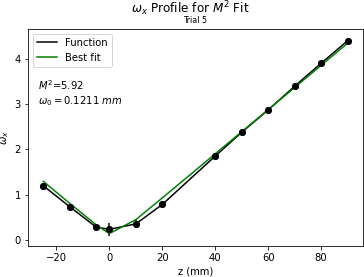
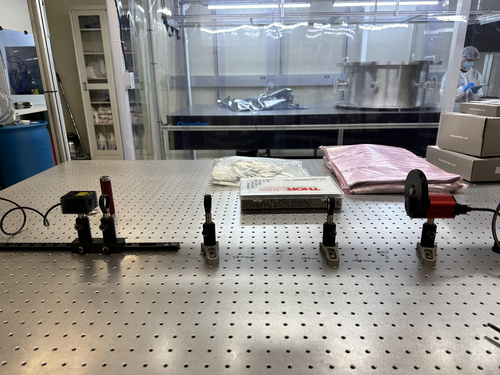
| Took more M2 Data today. Picture of the optical set up is shown below. lens1 f = 100mm, lens2 f = 50mm, lens3 f = 150mm. There was a nice converging/diverging beam profile, and the beam waist was able to be read by the camera. I took as much data as I could before clipping loss. The M2 value is quite high. |
| Attachment 1: OmegaY_M2_Fit_3.png
|
|
| Attachment 2: OmegaX_M2_Fit_3.png
|
|
| Attachment 3: optical_setup.jpg
|
|
|
50
|
Fri Mar 10 12:08:09 2023 |
Peter | Update | VLC Electronics | 532 M2 Measurements |
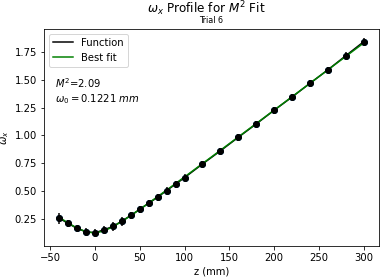
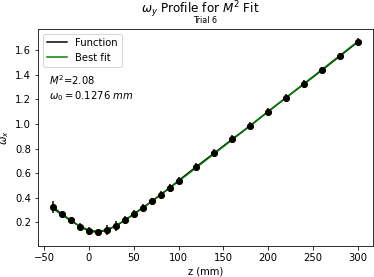
| Took more M2 laser data today. The configuration is the same as before except now the beam camera is the only component moving. Pictures can be seen below. The beam shape in x and y is very consistent with low error. However, the M2 value is still a bit high. |
| Attachment 1: OmegaX_M2_Fit_4.png
|
|
| Attachment 2: OmegaY_M2_Fit_4.png
|
|
|
61
|
Tue Apr 4 09:39:58 2023 |
Peter | Update | VLC Electronics | 532 M2 Measurements |
| Final M squared measurements were taken Wednesday, 3/29/23 by Peter and Ryan Hinosawa. 5 separate sets of data were taken, and upon discussion, we declared the plots shown below in attachment 1 and 2 as the final plots of our M squared measurements.
The optical design of the M squared measurement process is given in attachment 3. The laser and three lenses shown below are mounted on the optical table. The track is placed behind the third lens, and the camera is moved along the track to take successive measurements of the beam's width. This will allow us to see a change in the beam's width over its propagation direction.
The raw data is given in attachment 4 as a Beam_Data_8_3lens.txt file. This is eventually what gets used to generate the plots shown below.
The code to run the analysis on these measurements (as well as analysis on the Gaussian intensity profile fitting) can be found:
git@git.ligo.org:uc_riverside/visible-light-cavity.git |
| Attachment 1: OmegaY_M2_Fit_8.pdf
|

|
| Attachment 2: OmegaX_M2_Fit_8.pdf
|

|
| Attachment 3: M2_Measurements_Set_Up.svg
|

|
| Attachment 4: Beam_Data_8_3lens.txt
|
z-z0	x_width	y_width	x_error	y_error
-50	267	304	30	30
-40	227	261	30	30
-30	192	223	30	30
-20	167	194	30	30
-10	153	169	50	50
0	149	154	50	50
10	166	152	50	50
20	198	169	50	50
30	233	195	50	50
... 17 more lines ...
|
|
230
|
Fri Sep 29 11:53:54 2023 |
Shane | Update | Cleanroom | 5 zone particle count measurement in cleanroom |
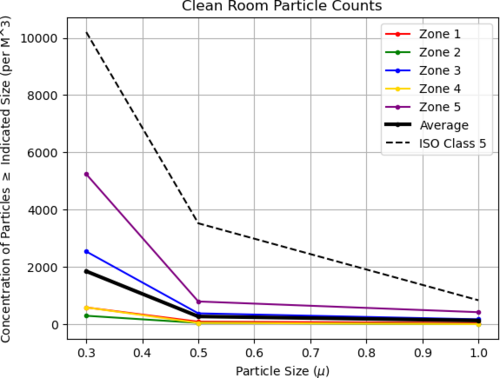
| Today's 5 zone measurement of cleanroom particulate concentration is attached |
| Attachment 1: 23.png
|

|
| Attachment 2: 23.png
|
|
|
270
|
Fri Nov 17 14:06:01 2023 |
Shane | Update | Cleanroom | 5 zone particle count |
| Here's today's 5 zone particle count measurement for the cleanroom. Zone 5 (closest to back wall by fire cabinet) is still above the limit for the larger size ranges; everything else is in good shape and roughly 10 times under the limit. Not sure why zone 5 is still so dirty (maybe some of the electronics being stored in bags/bins on the upper shelf of the desk aren't clean?) but will focus cleaning efforts on this zone next time. |
| Attachment 1: 23.png
|

|
|
260
|
Thu Nov 9 19:06:46 2023 |
shane | Update | Cleanroom | 5 zone cleanroom measurement |
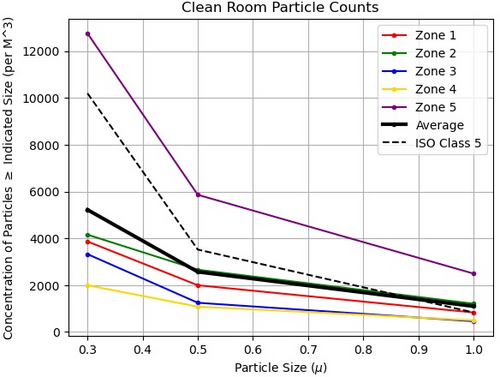
| Here's today's five zone measurement, taken ~5 hours after the cleaning. Zone 5 (closest to fire cabinet and back wall) is a bit over the limit in all size ranges (about 1500 particles in 1.0u size range over), and zone 2 is slightly over the limit in the 1.0u range, but everything else is under the requirement. |
| Attachment 1: 23.jpeg
|
|
|
619
|
Tue Jul 29 12:30:00 2025 |
Christina | Update | TCS | 260 hour ADC update |
[Ma, Christina, Tyler]
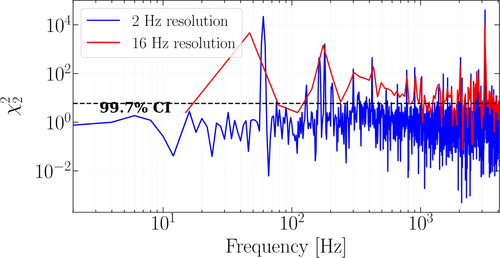
ADC CyMAC 260 hr, 8192Hz sampling rate channels V3 and Vref6 |
| Attachment 1: CSD_06_28_25_270hr.png
|
|
|
314
|
Fri Feb 2 19:08:20 2024 |
Aiden | Update | VAC | 1st Hot Element RGA Scan |
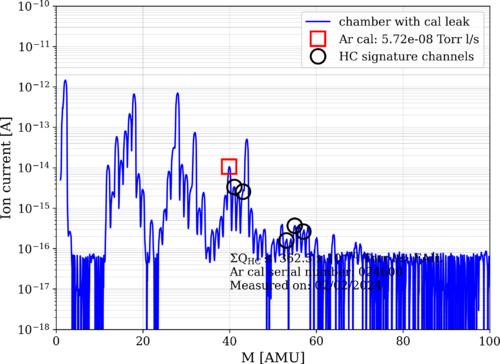
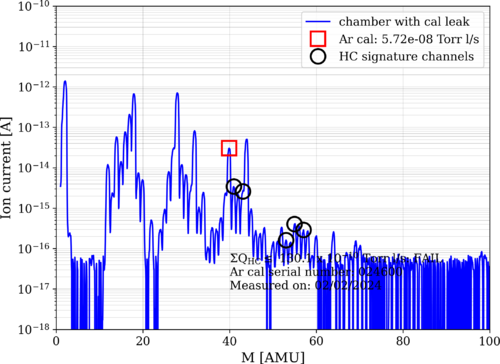
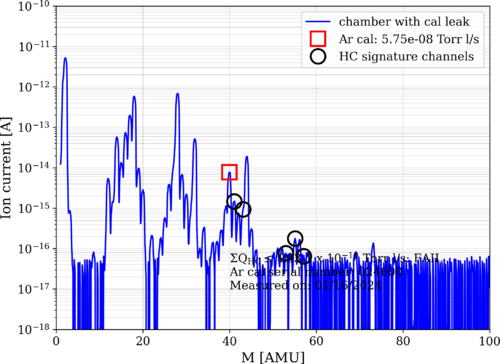
| Here are the measurements for the RGA scan of the elements while on at around 160C. The pressure of the chamber during the test was 4.12 e-8 torr. |
| Attachment 1: bake10_240202_Elements_ArC.png
|
|
| Attachment 2: bake10_240202_Elements_ArO.png
|
|
|
274
|
Tue Nov 21 14:47:24 2023 |
Tyler | Update | Lore | 1129 Workbench Assembly Update 1 |
[Tyler, Shane, Mohak, Cynthia, Luke, Michael, Luis]
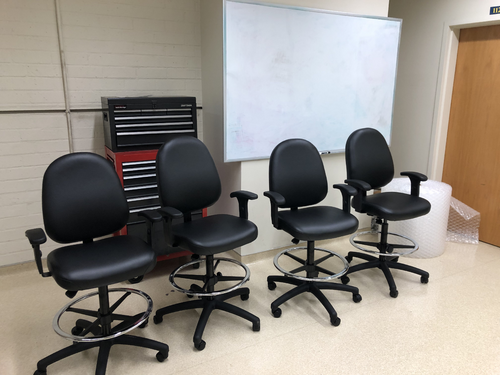
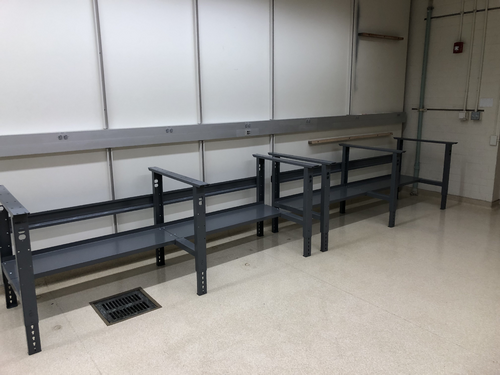
Started assembly of the workbench equipment today. We completed the stools, and have constructed the frames of each workbench. All that needs to be added are the tabletops and the top shelves, which will be done on Monday. |
| Attachment 1: IMG_7569.jpg
|
|
| Attachment 2: IMG_7568.jpg
|
|
|
278
|
Mon Nov 27 14:22:30 2023 |
Tyler | Update | Lore | 1129 Assembly Update |
| [Tyler, Michael, Luke, Cynthia]
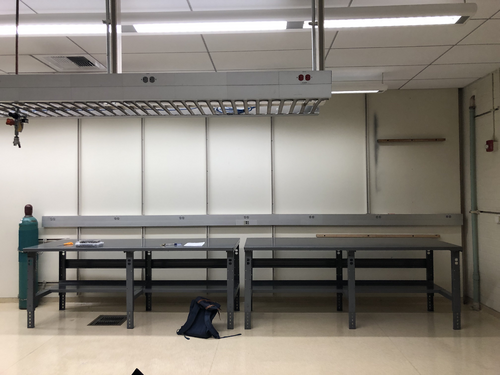
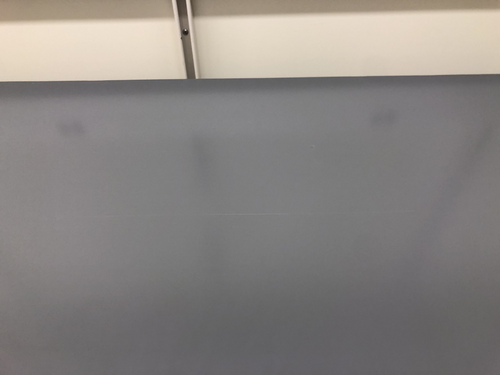
The tabletops have been attached to the workbench frames. Unfortunately, one of the tabletops came out of the box with a large scratch and small dent in the middle. One of the electric top shelves is ready to be attached to the undamaged table, but the other is yet to be opened. Assembly will be completed Wednesday morning.
|
| Attachment 1: IMG_7669.jpg
|
|
| Attachment 2: IMG_7668.jpg
|
|
|
75
|
Fri Apr 21 15:21:18 2023 |
Pamella | Update | FLIR | |
FLIR project updates
- 01:50 pm: Starting test position 34 mm distance to black wall.
- Parameters : 0.100 A, 1.5 V and the temperature inside the mirrors 40°C.
- 2:09 pm : Finished the test and figured out this position it is too far the black wall so now we change for more close position.
- 2:17 pm: Starting test in another position: 10 mm distance to the black wall( this measurement is between the black wall and the aluminum lid)
- 2:26 pm : Finished this second tried and take a snap. The image is attached below.
- The name for the picture for this tried is “AcquisitionImage(Apr-21-2023_14 26)”.
Note: The second tried the temperature didn't up more than 40°C for 8 minutes so I change the current for a few seconds.
I started with 0.98 A with 1.7 V and up until 0.350 A with 2.5 V, just for a few seconds and in this way the temperature up to 72°C and I get the snap.
The next step should be understand the problem with the shape and work in changes for get the triangle in the FLIR image. |
| Attachment 1: AcquisitionImage(Apr-21-2023_14_26).jpg
|
.jpg.png)
|
|
249
|
Mon Oct 30 11:03:56 2023 |
Tyler | Update | Scripts/Programs | |
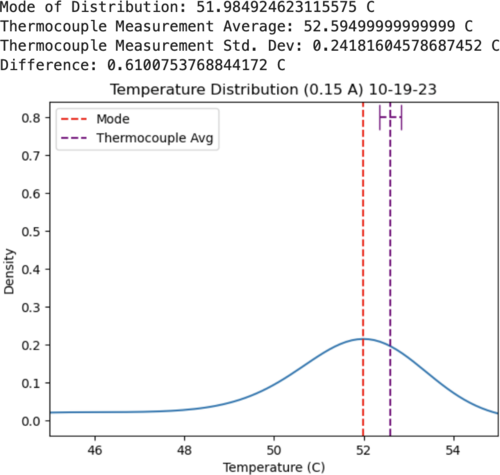
FLIR: After some adjustments, the plot generated from the FLIR measurements look much more symmetric (see attachment). There are more included grid points, which smooths out the curve as compared to last week.
Red Pitaya: It looks like a new OS update was released for the RP, which includes a new Python API (was previously only available in C). I'm going to try and update the one we have currently running in lab.
|
| Attachment 1: Screenshot_2023-10-23_at_12.39.05_PM.png
|
|
|
299
|
Mon Jan 8 20:24:53 2024 |
Aiden | Update | General | |
| [Jon, Aiden]
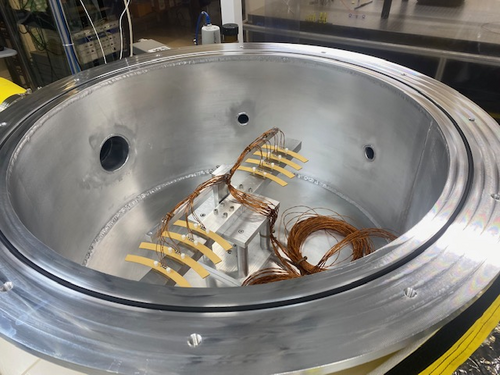
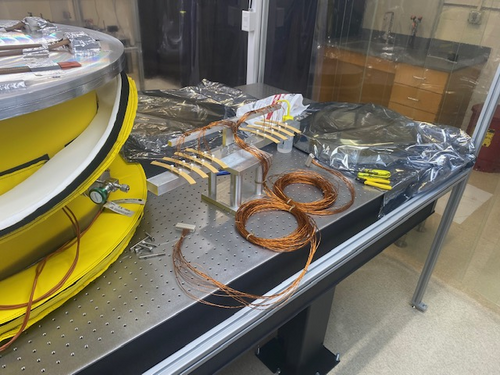
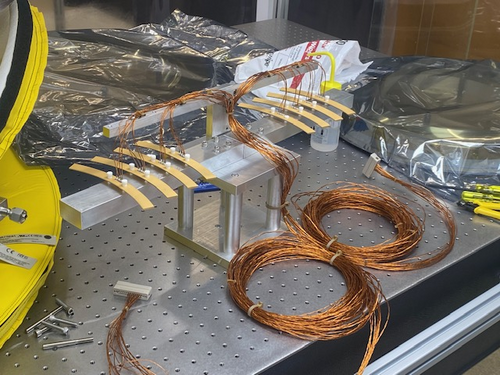
Installed the heater elements into their fixture and prepped the cables by twisting the wires into pairs. We also installed the pins onto the wires and placed them into the peek DB 25 connector. The installation tool we had did not fit the pin size we had so the pins needed to be installed by hand by opening the connector and holding them in place. In the future we will need to make sure we twist the wires together, group them, and then splice them all to the same size for easier installation. We then grouped all the twisted pairs into a bundle and zipped them together. On the left with two peek zip ties is the power and on the right is the RTD with one peek zip tie. This orientation remains true when looking at the feed through flange from the outside with the power port on closest to the wall.
We also installed the heater elements numbered 1-8 starting from the left in image 3. These elements have numbers as resistance data was taken before as to identify the heaters after they are in the chamber. After installing the DB 25 connectors we tested that the pins were in the right orientation by using a volt meter and testing the resistance where the cable runs into the the actual power supply. It seems that all the pins were properly installed and the resistance values all match with each one gaining about 2 Ohms from the cable itself.
Then the pump down was started. The pump was very slow and we suspected a leak but after changing the o-ring pump down was not any faster and we decided to leave it over break as it seemed to just be water outgassing from the aluminum. The chamber is now able to be RGA scanned and leak tested before the next bake as it is low enough pressure. |
| Attachment 1: IMG_4888.jpg
|
|
| Attachment 2: IMG_4886.jpg
|
|
| Attachment 3: IMG_4887.jpg
|
|
|
306
|
Tue Jan 16 16:11:41 2024 |
Aiden | Update | VAC | |
| [Aiden,Luis]
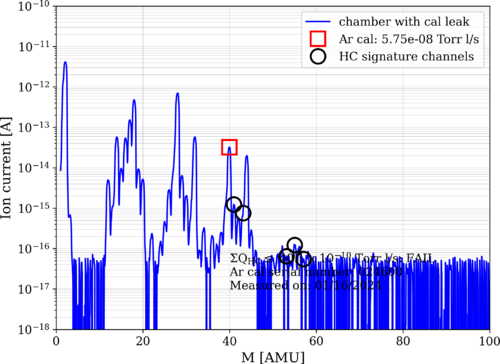
Below is the data for the most recent bake. I believe the chamber is cleaner than it is actually showing as the RGA data was still getting lower while the data was being taken. I will take the data again tomorrow just in case. Still, the data shows that the chamber is basically as clean as it was before bake 10 and this means further power testing can proceed.
Helium leak tested the chamber again today to check if the sealant changed anything. The two primary target flanges from last time have improved significantly with the flange from the RGA on the cross now being below 2e-14. While the turbo pump flange was leaking at a rate of 4e-13. Much better than what it has been before. |
| Attachment 1: bake10_240116_Elements_ArO.png
|
|
| Attachment 2: bake10_240116_Elements_ArC.png
|
|
|
391
|
Mon Jul 1 11:45:45 2024 |
Sid | Update | Interferometer Simulations | |
| Progress update: Most of last week was spent getting set up with SIS, and learning how to do basic simulations. The goal for this week is to begin reproducing the methodology from T2000338. I have begun with studying perturbations to mirror curvature and position in a simple FP cavity, but thus far have been unable to get the same results. |
|
421
|
Tue Aug 6 13:07:07 2024 |
Xuejun | Update | Interferometer Simulations | |
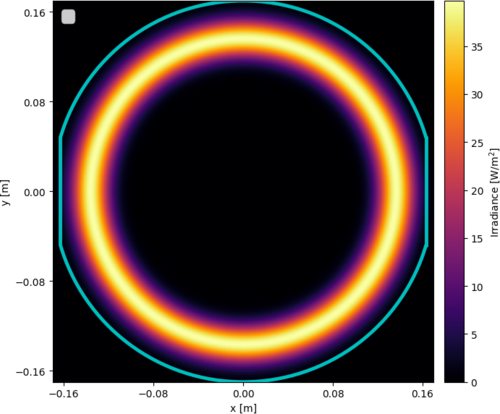
| [Xuejun]
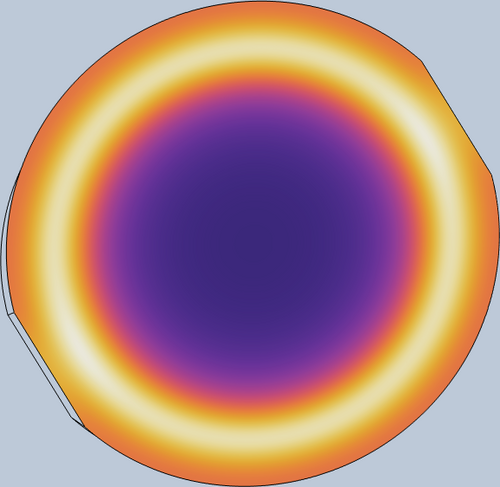
The width and location of the measured in-air change in temperature profile has been determined to be 0.045m and 0.137m respectively. Subsequently, a fake irradiance profile was able to be generated that best resembled what the actual irradiance profile could be using this information for testing in COMSOL. The generated irradiance profile that output the most similar change in temperature profile as the measured in-air profile has been included as well as the change in temperature profile it produced on the blackbody screen "test mass" model in COMSOL. |
| Attachment 1: Thermal_model_image.png
|
|
| Attachment 2: generated_irradiance_profile.png
|
|
|
471
|
Wed Nov 13 14:06:00 2024 |
Luke | Update | General | |
slides |
|
504
|
Mon Jan 27 23:35:28 2025 |
Xuesi Ma | Update | | |
[Ma]
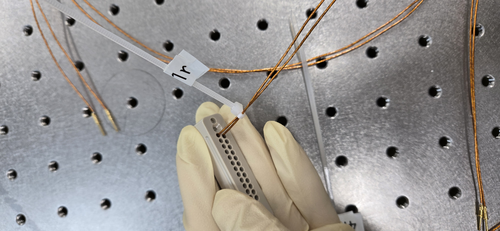
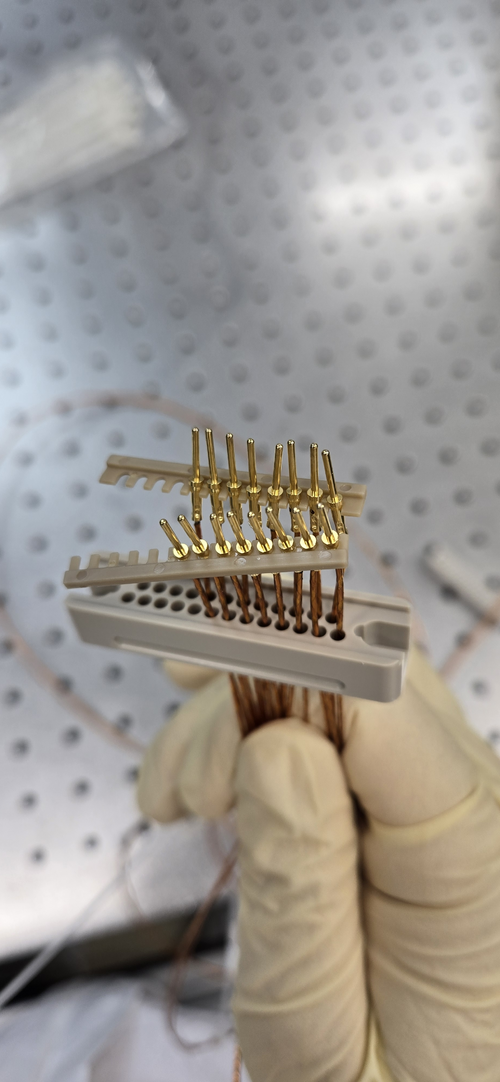
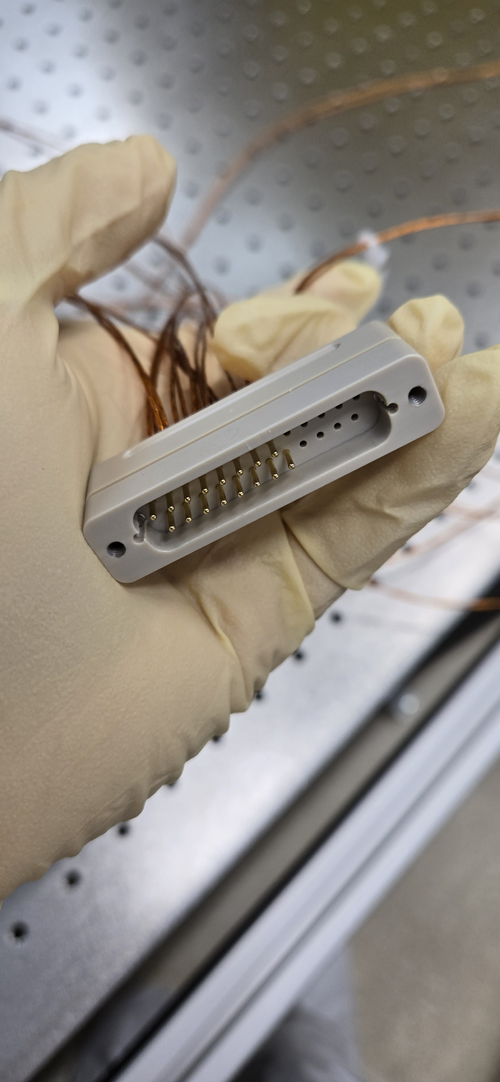
Installed all the pins to the peek DB 25 connectors |
| Attachment 1: 20250127_142647.jpg
|
|
| Attachment 2: 20250127_153454.jpg
|
|
| Attachment 3: 20250127_154516.jpg
|
|
|
508
|
Mon Feb 3 13:17:21 2025 |
Xuesi Ma | Update | | |
[Ma]
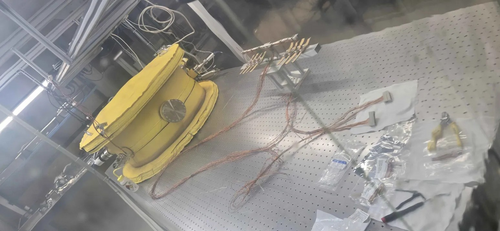
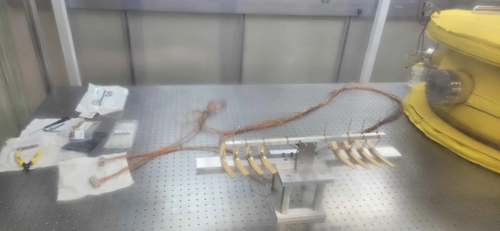
changed all zip ties to peek zip ties, and grouped wires together. The setup is ready to go into the chamber. |
| Attachment 1: 20250203_123153.jpg
|
|
| Attachment 2: 20250203_123213.jpg
|
|
|
514
|
Tue Feb 18 10:01:07 2025 |
Xuesi Ma | Update | | |
[Ma, Pooyan, Tyler]
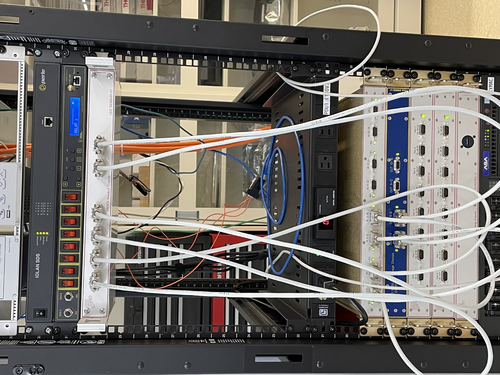
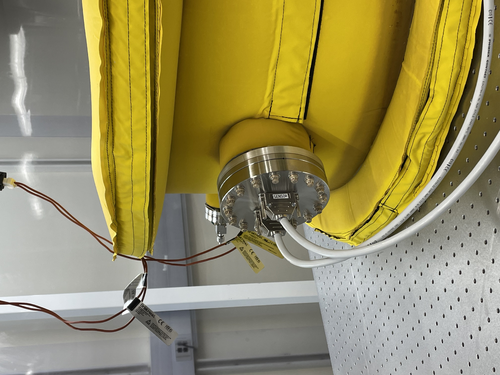
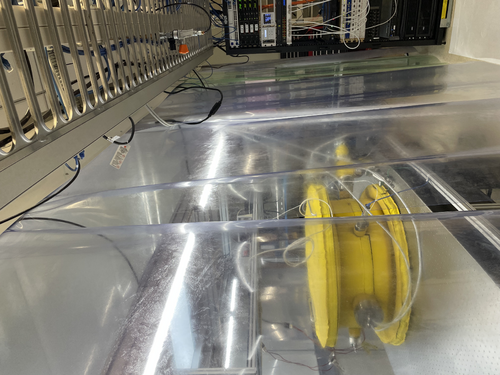
On Friday, we connected the vacuum chamber with the Cymac. |
| Attachment 1: IMG_7916.jpeg
|
|
| Attachment 2: IMG_7915.jpeg
|
|
| Attachment 3: IMG_7917.jpeg
|
|
|
525
|
Tue Feb 25 10:02:32 2025 |
Xuesi Ma | Update | | |
1424039912.625576 2025/02/19 22:38:14 UTC Time start
24V 2.8A right after start all 8 elements
1424044804.902443 2025/02/19 23:59:46 UTC Time stop
24V 1.8A right before stop all 8 elements
0.1A right before start and right after stop
note: turned on briefly to check current right before stop
2/20 RGA Scan
spikes??
1424129207.857777 2025/02/20 23:26:29 UTC Time start
24V 2.9A right after start all 8 elements
1424140789.856096 2025/02/21 02:39:31 UTC Time stop
24V 1.7A right before stop all 8 elements
0.1A right before start and right after stop
2025/02/21 02:43:19 UTC
Main chamber pressure: 1.54e-8
RGA chamber pressure:5.06e-9
spikes are due to loose connection between connectors.
1424210410.173863 2025/02/21 21:59:52 UTC Time start
24V 2.9A right after start all 8 elements
1424218357.96404 2025/02/22 00:12:19 UTC Time stop
24V 1.7A right before stop all 8 elements
each elements: 0.3A (0.2A increment)(all)
0.1A right before start and right before stop
2/24 RGA Scan
1424467918.129082 2025/02/24 21:31:40 UTC Time start
12V 2A right after start all 8 elements
1424478936.635821 2025/02/25 00:35:18 UTC Time stop
12V 1.6A right before stop all 8 elements
each elements: 0.4A (0.2A increment)(all)
0.2A right before start
rise time: A(1-exp(-t/tau))+B
fall time: Aexp(-t/tau) +B |
| Attachment 1: resistance_vs_time_all_channels_all_time.pdf
|

|
| Attachment 2: temperature_vs_time_all_channels_all_time.pdf
|

|
| Attachment 3: resistance_vs_time_rise_time.pdf
|

|
| Attachment 4: resistance_vs_time_fall_time.pdf
|

|
|
539
|
Tue Mar 11 10:43:57 2025 |
Xuesi Ma | Update | | |
Continue investigation in the spikes
Pulsed ADC with a function generator and find no spikes. Rules out ADC for causing the spikes
Loopback test that bypasses the FROSTI Chassis shows spikes (spikes happened on all channels at the same time)
Next step is to bypass the AI Chassis to find the source of the spikes |
| Attachment 1: 20250310_171936.jpg
|
|
|
544
|
Mon Mar 31 15:41:56 2025 |
Xuesi Ma | Update | | |
The result from AI Chassis bypass test showed that the AI Chassis may be the problem. There are no spikes from DAC's direct output.
All chassis except timing chassis are turned off. Power supplies for 24V, 18V, and -18V are turned off
The AI chassis has been taken out of the rack for further inspection
Refer to:
https://dcc.ligo.org/LIGO-E2300117
https://dcc.ligo.org/cgi-bin/private/DocDB/ShowDocument?.submit=Identifier&docid=D2300124&version= |
|
545
|
Tue Apr 1 11:47:08 2025 |
Liu | Update | | |
|
| Attachment 1: Thermal_state_decoder_update.pdf
|

|
|
547
|
Mon Apr 7 13:28:49 2025 |
Xuesi Ma | Update | | |
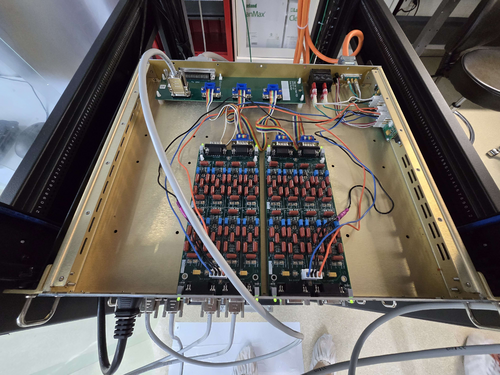
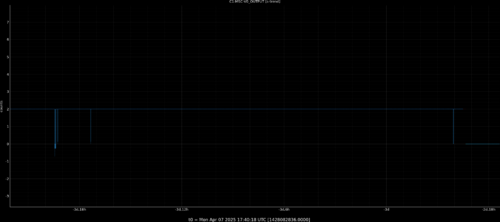
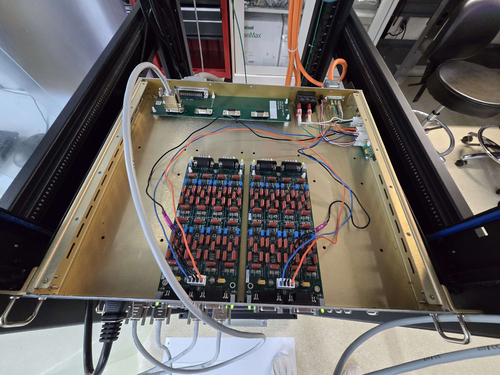
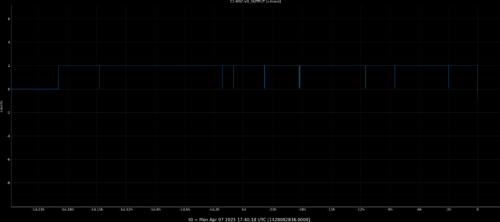
Test 1: Adapter Board Connected to Filter Board
- Setup: AI Chassis is powered on. Signal is measured directly from the adapter board. All other ports on the adapter board are connected to the filter board.
- Observation: Two distinct spikes observed at the beginning of the measurement.
Test 2: Adapter Board Disconnected from Filter Board
- Setup: AI Chassis remains powered on. Signal is again measured directly from the adapter board. This time, the remaining ports on the adapter board are not connected to the filter board.
- Observation: Multiple spikes observed, distributed evenly across the entire measurement.
Test 3: Isolation Test with Spare Adapter Board (ongoing)
- Setup: Suspecting the original adapter board may be faulty, a spare adapter board is used for comparison. Signal is measured directly from this spare board.
-
Update, 04/08/25, Tue 17:30
Took the old adapter board out of the AI chassis and and used it to connect DAC to AA chassis. If no spikes are seen, it means that the glitches are not originating from this board.
Also checked al the previous spikes using the raw data (65536 Hz sample rate). The duration of the glitches are ~1 second, despite the previous guess that they are happening in the Milli-second scale.
|
| Attachment 1: 20250403_151946.jpg
|
|
| Attachment 2: ELOG_Spike_adapter_filter_on.png
|
|
| Attachment 3: 20250404_143624.jpg
|
|
| Attachment 4: ELOG_Spike_adapter_isolate.png
|
|
| Attachment 5: 20250407_105846.jpg
|
|
|
553
|
Tue Apr 15 11:13:43 2025 |
Xuesi Ma | Update | | |
Test 4: AI Chassis ground isolation
- Setup: AI Chassis isolated from the ground with readout directly connected to adapter board
- Observation: No spike observed.
Test 5: Ribbon cable check
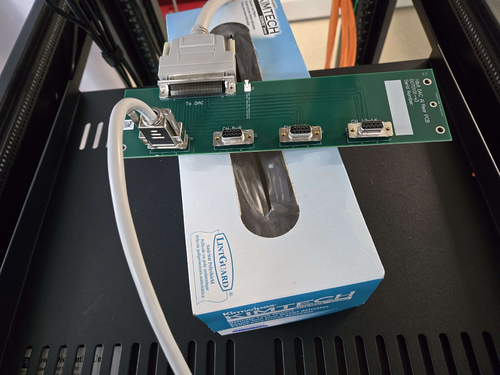
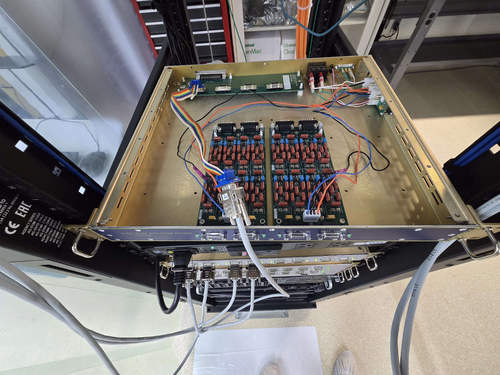
- Setup: AI Chassis remains isolated from the ground. The signal is measured after the ribbon cable. (Attachment 3)
- Observation: No spike observed.
Test 6: Single ground connection check
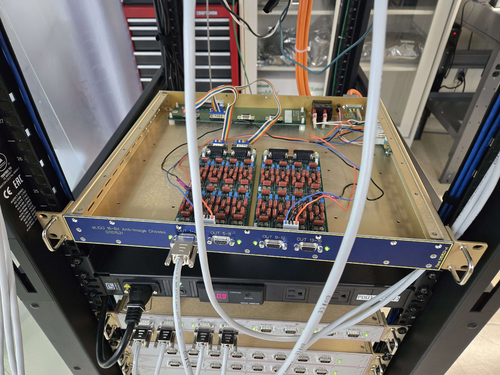
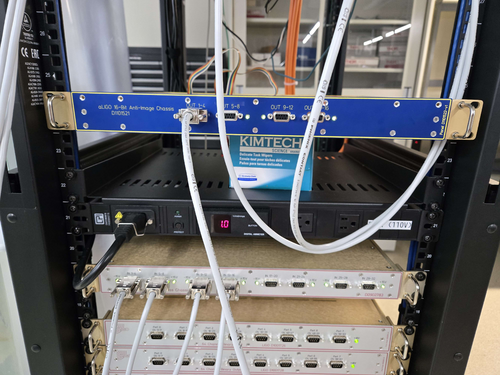
- Setup: AI chassis powered on but remains isolated from the frame. The signal is measured from the output of the AI Chassis. (Attachment 1 ,2)
-
- Observation: No spike observed.
|
| Attachment 1: 20250414_120428.jpg
|
|
| Attachment 2: 20250414_120423.jpg
|
|
| Attachment 3: 20250411_163105.jpg
|
|
|
559
|
Tue Apr 22 12:08:46 2025 |
Xuesi Ma | Update | | |
Test 7: Reconnect ribbon cables
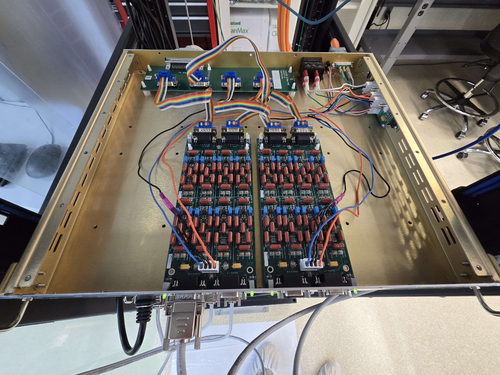
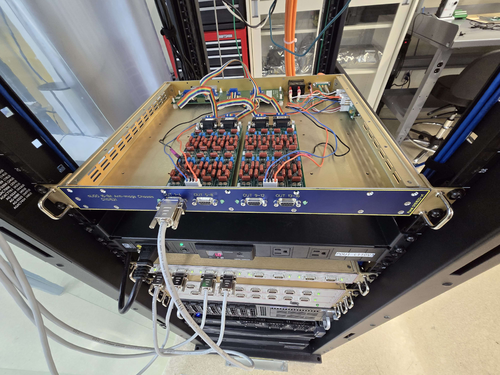
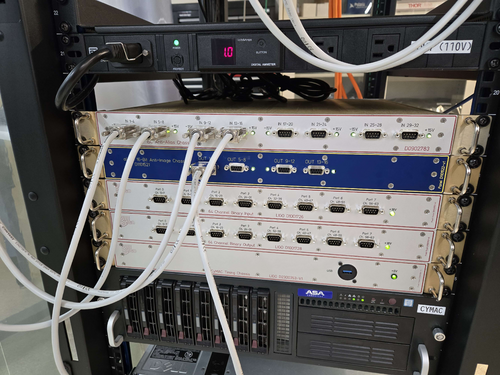
- Setup: Reconnect all the ribbon cables, and turned on the AI Chassis while isolated rack
- Observation: No spike observed.
Test 8: Reconnect to rack
- Setup: Reconnect the AI Chassis to the rack.
- Observation: No spike observed.
Test 9: Restore to original position.
- Setup: CLose up the AI Chassis, and put it back to its original location.
-
- Observation: No spike observed.
|
| Attachment 1: 20250415_161755.jpg
|
|
| Attachment 2: 20250416_174640.jpg
|
|
| Attachment 3: 20250422_105614.jpg
|
|
|
572
|
Tue May 6 13:19:31 2025 |
Xuesi Ma | Update | | |
|
| Attachment 1: resistance_vs_time_RV_rise_time_24.pdf
|

|
| Attachment 2: resistance_vs_time_all_channels_all_time_RV.pdf
|

|
|
576
|
Tue May 13 12:35:01 2025 |
Xuesi Ma | Update | | |
|
| Attachment 1: resistance_vs_voltage_all.pdf
|

|
| Attachment 2: resistance_vs_voltage_overlay.pdf
|

|
| Attachment 3: resistance_vs_time_all_channels_all_time_RV.pdf
|

|
|
579
|
Mon May 19 10:59:14 2025 |
Xuesi Ma | Infrastructure | | |
Status Update
Previous Status:
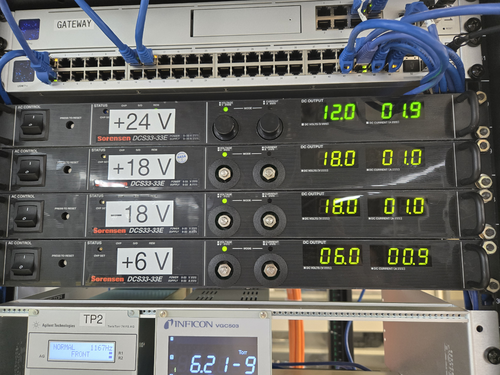
All Sorensen power supplies were turned off. The Cymac system was down (all chassis were offline).
If you need more information or assistance in turning them back on, please contact Xuesi Ma.
Update: The systems are now back online.
Note: The Sorensen power supplies’ voltage can now be controlled via channel VEXC8 of the DAC.
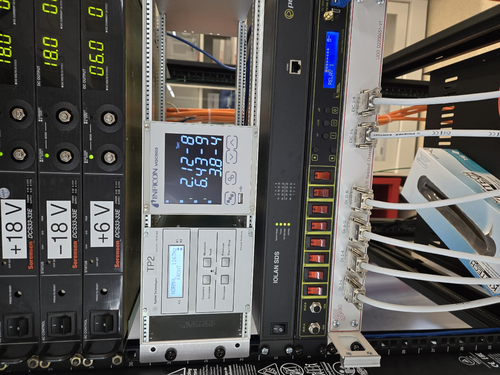
If scripting is required, the ezca Python package is highly recommended for interfacing and control.
|
|
583
|
Tue May 27 12:52:22 2025 |
Xuesi Ma | Update | | |
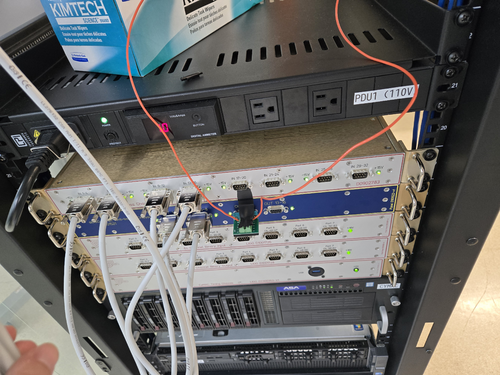
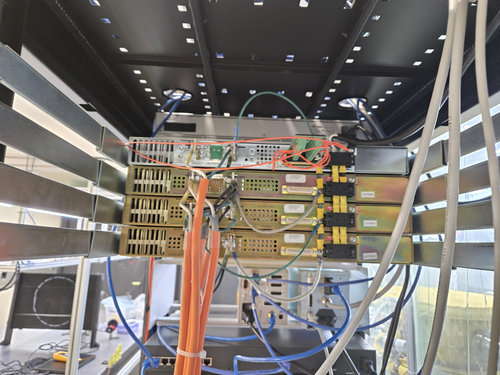
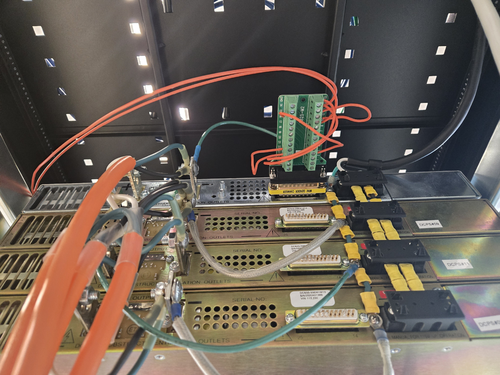
Using the configuration in section 2.11.1 in the Sorensen installation and operation manual (attached below), I'm able to remote control the Sorensen power supply.
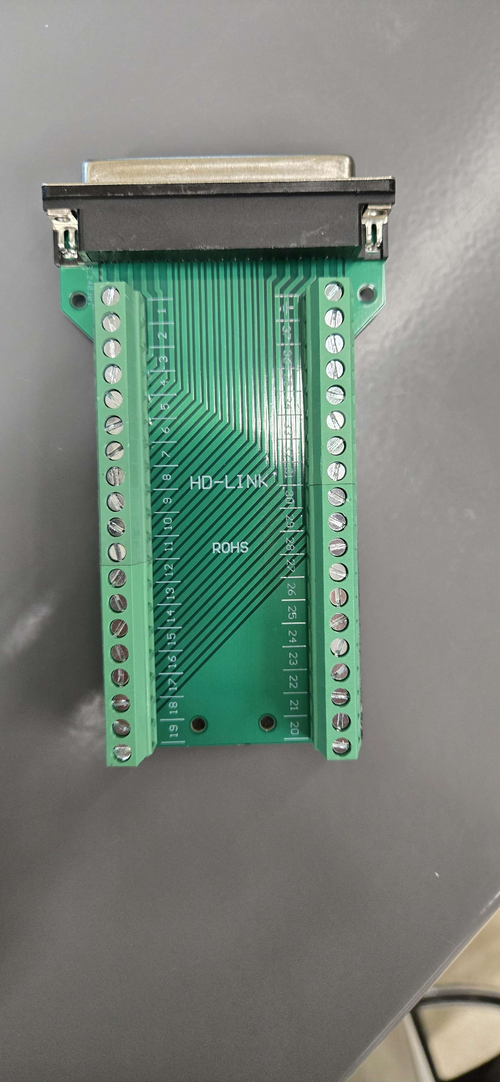
I use DAC VEXC8 as the external voltage source and a breakout board to match the configuration of connector J3.
I have recorded 7 cycles (attached below), and am now working on analyzing the data. |
| Attachment 1: operating-manual-Sorensen-DCS-programmable-switching-dc-power-supplies-1kw-dcs-e.pdf
|

|
| Attachment 2: 20250515_171905.jpg
|
|
| Attachment 3: 20250515_164637.jpg
|
|
| Attachment 4: 20250515_164634.jpg
|
|
| Attachment 5: 20250515_164842.jpg
|
|
| Attachment 6: resistance_vs_time_all_channels_all_time_RV_ladder.pdf
|

|
|
588
|
Tue Jun 3 13:08:47 2025 |
Xuesi Ma | Update | | |
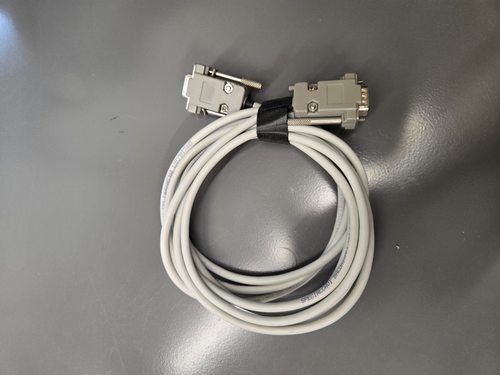
We currently have the parts for a DB9 connector but need parts for a DB25 connector, where did we get the parts for the DB9 connector? We may be able to use the same company for the DB25 connector.
Also need a cable for the connectors. Find a DB9 to DB9 cable in 1129, not sure if I can disassemble it and use just the cable.
The pressure in the vacuum chamber rises to 2.12e-8 torr, which needs baking. |
| Attachment 1: 934.jpg
|
|
| Attachment 2: 933.jpg
|
|
|
589
|
Tue Jun 3 13:16:53 2025 |
Xuesi Ma | Infrastructure | | |
|
Date and Time: Around 3:50 PM on June 2, 2025
Location and Temperature:
- Back of the room 1119, around the working station: 86 °F
- Front of the room 1119, around the doorway: 84.1 °F
- Back of the room 1129, around the working station: 78.6 °F
- Front of the room 1129, around the doorway: 78.3 °F
- In the hallway in front of room 1119: 75.2 °F
|