| ID |
Date |
Author |
Type |
Category |
Subject |
|
467
|
Tue Nov 5 09:56:04 2024 |
Luis Martin | Update | Clean & Bake | MR Bake |
| [Luke, Luis]
On Friday, 11/1/24, the MR was unpackaged and cleaned under the flow bench. We noticed an ink stain on one of the corners of the material. After wiping it down with IPA and Vector Alpha wipes, the stain was removed. However, the material showed some wear.
After cleaning, we placed it in the bake station and applied a stainless steel baking protocol. On Tuesday, 11/4/24, the material was removed from the furnace and packaged in a static shielding bag. The MR was wrapped in Vector Alpha wipes.
|
|
26
|
Fri Feb 10 16:34:45 2023 |
Huy Tuong Cao | Infrastructure | Clean & Bake | Nitrogen gas tank ready to use |
| Cao,
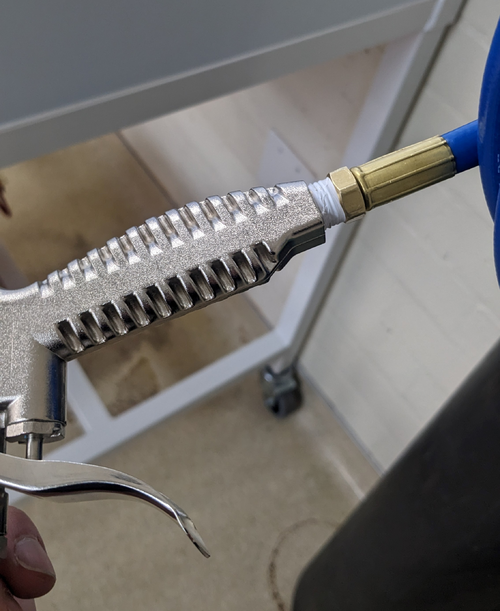
Today I fixed the final bit related to the nitrogen gas tank, which is to apply sealing tape to M-NPT connector of the hose to prevent
leakage (file: AirGunSealed.jpg)
After application of the tape, no audible leak can be heard from connection between the hose and the air gun.
The general operating procedure for the gas tank is as following:
- Turn the regulator (blue handle) anti-clockwise still it's loose
- Turn the valve on nitrogen as tank anti-clockwise, immediately the RHS meter of the regulator would jump to approx 2000 psi. This is the standard pressure for high pressure gas tank
- Turn the regulator clock-wise slowly until the pressure one the LHS meter face reads approx 60 psi. This is sufficient for drying parts with. At this point, the flow pressure still should register zero
- Press the trigger on the air gun, a high pressure air flow should come out and the flow meter should increase
- When finished, close the gas tank valve, turn the regulator anti-clockwise, then press the air gun trigger to release gas left in the hose/gun
|
| Attachment 1: AirGunSealed.jpg
|
|
|
3
|
Thu Jun 2 21:55:02 2022 |
Jon | Update | Cameras | FLIR Camera Setup |
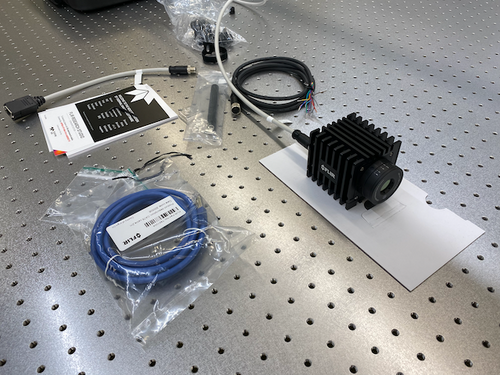
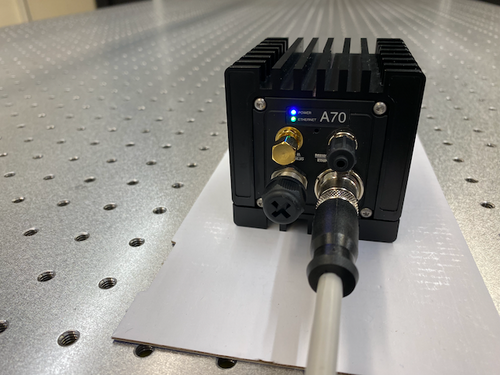
The new FLIR A70 infrared camera has arrived. Tyler and I unpacked it in the lab yesterday. In less than an hour, we succeeded in powering it on and connecting it to the lab network. We have assigned it the static IP address 192.168.1.6.
Online Configuration Portal
The FLIR camera can be configured, as well as stream live data, through a web browser interface. It can be accessed from any workstation on the lab network by navigating in the browser to http://192.168.1.6. The login credentials are stored here (log in with your LIGO.ORG credentials).
Next Steps
The next step is to install FLIR's Python API for controlling and reading out the camera on chimay. The API comes with demo codes which we can use to test the basic connectivity and which will serve as a reference for developing our own Python interface over the summer. |
| Attachment 1: IMG_1473.png
|
|
| Attachment 2: IMG_1474.png
|
|
|
4
|
Fri Jun 3 13:03:33 2022 |
Jon | Update | Cameras | FLIR Camera Setup |
Summary
I have installed the requisite software on chimay for interfacing the FLIR A70 camera in Python. There are two packages required from FLIR:
- Spinnaker SDK, which provides the low-level camera drivers and a C/C++ API.
- PySpin, a wrapper of the Spinnaker library which provides the Python API.
These installations did not work out-of-the-box for Debian 11 (only Ubuntu is officially supported). I had to make several modifications which are documented below for future reference.
This setup has not yet been tested with the camera connected to chimay.
Documentation and Demo Codes
The PySpin package comes with a number of Python demo codes and a complete API reference. These can be found on chimay at the following locations.
- Example codes:
/opt/spinnaker/python/Examples/Python3/
- Python API reference manual:
/opt/spinnaker/python/docs/PySpinDoc.pdf
Installing Spinnaker SDK
Below were the steps required to install Spinnaker on chimay (Debian 11).
- Download the Spinnaker binaries (AMD64 architecture) and copy the tarball to, e.g.,
/home/controls on chimay.
- Unpack the tarball contents and enter the new directory:
$ tar -xf spinnaker-2.6.0.160-Ubuntu20.04-amd64-pkg.tar.gz
$ cd spinnaker-2.6.0.160-amd64
$ sudo apt-get install libavcodec58 libavformat58 \
libswscale5 libswresample3 libavutil56 libusb-1.0-0 \
libpcre2-16-0 libdouble-conversion3 libxcb-xinput0 \
libxcb-xinerama0
qt5-default, which is obsolete in Debian and no longer available via the package manager (that is, its functionality was absorbed into other Qt packages). I was able to find a workaround based on these instructions.
- Install all the dependencies of
qt5-default:
$ sudo apt-get install qtbase5-dev qtchooser qt5-qmake qtbase5-dev-tools
- Manually remove the
qt5-default dependency from the Spinnaker package.
Unpack the spinview-qt_2.6.0.160_amd64.deb package:
$ mkdir tmp
$ cd tmp
$ ar -x ../spinview-qt_2.6.0.160_amd64.deb
$ tar xf control.tar.xz
Open the file control in a text editor and delete the qt5-default dependency from the Depends list.
Then repackage the contents:
$ tar cfJ control.tar.xz control
$ ar rcs ../spinview-qt_2.6.0.160_amd64.deb debian-binary control.tar.xz data.tar.xz
$ cd ..
$ rm -rf tmp
qt5-default dependency.
- Now proceed with running the install script:
$ sudo sh install_spinnaker.sh
This will install the Spinnaker library at /opt/spinnaker. Spinnaker also provides a standalone GUI application, SpinView, which can be executed from the terminal (from any directory) via the command spinview.
Installing PySpin
The main challenge with installing PySpin was that it is currently only supported for Python <=3.8. The system installation on Debian 11 is Python 3.9 and 3.8 is not available within the package manager. Following these instructions, I manually installed a second version of Python (3.8) on chimay, in a way that should not interfere with the system installation.
The Python 3.8 executable is in the system path and can be run only via the command python3.8. It is not symlinked to python or to python3. Those remain linked to the preexisting Python 3.9.
After installing Python 3.8, I proceeded with the installation as follows:
- Download the PySpin package (x86_64 architecture) and copy the tarball to, e.g.,
/home/controls on chimay.
- Unpack the tarball contents and into a new directory:
$ mkdir python
$ mv spinnaker_python-2.6.0.160-Ubuntu20.04-cp38-cp38-linux_x86_64.tar.gz python
$ tar xf spinnaker_python-2.6.0.160-Ubuntu20.04-cp38-cp38-linux_x86_64.tar.gz
- Move the new directory into the Spinnaker installation directory:
$ sudo mv python /opt/spinnaker
$ cd /opt/spinnaker/python
- Install the dependencies:
$ sudo python3.8 -m pip install --upgrade numpy matplotlib
- Finally, install PySpin itself:
$ sudo python3.8 -m pip install spinnaker_python-2.6.0.160-cp38-cp38-linux_x86_64.whl
If this succeeded, you should now be able to enter import the package PySpin as
$ python3.8
>>> import PySpin
without error. |
|
5
|
Mon Jun 6 17:11:48 2022 |
Jon | Update | Cameras | FLIR Camera Setup |
Today I tested the Spinnaker/PySpin software installations (detailed in ELOG #4) with the FLIR camera connected to chimay. It works!
Example codes
I was able to run several of the PySpin example codes. In particular, there is one which connects to the camera and streams live data to a pop-up Matplotlib window that looks very useful. It is called AcquireAndDisplay.py.
When running these, it is important to keep in mind that PySpin requires Python 3.8, which is not the default system version on chimay. So to run AcquireAndDisplay.py, for example, you must explicitly call the correct version of Python:
$ python3.8 AcquireAndDisplay.py
The standard python and python3 aliases are still linked to the system version (3.9), so calling these will result in a PySpin import error.
Git repository
I have set up a git repo for our FLIR camera control code. I have populated it with an Examples directory which contains the PySpin Reference Manual as well as all the example codes (see the README). There is a local copy of this repo on chimay at /home/controls/FLIR.
Other FLIR streaming software
In addition to the PySpin demos, there are several fully developed applications provided by FLIR. While we do not plan to use these long term, they may be very useful for debugging and cross-validation of our Python interface during development:
- Browser interface: From any web browser on the local lab network, navigate to http://192.168.1.6 and log in (credentials here). This interface supports live data streaming as well as full control of the camera settings.
- SpinView: A standalone application provided as part of the Spinnaker SDK. It supports streaming live camera data as well as saving images and videos. It can be launched from the terminal on chimay via the command: $
spinview
- Research Studio: This is FLIR's proprietary software, for which we have a one-year license. It can be launched from the terminal on chimay via the command:
$ FLIRResearchStudio
Permanent cabling
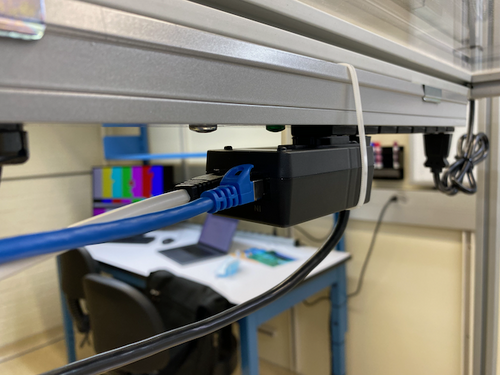
Since everything appears to be working, I ran a permanent Cat 6 cable from the lab switch to the camera's power+I/O adapter. The adapter is plugged into a UPS-protected power strip overhanging the optical table, as pictured below. To prevent the adapter from unplugging itself under its own weight, I attached a zip tie around the adapter to hold it securely in place. |
| Attachment 1: IMG_1480.png
|
|
| Attachment 2: IMG_1481.png
|
|
|
6
|
Tue Jun 21 18:31:49 2022 |
Cassidy and Phoebe | Update | Cameras | IR Absorbing Screen and FLIR Camera Setup |
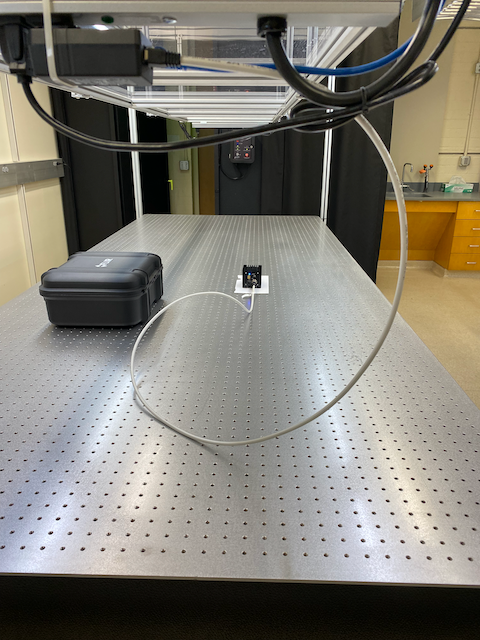
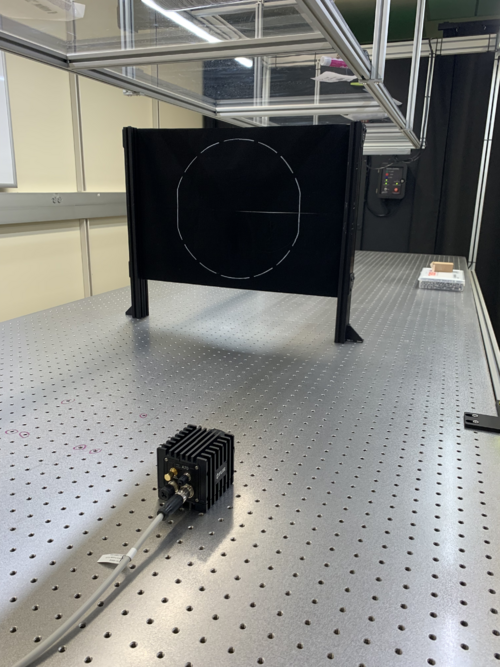
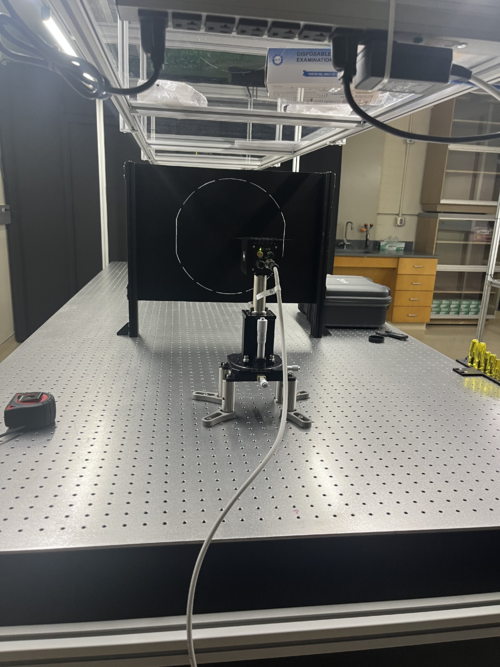
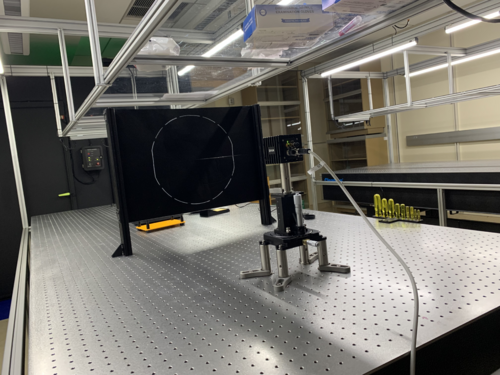
Today we set up the IR absorbing screen and the camera on the optical table, as well as tested that the camera was functioning as expected (picking up heat sources beyond the screen).
Screen Setup
The screen was set up by clamping it between two rectangular posts on each side. First, two posts were set up with 22 in. between them (thus allowing the screen to span a total distance of up to 24 in. when clamped down). To best stabilize the screen and to allow for it to be "pulled" taut by exploiting the give in the L-bracket, the L-bracket was bolted on the outside of the post, along the same axis as the screen itself.
On first attempt, the screen was too thin to be fully clamped between the posts. In order to have it fit snugly, sections of heat shrink tubing was used as a shim at the points where the posts were clamped together. The tubing was slid into the track of one optical post at the desired points. In order to accommodate the shim, the two posts had to be held together, ideally clamped, with the screen and shim in place. Then, the post clamps could be slid into the tracks of the post, moved to the optimal location, and tightened down. This required at least three people: two to tighten one side while the third holds up the screen on the other side. The screen was placed ~1/8" from the edge of the posts and flush with the top.
Camera Stage Setup
Once the screen was in place, the camera stage was set up by placing the XY-Translational with Rotation stage on four 3" optical posts. Then, the z-axis stage was placed in the center of that, with another 3" optical post on top, which was then topped with the camera. This was set and clamped down ~22.5" from the screen. This was about 1" closer than expected based on our theoretical models.
Fine Alignment
We used the visible camera to fine align the screen and to test the setup. Notably, the visible camera is placed below the infrared and thus requires a calibration in order to ensure the two are aligned on the computer image. This can be set by hand using the FLIR proprietary software (FLIR CamWeb) and adjusting the "MSX alignment". The image mode "Thermal MSX" allows both the visible and IR camera to be displayed at once and the difference in their positioning can be seen. We found an offset of ~0.5m to be nearly accurate (note: using this method, although you can get more accurate than this, the displayed value only has one significant figure).
In order to align the camera, we first used the exposed top edge to judge whether the camera was appropriately centered on the screen. We set the rotation as close as possible to being in line by eye, then adjusted the y-axis until the gap on both corners was a similar size, thus indicating that the rotation and y-position were correctly set. Rotationally, the camera required only a refinement of -1/2 degree. The y-axis is set at 1.25. Then, the camera was pulled as far from the screen as possible using the x-axis to allow the screen to be easily centered using the z-axis. Once the outlined test mass was centered, the x-axis was used to bring the camera close until the screen just barely filled the field of view. The x-axis is at 2.25. The z axis is set to it full dynamic range at 10. Unfortunately, the camera is still slightly too tall for the screen, likely requiring the purchase of a new optical post about 0.5in shorter the current one. This interchange will likely require a new fine alignment after.
Basic Imaging Tests
The camera was also focused on the screen based on the manufacturer's printed distance on the camera itself (using 22.5", or 0.572 m). Using the FLIR proprietary software, the camera appears to be in focus in IR (a hand was used as a good focusing tool for this). Additionally, the camera does pick up heat on the other side of the screen. A hand can be lightly seen warming the screen, as can a soldering iron tip. This was a very imprecise visual tool, but does indicate that the camera and screen are working roughly as expected.
Next Steps
A new optical post that is ~2.5" tall should be ordered to replace the one under the camera currently. The heating system also needs to be ordered and set up. Currently we are debating between a parabolic reflector with a hole in the back, and one without, as each would require a different mounting mechanism for the cartridge heater. |
| Attachment 1: IMG_6751.png
|
|
| Attachment 2: IMG_1146.png
|
|
| Attachment 3: IMG_6756.png
|
|
|
9
|
Tue Jul 26 14:10:35 2022 |
Cassidy | Update | Cameras | Optical Post Replacement and Realignment |
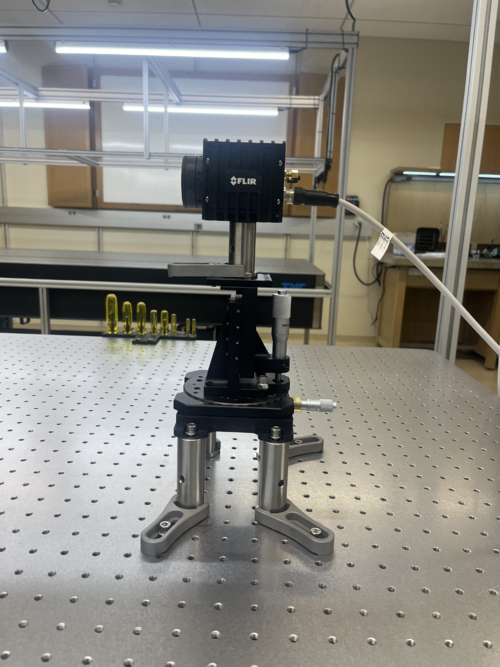
| Today I replaced the 3" optical post that the camera rests on with a 2" optical post in order for the screen to correctly fill out the camera's FOV. The 3" post is now in the glass optics cabinet next to the FLIR camera configuration box, wrapped in the protective materials from the 2" post for safekeeping.
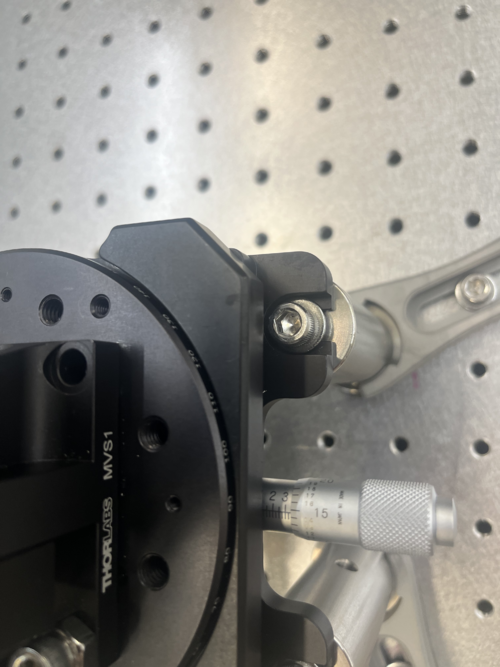
There were no issues with the physical replacement of the post, except that the fork clamp on the post needs to be on one of the perpendicular, not diagonal, axes in order to be secure. I chose the front axis (towards the screen) as before in order to easily access the alignment knobs.
To align, I followed the same process as last time except for a more purposeful original rough alignment. For alignment purposes, the visual camera was used. For the first rough alignment, I pulled the camera as far back as possible on the x axis (with the z axis roughly centered), then moved the entire stage setup back until I could just see both the top and bottom edge of the screen. Then, I set the z-axis to an extreme in order to use the edge of the screen to align the rotational and y-axis pieces for the fine alignment.
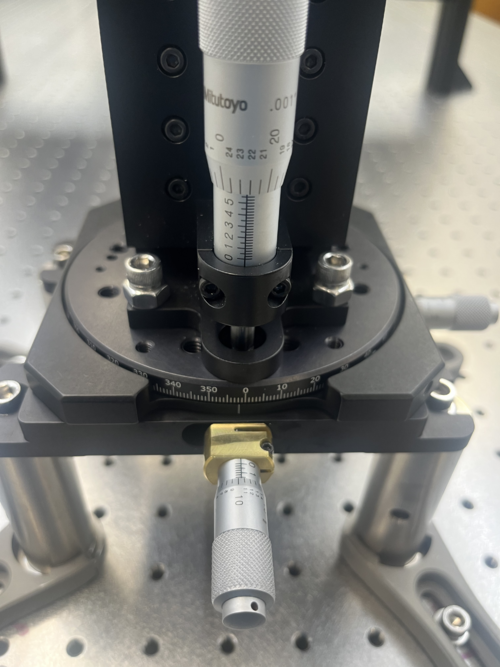
For the fine alignment, starting with the z and x axis at extremes, I began by aligning the rotational axis. To do this, I used the gaps between the top of the screen and the camera window on the far left and right of the image. When these gaps were equal I knew the rotation was adequately set. Then, I set the y-axis so that the pattern was centered. If the gaps were no longer even, I redid the rotation alignment and ditto with the y axis until both were set. This resulted in a rotation of about two degrees and a y axis at just under 3.5.
To set the z and x axis, I centered the z-axis using the top and bottom of the screen, which should both be visible if the rough alignment was done correctly. Then, I adjusted the x axis by pushing it forward until the top and bottom of the screen were just out of the frame. As with the rotational and y-axis, I iteratively fine tuned the x and z axis until both the image was centered in the z axis and only the screen was in view. This resulted in a z-axis value of just over 5.5 and an x axis value of nearly 1.75.
Pictures are included of all alignment knobs and the new post/stage setup! |
| Attachment 1: YAxisAlignment.png
|
|
| Attachment 2: XRotZAlignment.png
|
|
| Attachment 3: NewOpticalPost.png
|
|
|
58
|
Wed Mar 29 16:00:36 2023 |
Pamella | Update | Cameras | FLIR project |
|
Today Pamella and Tyler started work in the updates for the FLIR project.
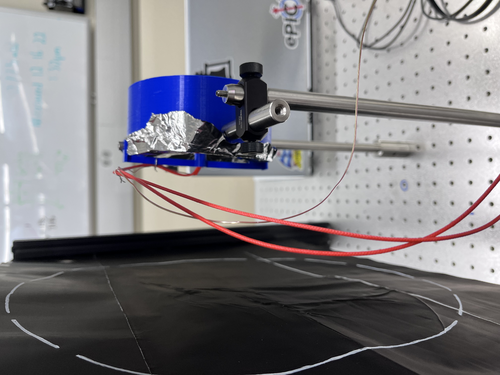
We trie for the first time cover the mirrors with aluminum foil and run the code with this.
We work in figured out how the python codes works with real datas.
To do:
Understand how get the real datas and how to compere that with the old datas.
Starting test with the FLIR and mirrors with aluminum foil in with the power on.
Testing the FLIR camera more times with the mirrors covered with aluminum foil. |
| Attachment 1: 15D13FE3-48A9-4ACF-9422-07032DD8D028.jpeg
|
|
|
243
|
Mon Oct 23 11:28:05 2023 |
Tyler | Update | Cameras | FLIR Camera Code Updates |
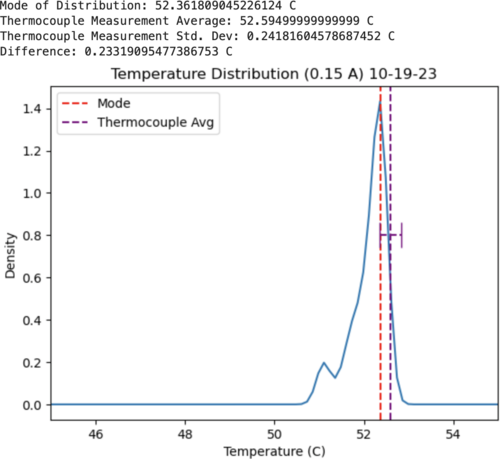
| The past week I've been spending time going through the FLIR code on gitlab. Initially, it had appeared that our measurements with the camera had differed about 2 degrees C from what the thermocouple was giving (Ref ELOG 181). Upon inspection of the FLIR streaming code, I noticed a few issues:
1. The emissivity value wasn't set correctly (was 0.999 originally, should be about 0.95).
2. The ambient temperature was set to about 21.6 C (71 F).
3. The distance given before was about an inch off from what I measured.
These three parameters all must be manually specified to calculate the temperature values, and are what I assume caused the larger temperature difference seen before. I've attached a new set of measurements that I took below, where 6 images were taken by the camera, looking at a heating source with a current of 0.15 A being driven. The difference between the camera and the thermocouple were much smaller, as seen below. I'd still like to take a few more measurements to solidify that this has rectified the issue, but at the moment it seems this is working much better.
Images at: https://drive.google.com/drive/folders/1VDvZ1rfEGWsHq1AgG-chde3Cd8Do_piD?usp=sharing |
| Attachment 1: Screenshot_2023-10-23_at_11.06.04_AM.png
|
|
|
191
|
Thu Aug 3 18:03:42 2023 |
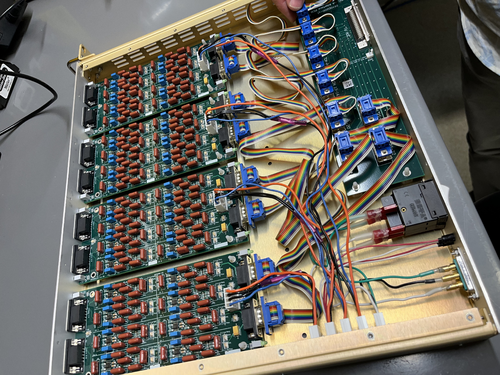
Shane, Jon | Update | CDS | Anti-Aliasing chassis complete |
| We finished installing the internal power supply cables in the anti-aliasing chassis today, which concludes its assembly. Work on AI, BI, BO chassis still underway. |
| Attachment 1: IMG_8544.jpeg
|
|
|
193
|
Mon Aug 7 13:58:46 2023 |
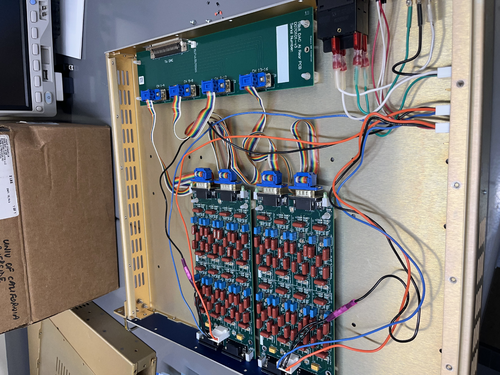
shane | Update | CDS | internal power supply cables done for AI chassis |
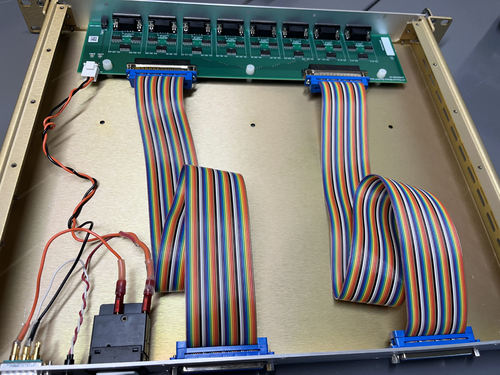
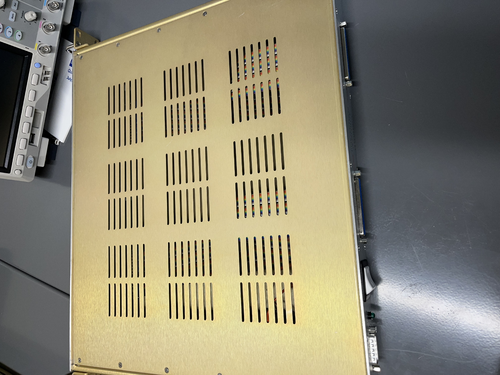
| Finished assembling and installing the aLigo chassis internal power supply cables in the anti-imaging chassis today. Tested for continuity and everything looked good. Chassis lid still secured with two temporary screws because I'm not sure what the correct size is. |
| Attachment 1: IMG_8674.jpeg
|
|
|
197
|
Tue Aug 8 17:03:22 2023 |
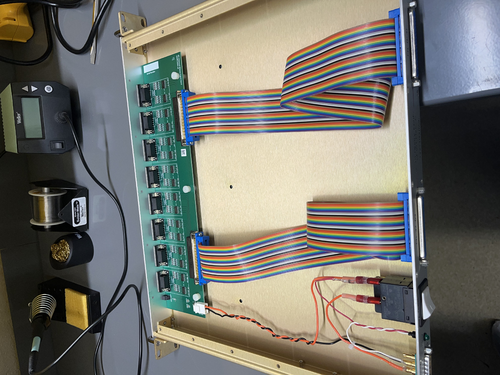
Shane, Jon | Update | CDS | Binary input chassis finished |
| Finished assembly of the binary input chassis today, including DC on/off switch and LED installation. external cable assemblies still needed, but internal work done. |
| Attachment 1: IMG_8681.jpeg
|
|
|
199
|
Wed Aug 9 17:35:26 2023 |
Shane | Update | CDS | Binary output chassis finished |
| Finished the internal wiring for the binary output chassis today, which completes its assembly. Also secured ribbon cables and chassis lid with their respective screws. Note: one of the spade lugs' internal metal piece is a little loose and had to be reinserted after falling out once. Seemed secure after this, and I checked continuity on everything and it was all good. |
| Attachment 1: IMG_8685.jpeg
|
|
| Attachment 2: IMG_8686.jpeg
|
|
|
210
|
Wed Aug 16 16:55:40 2023 |
Shane, Jon | Update | CDS | external power supply cables finished |
| All four external power supply cables for the CyMAC chassis are now assembled. Using them now to test if chassis power up correctly. |
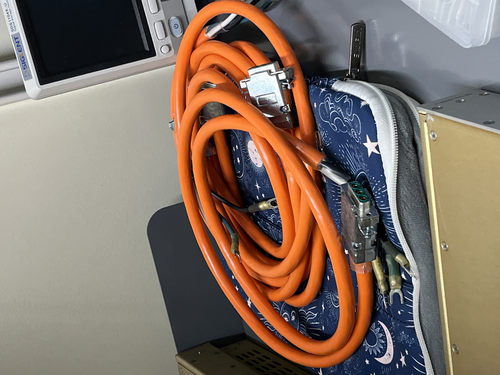
| Attachment 1: IMG_9251.jpeg
|
|
|
211
|
Wed Aug 16 17:17:02 2023 |
Shane, Jon | Update | CDS | Binary input chassis powering correctly |
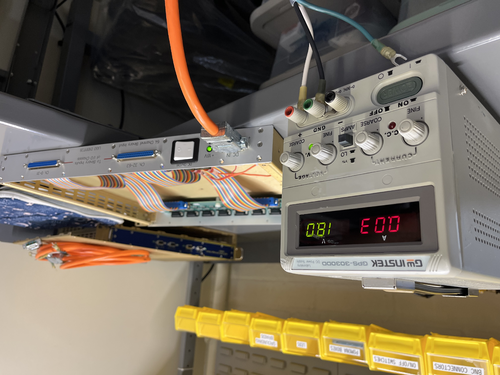
| Binary input chassis passed power-on test, and is lighting up as expected. Binary output chassis also successfully powered on. AA and AI chassis not powering on correctly, need to do some debugging to find the problem. |
| Attachment 1: IMG_9253.jpeg
|
|
|
225
|
Thu Sep 14 17:05:38 2023 |
Shane, Jon | Update | CDS | Timing chassis setup and testing |
| Tested the setup today for the timing chassis (intended to provide the timing reference for the CyMAC). Was able to read the correct frequency, but voltage was significantly lower than needed. Still identifying source of problem, and looking into the relationship between the supportable ohm load and the voltage. |
|
231
|
Fri Sep 29 17:27:30 2023 |
Shane, Jon | Update | CDS | Timing chassis assembly progress (CyMAC) |
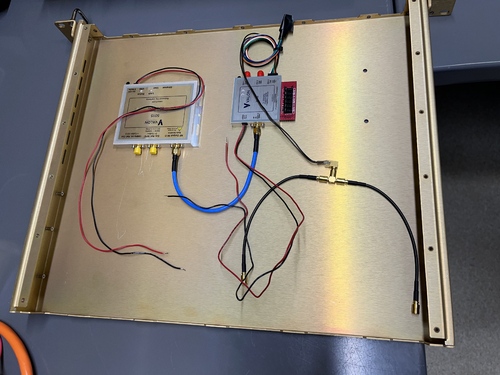
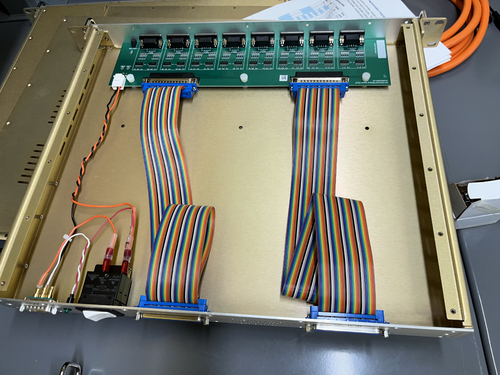
| Worked on timing chassis assembly today for the CyMAC, settled on layout (see attachment 1). Frequency synthesizer and frequency divider tentatively mounted. Next steps involve putting together and installing an LED and DC on/off switch assembly like the one in the binary input chassis (attachment 2 for comparison; orange and black wires in BI chassis analogous to red and black wires in timing chassis). Will also use front and back panels of BI chassis as a template for the timing chassis panels, with the following alterations: two SMB feedthroughs in place of the ribbon cable connections shown on the back panel, the addition of an LED on the front panel to indicate power, and potentially a spot on the front panel for usb connection to programmable frequency synthesizer. |
| Attachment 1: timing_chassis.jpeg
|
|
| Attachment 2: BI_chassis.jpeg
|
|
|
236
|
Mon Oct 9 16:59:21 2023 |
Shane, Jon | Update | CDS | timing chassis power cable and AI chassis testing for CyMAC |
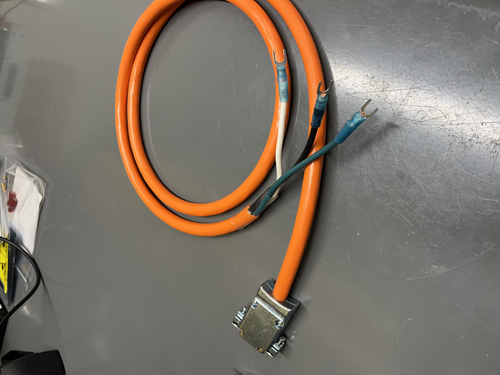
[Shane, Jon]
Today's CyMAC work:
- Finished assembling external power supply cable for the timing chassis (see attached image)
- Also did some debugging of AA and AI chassis re: power issues. After testing voltages at various test points on the power regulator board (TP1-TP6) in the AA chassis, it seems like it's the source of the problem. Used bench DC power supply to test, running 15V, and the correct voltage is coming in to the board but something significantly smaller is being output. We're also getting unexpected negative signs on voltage at certain test points, with leads in correct positions
- Upon further examination, it looks like the lights on the filter boards are actually turning on (in both the AA and AI chassis), though it's only 2/4 lights on each board and they are very faint
- Corrected DC on/off switch spade lug orientation in AI chassis.
- Tested AI chassis power regulator board to see if the problem was the same, and found again that voltage coming in was correct, and voltage going out was not.
- In case of interest in exact numbers, results were as follows:
- Voltage difference between TP1(+Vin) and TP6(-Vin) is ~30V
- Voltage difference between grounded chassis wall and TP1 (+Vin) is ~15V
- Voltage difference between grounded chassis wall and TP6(-Vin) is ~-15 V
- voltage difference between TP2(+Vout) and TP5(-Vout) is ~3V
- Voltage difference between TP3 (gnd) and TP2(+Vout) is -0.065V
- Voltage difference between TP5(-Vout) and ground is ~3V
|
| Attachment 1: IMG_1457.jpeg
|
|
|
244
|
Mon Oct 23 18:02:23 2023 |
Shane, Jon | Update | CDS | Timing chassis assembly complete |
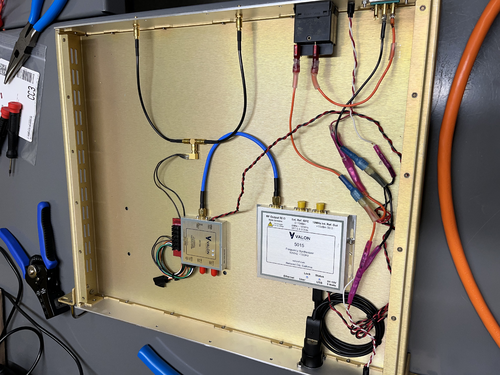
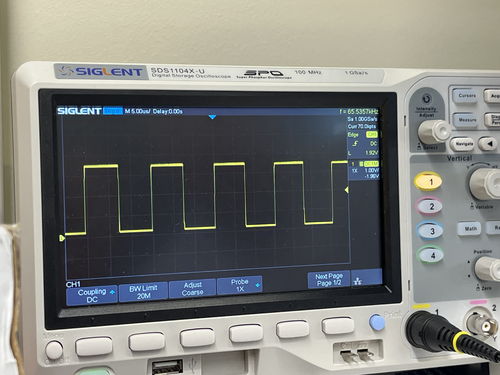
| Concluded assembly of timing chassis for CyMAC today; see attachment 1 for interior set up of chassis. Installed front and rear panels, wired on/off switch and LED assembly, and tested to confirm everything is powering on correctly. Also tested the outputted timing reference that will go to DAC and ADC adapter boards (see attachment 2 for output 1 and attachment 3 for output 2). |
| Attachment 1: timing_chassis_complete.jpeg
|
|
| Attachment 2: timing_chassis_output_1.jpeg
|
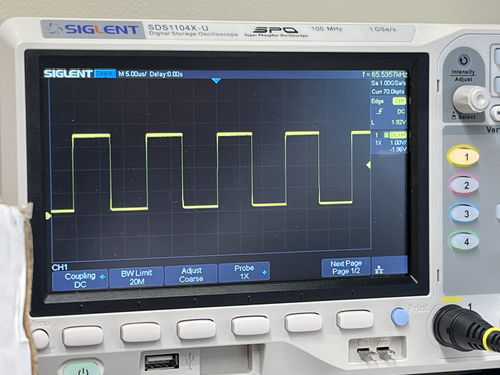
|
| Attachment 3: timing_chassis_output_2.jpeg
|
|
|
247
|
Fri Oct 27 15:28:30 2023 |
Shane | Update | CDS | AA and AI chassis for CyMAC powered on and functional |
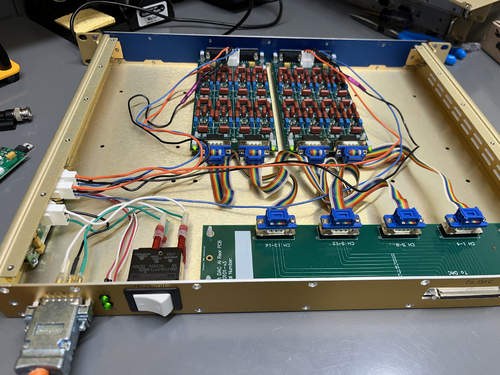
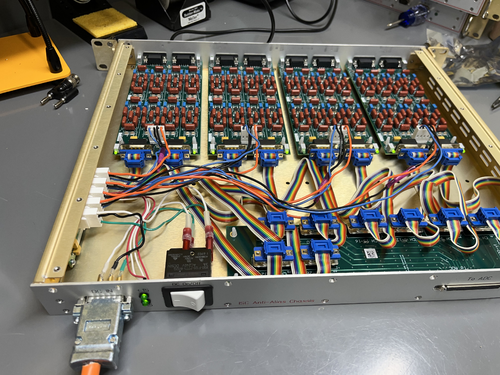
| CyMAC updates: Switched out the faulty power regulator boards in the Anti-Aliasing and Anti-Imaging chassis. Both chassis are now powering up correctly with lights on and the correct voltages in/out of the power regulator board. Images attached. All chassis for the CyMAC now functional, so next step is mounting everything in the rack. |
| Attachment 1: AI_chassis_lights_on.jpeg
|
|
| Attachment 2: AA_chassis_lights_on.jpeg
|
|
|
250
|
Mon Oct 30 18:15:13 2023 |
Shane | Update | CDS | CyMAC chassis mounted and progress on power connections |
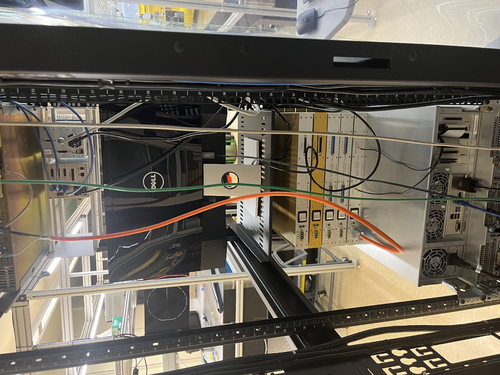
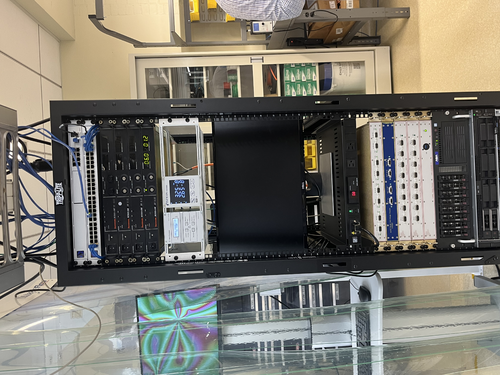
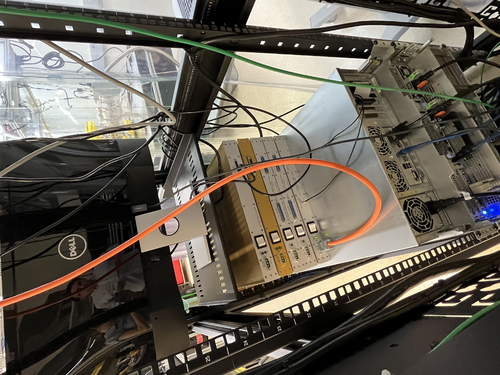
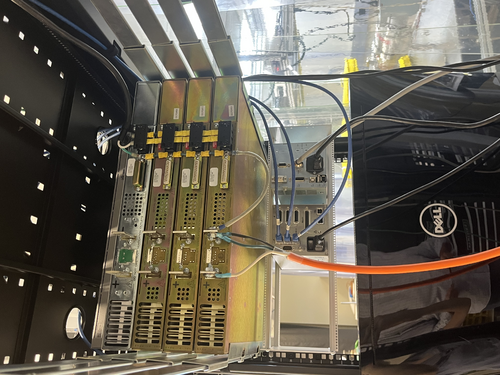
| All CyMAC chassis mounted in electronics rack today, and shelf for monitor also mounted. Images attached. Assembled grounding cables for power connections, and attached the timing chassis to power & gnd. Powered on successfully with correct voltages in expected places. After power test, everything was turned off and unplugged. Next steps: attach grounding cables to other four power supply chassis. Also attach anti-aliasing, anti-imaging, binary input and binary output chassis to power supply. |
| Attachment 1: electronics_rack_back.jpeg
|
|
| Attachment 2: electronics_rack_front.jpeg
|
|
| Attachment 3: mounted_chassis.jpeg
|
|
| Attachment 4: power_supply.jpeg
|
|
|
252
|
Wed Nov 1 18:24:01 2023 |
Shane | Update | CDS | CyMAC Power connections made |
Finished power connections today for the CyMAC chassis. Images attached. Had to switch the shrink fork terminals on the power supply cables to shrink ring terminals, but was able to get everything connected and secured. Upcoming work: turning on power supply and testing voltages/checking everything is turning on and lighting up correctly.
Configuration is as follows:
- Topmost Sorensen: +24V (reserved for FROSTI)
- Negative terminal: [negative terminal is grounded]
- jumper to Sorensen ground screw
- Sorensen 2nd from the top: +18V
- Positive terminal:
- white power cable wire for AA chassis
- white power cable wire for AI chassis
- white power cable wire for BI chassis
- white power cable wire for BO chassis
- Negative terminal: [negative terminal is grounded]
- jumper to Sorensen ground screw
- black power cable wire for AA chassis
- black power cable wire for AI chassis
- black power cable wire for BI chassis
- black power cable wire for BO chassis
Sorensen 3rd from the top: -18V
- Positive terminal:[positive terminal is grounded]
- jumper to Sorensen ground screw
- green power cable wire for BI chassis
- green power cable wire for BO chassis
- Negative terminal:
- green power cable wire for AA chassis
- green power cable wire for AI chassis
Bottommost Sorensen: +6V
- Positive terminal:
- white power cabe wire for timing chassis
- Negative terminal: [negative terminal is grounded]
- jumper to Sorensen ground screw
- green power cable wire for timing chassis
- black power cable wire for timing chassis
|
| Attachment 1: cymac_power_connected.jpeg
|
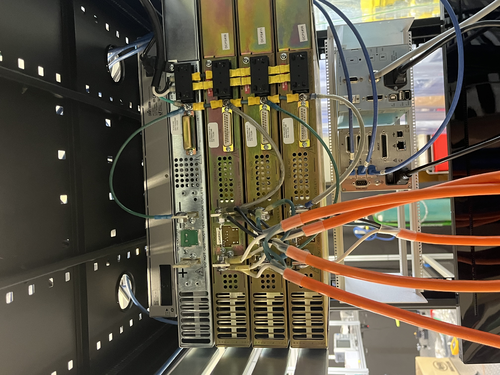
|
| Attachment 2: cymac_power_connections_back.jpeg
|
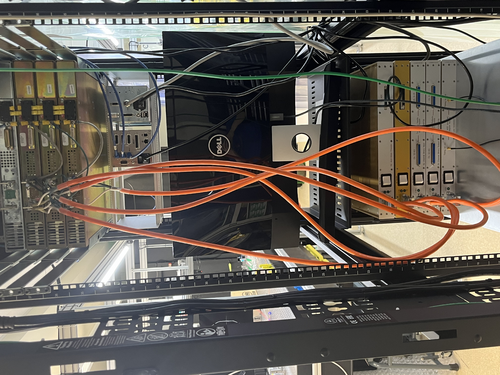
|
|
254
|
Thu Nov 2 17:14:36 2023 |
Shane, Jon | Update | CDS | CyMAC set up permanentized |
|
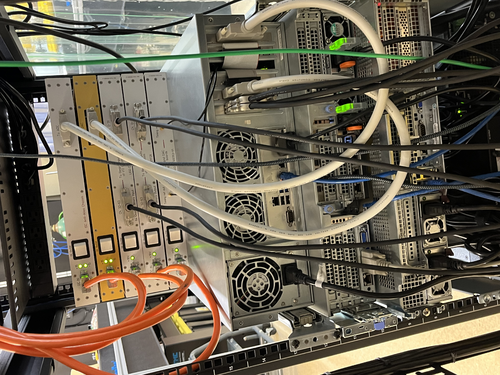
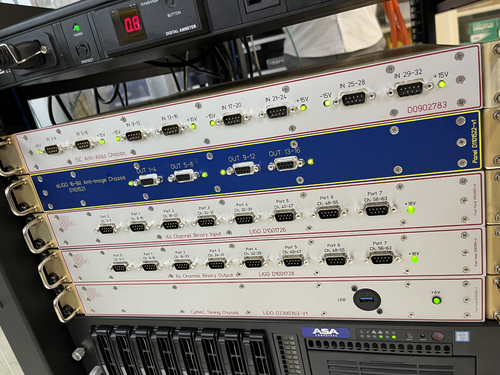
CyMAC connections have been finalized and made permanent. Also tested voltages, which are all looking good. Warning: power is on. Do not touch power supply terminals or screws connected to grounding cables (see attached images 4 and 5; green wires on back of power supply with black and yellow covers, and exposed positive and negative terminals on back of power supply).
Also established connections from Anti-Aliasing chassis to ADC adapter board, Anti-Imaging chassis to DAC adapter board, and binary in/out chassis to BIO card, all mounted within Cymac host computer. Turned on CyMAC and ran test model, received error message likely pointing to timing signal not being successfully passed to the adapter boards. Next steps are checking to make sure correct timing signal is actually being output, and then checking internal ribbon cable in host chassis, which is another potential cause of the error.
|
| Attachment 1: cymac_chassis_back.jpeg
|
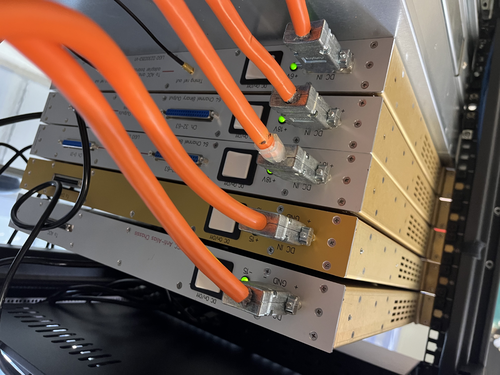
|
| Attachment 2: cymac_chassis_back2.jpeg
|
|
| Attachment 3: cymac_chassis_front.jpeg
|
|
| Attachment 4: final_connections_back_of_power_supply.jpeg
|
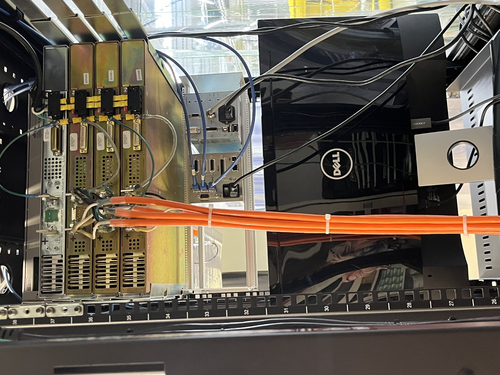
|
| Attachment 5: power_supply_back.jpeg
|
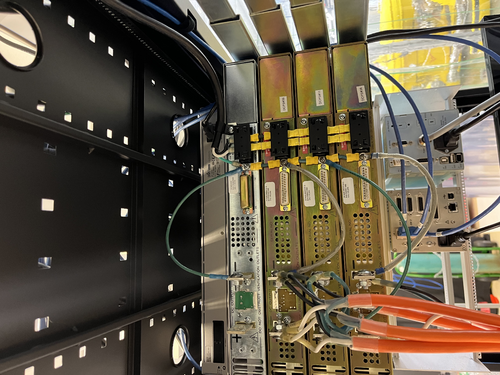
|
|
265
|
Mon Nov 13 11:23:54 2023 |
Jon | Update | CDS | CyMAC testing |
[Jon, Shane, Luis]
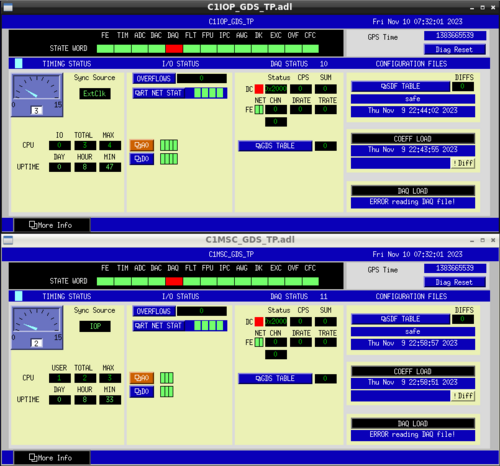
My repair of the internal ribbon connecting the ADC to the adapter board resolved the timing signal problem. After this repair, we were able to start the front-end IOP model and checked out the RTS diagnostic screens (pictured below). All indicator lights were green except for the DK flag (indicating the DAC outputs are not enabled) and the DAQ flag (indicating that the system is recording data to disk). Those were both as expected, because the DAQD data acquisition service was not set up yet and the DAC outputs are not enabled until at least one user model (which outputs signals to the DAC) is started. I created and installed a simple user model (C1MSC) and confirmed that the DK flag clears once this model starts.
I later attempted to set up the DAQD service, which is needed to save data, but am yet to successfully debug it. I have received some guidance from one of LIGO's CDS experts and will try it at my next opportunity for lab work. |
| Attachment 1: Cymac_GDS_Diagnostics.png
|
|
|
276
|
Wed Nov 22 15:46:50 2023 |
Shane | Update | CDS | DB25 signal connections for FROSTI heaters |
[Shane, Jon]
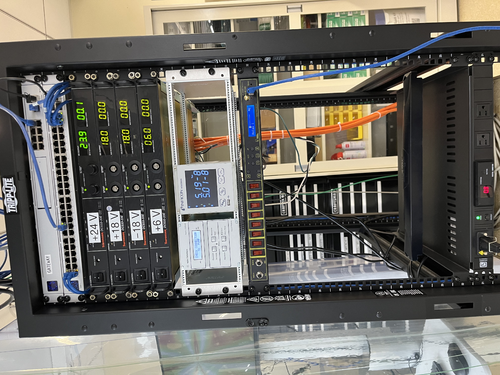
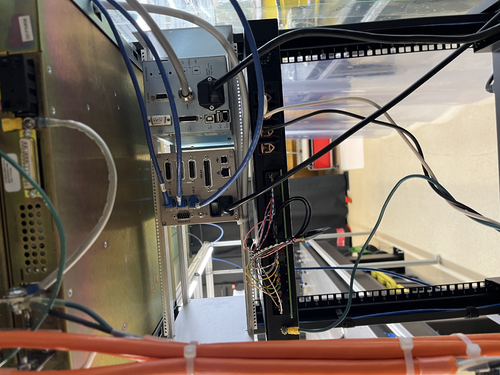
Installed new DC smart switch in electronics rack, configured power connections. Images attached. Attached is a diagram of the male DB25 signal connections to be used for FROSTI heaters. Also included below is table detailing pin and signal configuration.
| Pin |
Signal |
| 1 |
V+ Heater 1 |
| 2 |
V+ Heater 2 |
| 3 |
V+ Heater 3 |
| 4 |
V+ Heater 4 |
| 5 |
V+ Heater 5 |
| 6 |
V+ Heater 6 |
| 7 |
V+ Heater 7 |
| 8 |
V+ Heater 8 |
| 9 |
N/C |
| 10 |
N/C |
| 11 |
N/C |
| 12 |
N/C |
| 13 |
N/C |
| 14 |
RTN heater 1 |
| 15 |
RTN heater 2 |
| 16 |
RTN heater 3 |
| 17 |
RTN heater 4 |
| 18 |
RTN heater 5 |
| 19 |
RTN heater 6 |
| 20 |
RTN heater 7 |
| 21 |
RTN heater 8 |
| 22 |
N/C |
| 23 |
N/C |
| 24 |
N/C |
| 25 |
N/C |
|
| Attachment 1: DB25input_signals.pdf
|

|
| Attachment 2: IMG_3137.jpeg
|
|
| Attachment 3: dc_smart_switch_signal_connections.jpeg
|
|
|
277
|
Thu Nov 23 12:34:44 2023 |
Jon | Update | CDS | DB25 signal connections for FROSTI heaters |
Update: I was able to put the FROSTI power controller on the lab network. It is connected to the switch in the top of the rack and is assigned a static IP address of 192.168.1.12 and an NDS hostname of relay1.
The controller can be remotely accessed through an SSH command line interface as well as an HTML webpage, which can be opened from any web browser on the lab network by navigating to the above IP address (the login credentials are the same as for the workstation computers).
There is also an unofficial Python package for interfacing with the controller: dlipower. We will investigate using this package to interface the controller with soft EPICS channels hosted on the CyMAC. This will allow us to create a custom MEDM screen for controlling the FROSTI heater elements.
Edit: The login credentials were set up to be the same as for the CDS workstations. |
|
285
|
Mon Dec 4 21:27:53 2023 |
Shane | Update | CDS | ADC-DAC loopback test results |
| Here are the test results from today's ADC-DAC loopback tests. Channels 14 and 15 were the only ones behaving abnormally. Not sure what the issue is, but needs further debugging. The DAC output was as expected for both of them, but the corresponding ADC inputs were the same regardless of what offset was used (hovering around values of -4 and -5). NOTE: all measurements listed in the attached table are 'averages' in the sense that the ADC inputs and DAC outputs hovered around the listed values, changing by +1 or -1. |
| Attachment 1: adc-dac_loopback_testing_results.pdf
|

|
|
290
|
Mon Dec 11 12:58:57 2023 |
Shane, Luis | Update | CDS | DAC-ADC loopback test debugging |
| [Luis, Shane]
Working on debugging last week's weird results for the ADC-DAC loopback test for channels 14 and 15. With DAC output channels 12-15 connected to ADC input channels 12-15: tried setting matrix coefficients for channels 12-15 to 1, and as with last week's results, DAC is outputting as expected for all three channels and ADC is not reading in the signal (hovering around -4,-5) for channels 14 and 15. Channels 12 and 13 still reading in correctly. Tried switching DAC output plug into channels 0-3, with ADC input plugged into channels 12-15, and all input/output signals were reading correctly. Then switched to plugging in DAC output to channels 12-15 and ADC input to channels 0-3, and saw that channels 0-3 were only able to receive the first two ADC input values. This shows that channels 12-15 are capable of receiving the correct inputs from other channels, but are failing to produce outputs for channels 14 and 15. |
|
312
|
Wed Jan 31 14:37:26 2024 |
Shane | Summary | CDS | path directions for CyMAC model and parts library |
| Path to cds parts library in Matlab simulink: /usr/share/advligorts/src/src/epics/simLink. File name CDS_PARTS.mdl
Path to user models: /opt/rtcds/usercode/models, using file name c1msc.mdl |
|
313
|
Fri Feb 2 16:56:56 2024 |
Jon | Update | CDS | RTS model implemented for FROSTI RTD readouts |
Summary
Today I finished implementing an RTS model to read out the integrated FROSTI RTDs (temperature sensors) via the CyMAC. The model is named "MSC" and is located at cymac:/opt/rtcds/usercode/models/c1msc.mdl. We successfully tested it with the heater elements operating in vacuum at low power (12 VDC), finding them to reach an average steady-state temperature of 160 C.
From the cymac host, the MEDM control screen can be accessed with the terminal command "sitemap" (from any directory).
Measurement Technique
Each FROSTI heater element [299] contains an internal two-wire RTD placed near the front emitting surface, which enables the temperature of the blackbody emitter to be directly monitored. From the measured temperature and the emissivity of the uncoated aluminum nitride surface (known to be ~1 in the IR), the radiated source-plane power can also be estimated.
The resistance of each RTD is measured via a ratiometric technique. The RTDs are powered in series with a 1 kΩ reference resistor located inside the readout chassis [305], whose temperature is not changing. The signal is obtained by taking the ratio of the voltage difference across each individual RTD to the voltage difference across the reference resisitor. The advantage of this technique is that the ratio of the voltage differences is insensitive to changes in the current through the resistors (since they are all in series; see [271] for wiring diagram).
Implementation Detail
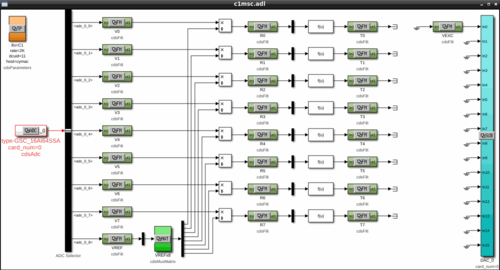
The signal flow is shown in Attachment 1. The eight RTD signals enter through ADC channels 0-7, along with the reference resistor signal on channel 8. The first set of filter modules apply a calibration gain to convert the signals from raw ADU counts to units of input-referred voltage. The ratio of each RTD signal to the reference resistor signal is then taken. The second set of filter modules multiply the voltage-difference ratios by the resistance of the reference resistor, 1 kΩ ± 0.01%, to obtain the RTD resistances in physical units of ohms.
Finally, a freeform math module is used to invert the quadratic relation between each RTD's resistance and temperature. The final signals passed to the third set of filter modules are the RTD temperatures in physical units of degrees C. The temperatures of the tungsten RTDs are estimated assuming TCR coefficients of A=0.0030 C-1 (±10%) and B=1.003E-6 C-2, which were provided by the manufacturer.
One DAC channel is used to provide the excitation voltage for the RTD measurement, which is visible on the far right of the control screen. At its maximum output voltage of +10 V, the DAC can drive a maximum current of 10 mA. |
| Attachment 1: sitemap_screen.png
|
|
|
329
|
Mon Feb 19 14:40:21 2024 |
Shane | Update | CDS | MEDM screen for FROSTI temp readouts |
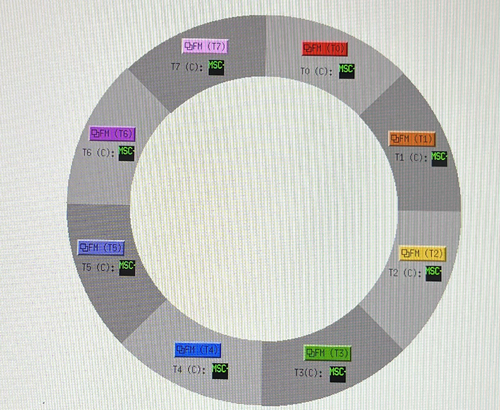
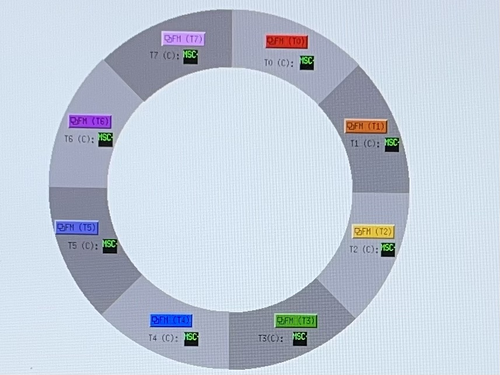
| Here's the latest draft of the MEDM screen for the FROSTI heating elements' temperature readouts. Note that the MEDM screen isn't actually this grainy, this just happens to be a photo of the lab monitor's screen off a phone. |
| Attachment 1: IMG_6094.jpeg
|
|
| Attachment 2: IMG_6092.jpeg
|
|
|
337
|
Fri Feb 23 15:01:48 2024 |
Shane | Update | CDS | Latest draft of MEDM screen for FROSTI readouts |
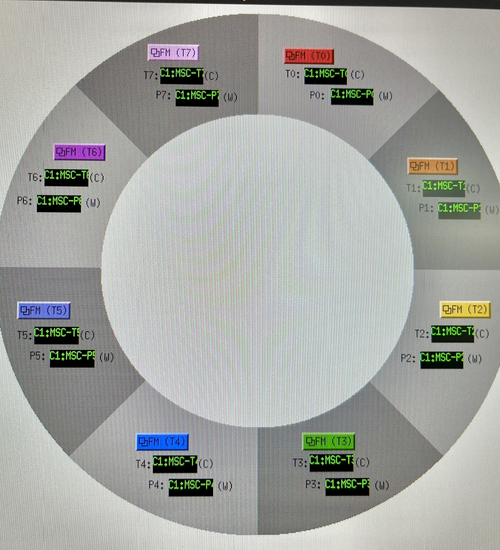
| Here's the latest draft of the MEDM screen for the FrOSTI temp and power readouts. Also, debugged the text readout boxes so they're now correctly reading out the live temperature and power values. |
| Attachment 1: IMG_6128.jpg
|

|
| Attachment 2: 23.jpg
|
|
|
346
|
Thu Feb 29 17:16:48 2024 |
Shane | Update | CDS | MEDM screen for FROSTI T/P readouts |
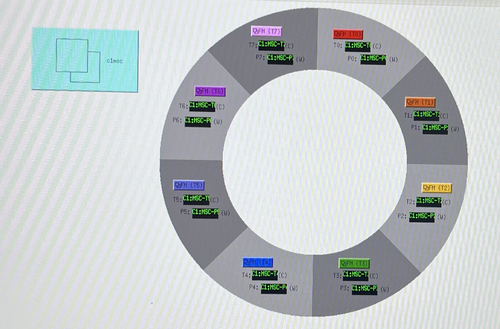
| Here's the latest draft of the MEDM screen for the FROSTI temp and power readouts, now with a button linking to the c1msc file display. Size/color/label are all changeable, if adjustment is needed. Checked in execute mode as well, and it's working correctly. Also noticed that the MEDM file name has been changed to FROSTI.adl, which I'm noting here for future reference. Still in medm_sandbox directory. |
| Attachment 1: IMG_6259.jpeg
|
|
|
365
|
Tue May 7 20:34:31 2024 |
shane | Update | CDS | frosti MEDM screen update |
| [Luis, Shane]
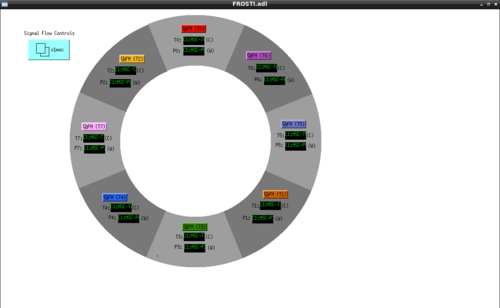
Here is the updated MEDM screen, with new orientation and updated labeling to reflect the actual positions of the heater elements. Note that indices start at T0 to be consistent with simulink model, though in the previous elog for the FROSTI layout the heater elements are labeled 1-8.
Also, we finally learned how to take a screenshot on debian. |
| Attachment 1: FROSTIMEDMMay7.2024.png
|
|
|
398
|
Mon Jul 8 17:01:45 2024 |
Shane | Update | CDS | New CyMAC internal layout |
| [Jon, Shane]
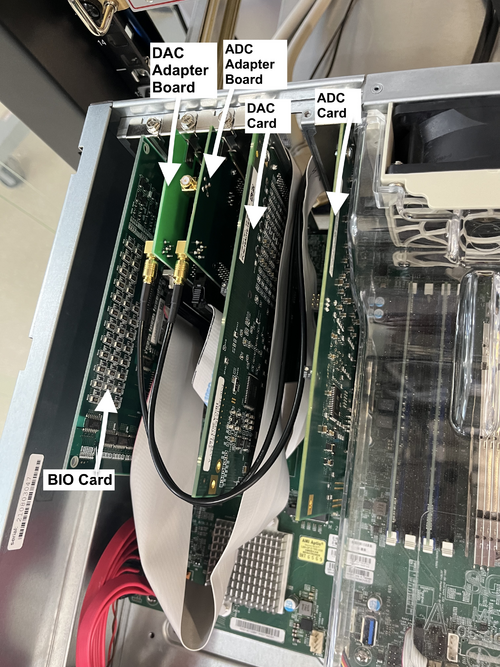
Internal layout of CyMAC has been updated (labeled image attached) to accommodate the replacement of the two ribbon cables. Looking down on the chassis from the front, and going from left to right, the new placement is as follows: BIO card, DAC adapter board, ADC adapter board, DAC card, ADC card. NOTE: As part of ADC-DAC loopback testing, we're disconnecting from the FROSTI readout chassis and using the cables to connect directly from ADC input channels to DAC output channels . Initial testing confirmed functionalility of all 32 ADC input channels and the first 8 DAC output channels. |
| Attachment 1: updated_cymac.jpeg
|
|
|
399
|
Tue Jul 9 18:19:50 2024 |
Shane | Update | CDS | ADC-DAC loopback testing and IOLAN installation |
| [Shane, Jon]
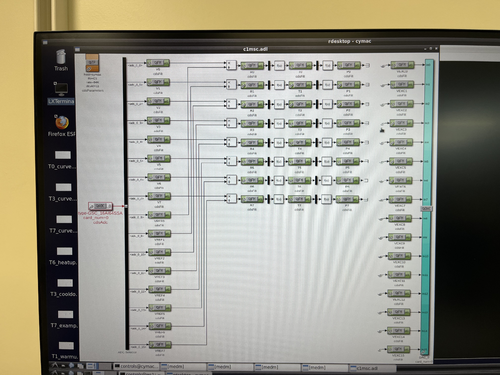
Finished ADC-DAC loopback testing today (see attached xlsx file or access directly here). All looks well with the first 8 channels, with the gain hovering just under 2. Also edited c1msc model in simulink to add channels 7-15 (the last 8 channels), and changed the rate back to 64K. See image 1 for the updated c1msc model. The last 8 channels are also looking good and show no problems, with slightly more scattering for the gain, but all values very close to 2.
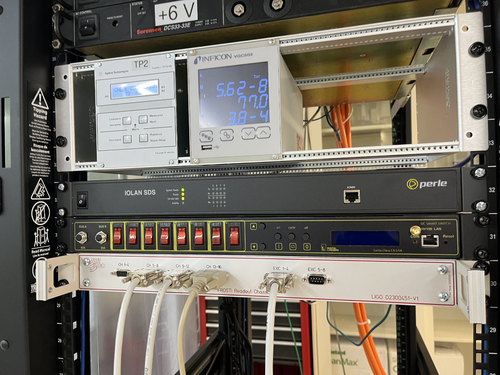
We also installed the new eight-channel Perle IOLAN SDS8 terminal server today. Image attached.
NOTE: When we were installing it, we noticed an energized wire dangling from the 24V power supply. Has since been fixed and put back into place. |
| Attachment 1: iolanServerTerminal.jpeg
|
|
| Attachment 2: ADC-DAC_Loopback_Testing.xlsx
|
| Attachment 3: updatedc1msc.jpeg
|
|
|
410
|
Tue Jul 16 18:43:07 2024 |
Shane | Update | CDS | ADC-DAC loopback testing and IOLAN installation |
|
UPDATE:
Follow up ADC-DAC loopback testing now complete, matching all the ADC channels to a single DAC channel, and then matching all the DAC channels to a single ADC channel (see attached xlsx file or access directly here). Also note c1msc model file has been updated to include the second set of 16 ADC channels. The newly added channels also have their own filter modules, but those are not needed for anything other than the loop-back testing and can now be deleted if we don't want to keep them.
| Quote: |
| [Shane, Jon]
Finished ADC-DAC loopback testing today (see attached xlsx file or access directly here). All looks well with the first 8 channels, with the gain hovering just under 2. Also edited c1msc model in simulink to add channels 7-15 (the last 8 channels), and changed the rate back to 64K. See image 1 for the updated c1msc model. The last 8 channels are also looking good and show no problems, with slightly more scattering for the gain, but all values very close to 2.
We also installed the new eight-channel Perle IOLAN SDS8 terminal server today. Image attached.
NOTE: When we were installing it, we noticed an energized wire dangling from the 24V power supply. Has since been fixed and put back into place. |
|
| Attachment 1: Follow-up_ADC-DAC_Loopback_Testing.xlsx
|
|
419
|
Fri Aug 2 13:50:22 2024 |
Shane | Update | CDS | Serial Comm. Test (Agilent Turbo Pump) |
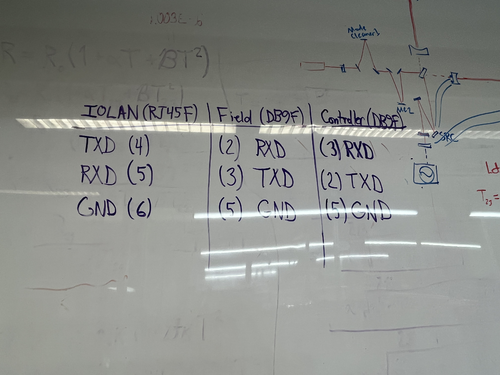
| Did a brief communication test with the agilent turbo pump today, to see if we could get serial communications up and running for it. Used a simplified python script with sockets package to establish a connection and send a simple command to query the pump's operational status. The connection was successful, and had no issues establishing. The command also sent successfully, and received a response. The response didn't make sense, though, as all the possible statuses correspond to integers 0-7, and this test returned the integer 15. Need to troubleshoot some more to figure out why it's returning nonsense values. Possible match-up issue with the way the information is being encoded on each end? At the very least, connection and command sending are both working fine, and this showed that the pin-out connections we were assuming (image attached) are correct for basic connection to work. |
| Attachment 1: pinouts.jpeg
|
|
|
434
|
Tue Sep 3 18:24:17 2024 |
Tyler | Update | CDS | Cymac Timing Chassis Issue |
| [Tyler, Jon]
The timing chassis used for the cymac has been shut off due to an unknown issue causing its supplied current to fluctuate. All real-time models will be suspended until a solution is found.
|
|
Draft
|
Tue Oct 1 19:41:23 2024 |
Shane | Update | CDS | CyMAC Timing Chassis Issue |
| [Shane, Luis]
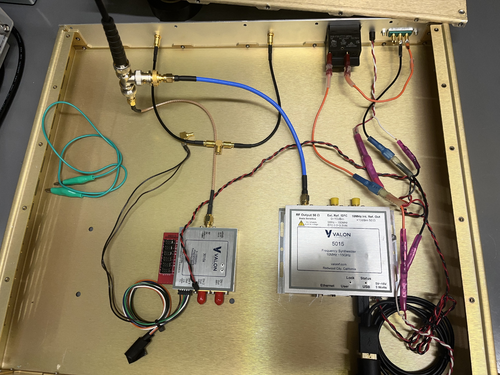
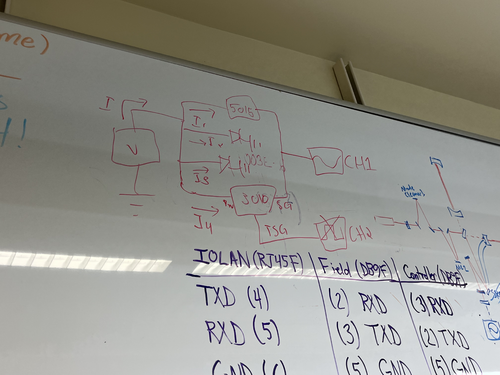
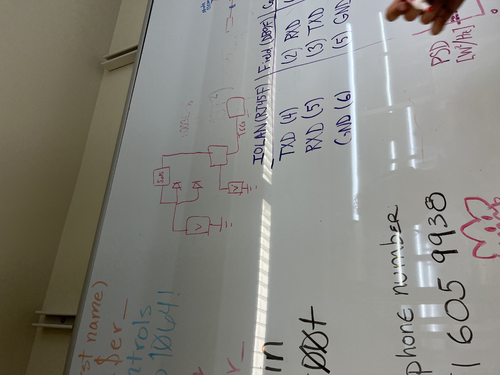
Summary of the issue we've been having with the timing chassis: when we connect only the Valon 5015 to power, the timing signal comes out of it sinusoidal as expected and the status lights are steady and all looks good. As soon as we connect the 3010 to power, the signal (both coming out of the 5015 and coming out of the 3010) go flat and the status lights of the 5015 start to flicker.
We think what may be going on is that the 5015 is drawing just enough power to survive on its own, but when the current gets split to go to the 3010 as well, the 5015 takes more than it needs and becomes overpowered, and thus no longer outputs anything. We want to test further by powering them with two separate power supplies, but we need another one of the power connectors for the 3010 (the only one we have branches out from the connector to the 5015 and we don't want to cut any of the wires).
Images of the inside of the chassis, along with two roughly sketched circuit diagrams (one showing the current setup, in which they're powered by the same source, and one showing a possible test set up, in which they're powered separately. |
| Attachment 1: IMG_5917.jpeg
|
|
| Attachment 2: IMG_5803.jpeg
|
|
| Attachment 3: IMG_5804.jpeg
|
|
|
461
|
Thu Oct 17 13:24:23 2024 |
Shane | Update | CDS | Timing Chassis issue identified |
|
[Ma, Luis, Shane]
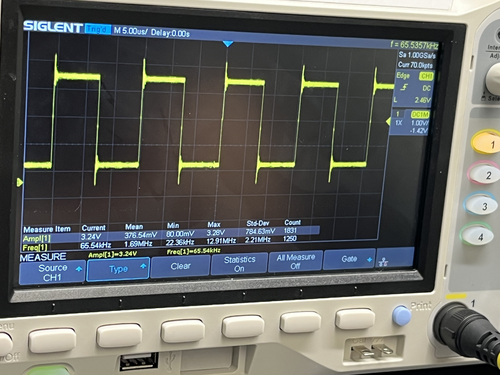
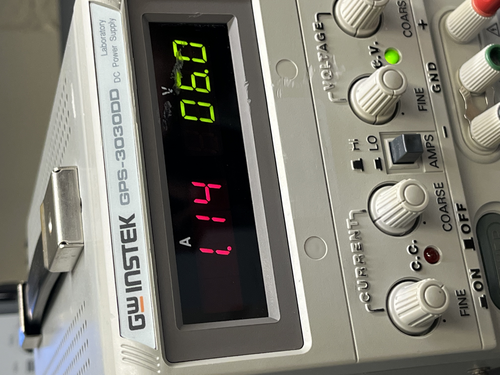
Working theory for the timing chassis issues had been that the 1A breaker was tripping and causing the failure of the Valon 5015 and 3010 to output the timing signal correctly. We just tried bypassing the breaker, running 6 V on the benchtop power supply (set the current limit to 1.5A), with the 5010 generating the sine wave to pass to the 3010. All worked correctly, and there were no issues. Square wave outputted by the 3010 was exactly as desired (image attached) at the correct frequency, and this confirms the issue was the breaker, not the valon 5015. Ready to go ahead with ordering a new replacement breaker.
|
| Attachment 1: IMG_6462.jpeg
|
|
| Attachment 2: IMG_6464.jpeg
|
|
|
465
|
Fri Oct 25 10:56:30 2024 |
Shane | Update | CDS | Timing Chassis fixed and reinstalled |
|
[Ma, Shane]
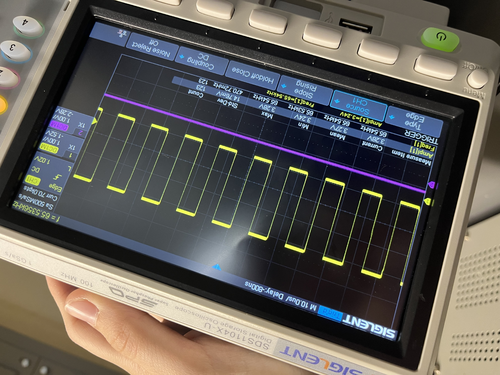
We replaced the 1A breaker in the timing chassis today with a 4A one, and tested that all is working well. The chassis successfully outputted the correct signal (image attached). The real time models have also been restarted and the CyMAC diagnostics screen is showing all green flags. Timing chassis has been closed up and reinstalled in the server rack.
|
| Attachment 1: successful_timing.jpeg
|
|
|
473
|
Thu Nov 14 11:58:05 2024 |
Shane | Update | CDS | Turbo pump connection troubleshooting |
| Attempted connection to the TV551 turbo pump through Varian/Agilent's software on spica. Successful connection established, and we are able to read out al the readings associated with the pump (status, temperature, etc) through the software, which is actually pretty extensive and well organized. Was able to stop and restart the pump with no issues. Serial communications seem to be working fine, and the current serial settings (baud rate 9600, serial type RS232) all match what the Iolan was expecting with the previous connection test. Also notable: the code used for the previous (failed) connection test is written using 'Letter protocol', which is the older of the two communications protocols supported by these kinds of pumps. This rules out the pump being too old to accept the newer communication format as the issue, since it's the older format being used anyway. Will continue trouble shooting to determine why previous connection test failed. |
|
484
|
Wed Dec 4 16:01:23 2024 |
Shane | Update | CDS | Vac serial interfacing troubleshooting update |
| Update on the issue with serial interfacing for the TV 551 turbo pump: Tried a new test today, to see if the commands being sent to the controller were actually getting through at all, since we know that no response is getting back to us. To test this, I sent the start/stop command for the pump, disconnected the serial connection and instead connected the controller to spica so I could run the manufacturer's software, and used the manufacturer's sotware to check the pump status manually. After trying a few variations of this test, during which the pump status did not change at all from 'normal' (meaning the stop command being sent was not actually received), we've concluded that the commands being sent to the pump with the serial comms code are not being received. Further troubleshooting needed. |
|
505
|
Tue Jan 28 13:30:46 2025 |
shane | Update | CDS | Serial comms testing update |
| Attempted to communicate with the smaller vac pump (TwissTor 74) via Agilent software today. Was able to communicate with the pump via python serial connection code as usual, with no issues. When using the manufacturer software though, it was unable to 'locate' the pump and failed to connect to it. So manufacturer software works for the big (older) pump, but not the smaller, newer one. Unclear if this is somehow related to the fact that using the manufacturer software for the bigger pump involved manually connecting its controller to spica with a db9, and there was no obvious way to do that for the smaller pump's controller. |
|
518
|
Wed Feb 19 13:44:48 2025 |
Shane | Update | CDS | Vac serial interfacing update |
|
[Jon, Shane]
Debugging update for vac system serial communications: we were able to successfully connect the smaller turbo pump to the Varian (manufacturer) software today by plugging the controller db9 directly into spica, and verified that the pump was able to send and receive information. Still no success on communication with the larger pump via python serial code, though. Issue potentially lies in the pinout mapping of the connectors, as the pinouts we'd been using work successfully for the small pump which only requires 3 connections (RXD, TXD, GND), but the large pump may require more. Tried to test this on the big pump by keeping the pinout setup for the small pump, and incrementally adding the remaining 6 connections on a one to one scale (Pin 1 matched to Pin 1, etc) between the controller DB9 and the field DB9 connected to the IOLAN ethernet cable. After each new connection was added, I retried running the serial connection code. None of the additional connections yielded any results, and the large pump remained unable to connect through the code. Next step is further looking into documentation on the pinouts to see if the large pump requires a different connection setup than the small pump.
|
|
527
|
Thu Feb 27 18:22:21 2025 |
Shane | Update | CDS | Ongoing work in server rack and desk area (1119) |
| As part of the vacuum communications debugging process, there is ongoing work in the server rack and desk area in 1119. Please be careful not to move any of the materials left out in the server rack or on the work bench. |
|
532
|
Tue Mar 4 10:47:03 2025 |
Shane | Update | CDS | Vac system pinouts |
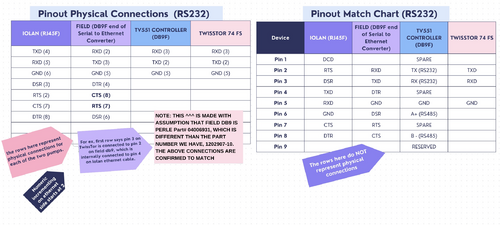
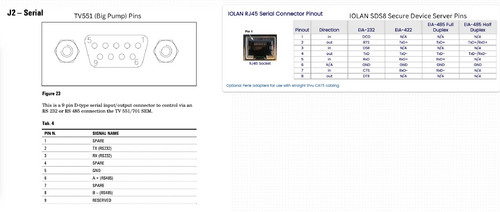
| Attached here are the pinouts, as we currently know them, for the vacuum system. The three items focused on here are the Agilent TwissTorr 74 FS turbo pump (the smaller/newer pump) and controller, the Agilent TV 551 Navigator turbo pump (the larger/older pump) and controller, and the Eight-channel Perle IOLAN SDS8 terminal server. The 'field' pinouts in the attached tables refer to the DB9 end of the RJ45F to DB9F converter. |
| Attachment 1: vac_pinouts_1.jpeg
|
|
| Attachment 2: vac_pinouts_2.jpeg
|
|
|
533
|
Wed Mar 5 12:16:28 2025 |
Shane | Update | CDS | Vac system communications update |
|
[Shane, Jon]
Update on the serial interfacing with the vacuum system: both turbo pumps are now able to successfully communicate through the code. The older pump, for unknown reasons, required a newer version of the communication syntax (despite the newer, small pump being able to communicate fine with the old communication format). We have also confirmed that the newer pump works with this new format as well. Next step is interfacing the pressure gauge.
|
|
534
|
Wed Mar 5 18:13:20 2025 |
Shane | Update | CDS | vac system comms |
|
[Shane, Jon]
Update on the serial interfacing with the Inficon VGC503 pressure gauge: We began setup of the Inficon pressure gauge today. We configured the ethernet setting via USB and assigned it a static IP address of 192.168.1.30, which is listed in the network table on the lab wiki. It is showing up on the network successfully, and is responding to pings. Will attempt communication via code next.
|