| ID |
Date |
Author |
Type |
Category |
Subject |
|
258
|
Thu Nov 9 13:48:47 2023 |
Aiden | Update | VAC | Vacuum Chamber Baking Update |
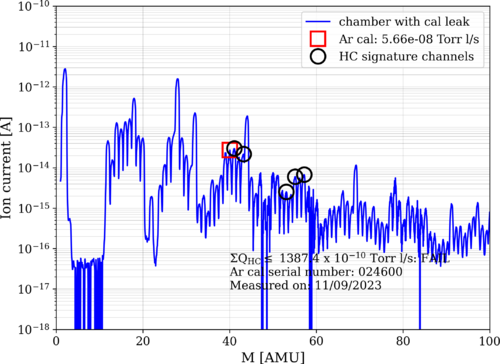
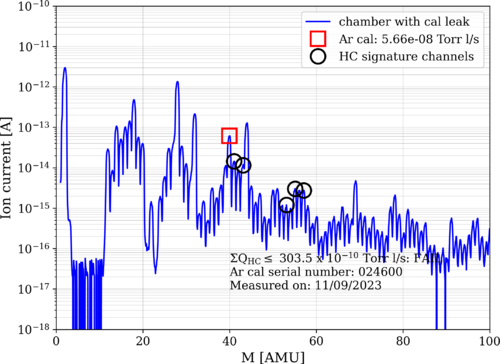
| After bake 7 was stopped on Wednesday morning (11,8,2023), I took RGA data of the chamber to compare to a later scan that will be done on Monday to make sure the chamber has reached its lowest pressure. Below are the graphs. |
| Attachment 1: bake7_231109_ArC.png
|
|
| Attachment 2: bake7_231109_ArO.png
|
|
|
259
|
Thu Nov 9 13:57:58 2023 |
Shane, Luis, Aiden, Tyler | Update | Cleanroom | cleanroom cleaning and particle count |
|
[Aiden, Shane, Luis, Tyler]
cleaning cleanroom and particle count
- 12:30 pm: Tyler and Aiden started organizing cables in cleanroom
- 12:35 pm: started particle count in flow bench
- 0.3 u: 11681
- 0.5 u: 3284
- 1.0 u: 1039
- 12:50 pm: started cleanroom particle count
- zone 3:
- 0.3 u: 14549
- 0.5 u: 10351
- 1.0 u: 6194
- zone 4:
- 0.3 u: 10808
- 0.5 u: 4655
- 1.0 u: 1953
- 1:07 pm: began surface check and wipedown, including softwalls
- 1:19 pm: started vacuuming the floor
- 1:28 pm: finished vacuuming the floor
- 1:29 pm: started mopping the floor
- 1:33 pm: finished mopping the floor
- 1:34 pm: started cleaning the buckets
- 1:37 pm: started mopping with IPA wipes
- 1:39 pm: finished mopping with IPA wipes
- 1:40 pm: changed sticky floor mats
- 1:41 pm: started particle count
- zone 3:
- 0.3 u: 8397
- 0.5 u: 5071
- 1.0 u: 2618
- zone 4:
- 0.3 u: 6651
- 0.5 u: 4323
- 1.0 u: 2120
|
|
260
|
Thu Nov 9 19:06:46 2023 |
shane | Update | Cleanroom | 5 zone cleanroom measurement |
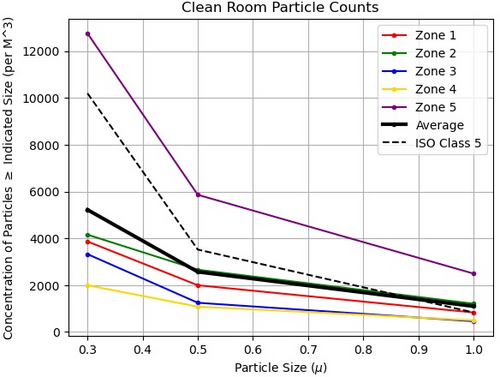
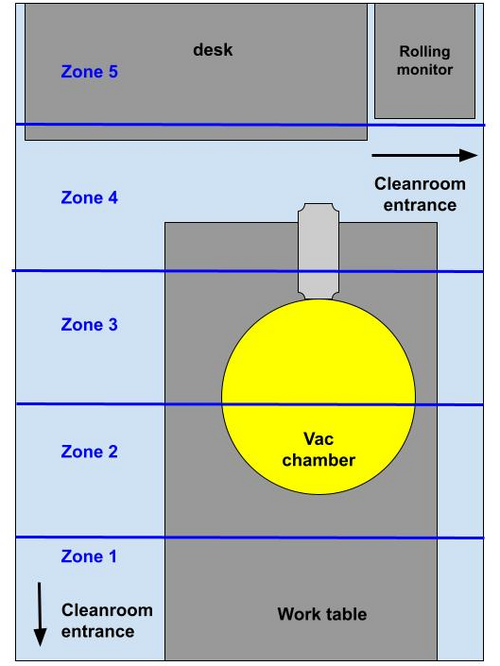
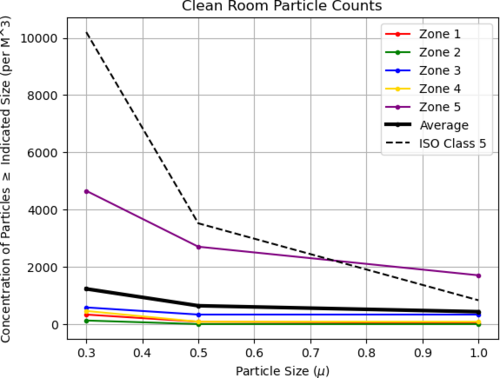
| Here's today's five zone measurement, taken ~5 hours after the cleaning. Zone 5 (closest to fire cabinet and back wall) is a bit over the limit in all size ranges (about 1500 particles in 1.0u size range over), and zone 2 is slightly over the limit in the 1.0u range, but everything else is under the requirement. |
| Attachment 1: 23.jpeg
|
|
|
261
|
Fri Nov 10 08:32:34 2023 |
Jon | Update | VAC | RGA experiments |
I ran a 3-minute degas cycle of the RGA filament for the first time yesterday (in this process, the filament gets very hot in order to "boil off" settled particulate). I was surprised to see the pressure (of not just the RGA volume, but also the main volume) rise from 2e-8 to 5e-6 torr.
This observation, plus the rise in pressure seen every time the filament is activated for an RGA scan, indicates we have significant particulate settling on the RGA filament. This may be systematically biasing RGA scans taken within a short time (~15 minutes) of turning on the filament.
I have two ideas to reduce particulate on the RGA. However, before implementing these, I first want to consult with the vacuum experts at LIGO Lab.
- Run a second RGA degas cycle, but next time with the main volume valved off with only the RGA volume being pumped (through the bypass line). This will prevent "boiled off" particulate from entering the main chamber and will also increase the pumping rate for the RGA volume, reducing the amount of particulate that resettles on the RGA filament.
- I also noticed that the SRS manual states that the filament is designed to be long-lived and it is recommended to leave it on any time the RGA is on. By leaving the filament on all the time (i.e., hot), we could reduce the amount of particulate that is evidently settling on it between scans. I am checking whether LIGO Lab does this in their own chambers.
|
|
262
|
Fri Nov 10 14:16:04 2023 |
shane | Update | Cleanroom | new cleanroom zone diagram |
| since the vac system has been moved and made permanent, here's a new diagram of the cleanroom zones. The zones themselves haven't moved, but the diagram has been updated to reflect the new set up of the cleanroom. |
| Attachment 1: cleanroom_zones_nov2023.jpg
|
|
|
263
|
Mon Nov 13 06:15:45 2023 |
Peter | Update | VLC Update | VLC Mode Matching |
| Weekly Updates Attached in pdf |
| Attachment 1: VLC_Mode_Matching_3.pdf
|

|
|
264
|
Mon Nov 13 11:07:50 2023 |
Tyler | Update | VAC | RTD Analysis |
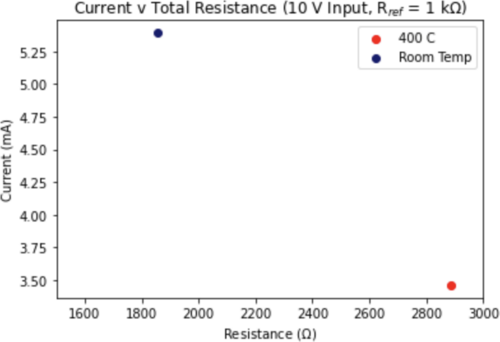
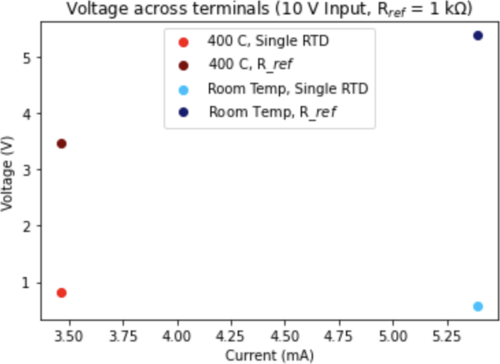
After initial analysis from last week on a single RTD, I then extended to looking at all 8 in series with R_ref (set to 1 kOhm). Shown below are the edge cases for the setup:
- RTDs are all at ambient lab temperature. This would correspond to a minimum resistance value.
- RTDs all read out 400 C. This gives the maximum resistance value.
The results show that indeed only a few mA of current is drawn even at room temperature (a little above 5.5 mA), and this will continue to decrease with increasing temperature. The voltage across a single terminal, at a maximum, is only about 5.4 V. |
| Attachment 1: Screenshot_2023-11-13_at_11.05.45_AM.png
|
|
| Attachment 2: Screenshot_2023-11-13_at_11.06.04_AM.png
|
|
|
265
|
Mon Nov 13 11:23:54 2023 |
Jon | Update | CDS | CyMAC testing |
[Jon, Shane, Luis]
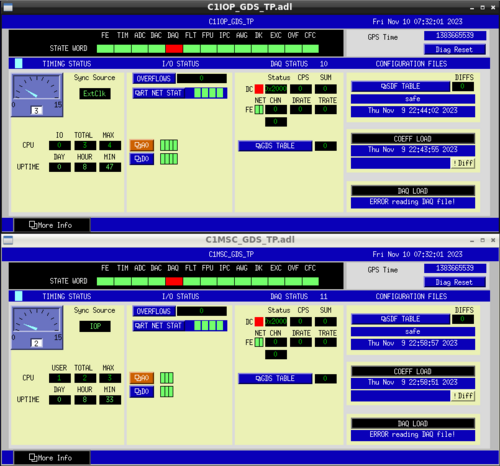
My repair of the internal ribbon connecting the ADC to the adapter board resolved the timing signal problem. After this repair, we were able to start the front-end IOP model and checked out the RTS diagnostic screens (pictured below). All indicator lights were green except for the DK flag (indicating the DAC outputs are not enabled) and the DAQ flag (indicating that the system is recording data to disk). Those were both as expected, because the DAQD data acquisition service was not set up yet and the DAC outputs are not enabled until at least one user model (which outputs signals to the DAC) is started. I created and installed a simple user model (C1MSC) and confirmed that the DK flag clears once this model starts.
I later attempted to set up the DAQD service, which is needed to save data, but am yet to successfully debug it. I have received some guidance from one of LIGO's CDS experts and will try it at my next opportunity for lab work. |
| Attachment 1: Cymac_GDS_Diagnostics.png
|
|
|
266
|
Tue Nov 14 17:21:40 2023 |
Jon | Update | VAC | RGA best practices |
As a follow up ELOG 261, I have received advice from one of the vacuum experts at LIGO Hanford on best practices for our RGA:
-
For future RGA degassing, definitely keep the main volume isolated, since it could contaminate the main volume with everything that just got cooked off of the filament. So the procedure should be to (i) close both gate valves, (ii) ensure the angle valve on the bypass line is open, (iii) initiate the degas cycle on the RGA, (iv) pump the RGA volume through the bypass line, until its pressure returns to its pre-degas level.
-
Repeated degassing of the filament will definitely wear it down much faster, so do this operation sparingly.
-
As long as the pressure of the RGA volume is in the UHV range (~1e-9 torr), best practice is to leave the filament on. This keeps it hot which helps prevent particulate from settling on it. However the electron multiplier should stay off when not actively taking scans, as it will wear down if left on all the time.
|
|
267
|
Wed Nov 15 21:52:33 2023 |
Aiden | Update | VAC | Vacuum Chamber Baking Update |
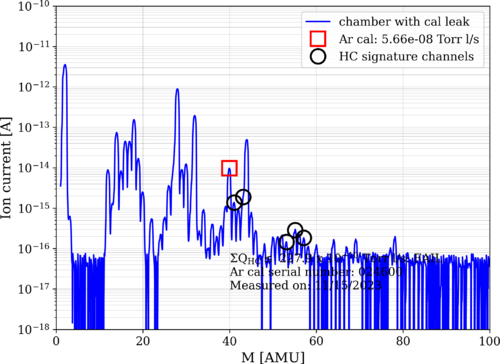
| Took RGA data before running the degas mode. Made sure to close off the main volume before running the degas. And left the filament on. |
| Attachment 1: bake7_231115_ArC.png
|
|
| Attachment 2: bake7_231115_ArO.png
|
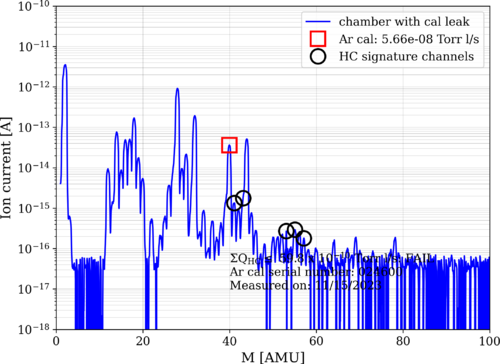
|
|
268
|
Thu Nov 16 17:12:42 2023 |
Luis, Shane, Mohak | Update | Cleanroom | Cleanroom cleaning and particle count |
|
[Shane, Luis, Mohak]
cleaning cleanroom and particle count
- 3:37 pm: started particle count
- zone 3:
- 0.3 u: 1205
- 0.5 u: 748
- 1.0 u: 249
- zone 4:
- 0.3 u: 1496
- 0.5 u: 748
- 1.0 u: 290
- 3:57 pm: began surface check and wipedown, including softwalls. NOTE: vacuum chamber insulation crumbling at edges, dropping loose flakes. Scatters residue whenever jostled, so wiping it down just releases more. Not enough flakes are being released for it to be a major issue, but definitely something to keep an eye on.
- 4:18 pm: started vacuuming the floor
- 4:29 pm: finished vacuuming the floor
- 4:30 pm: started mopping the floor
- 4:35 pm: finished mopping the floor
- 4:36 pm: started cleaning the buckets
- 4:41 pm: started mopping with IPA wipes
- 4:52 pm: finished mopping with IPA wipes
- 4:52 pm: changed sticky floor mats
- 4:53 pm: started particle count
- zone 3:
- 0.3 u: 3367
- 0.5 u: 1787
- 1.0 u: 914
- zone 4:
- 0.3 u: 1039
- 0.5 u: 498
- 1.0 u: 249
|
|
269
|
Thu Nov 16 19:32:31 2023 |
Aiden | Update | VAC | VAC HC Levels Update |
| Took some more RGA data today and overlaid it with data taken from October 19. I added a red line that symbolizes where all amu peaks above 44 need to be bellow as well as a black square around the 44th amu peak. The chamber is very close to being meeting LIGO's vacuum chamber standards. |
| Attachment 1: bake7_231116_ArO.png
|
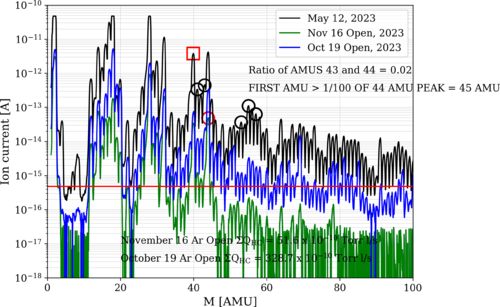
|
| Attachment 2: November_15_Ar_Open_Analyzed.png
|
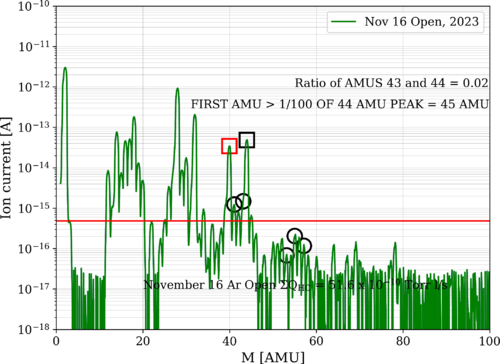
|
|
270
|
Fri Nov 17 14:06:01 2023 |
Shane | Update | Cleanroom | 5 zone particle count |
| Here's today's 5 zone particle count measurement for the cleanroom. Zone 5 (closest to back wall by fire cabinet) is still above the limit for the larger size ranges; everything else is in good shape and roughly 10 times under the limit. Not sure why zone 5 is still so dirty (maybe some of the electronics being stored in bags/bins on the upper shelf of the desk aren't clean?) but will focus cleaning efforts on this zone next time. |
| Attachment 1: 23.png
|
|
|
272
|
Mon Nov 20 20:37:45 2023 |
Aiden | Update | VAC | Clean and Bake Batch 20 |
| [Aiden, Luis]
Started to clean and bake the macor parts for the FROSTI reflector. Per LIGO documentation cleaned the macor in liquinox for 10 minutes and put them in the oven at 200 degC for 24 hours. |
|
273
|
Mon Nov 20 20:45:16 2023 |
Aiden | Update | VAC | Leak Test |
[Aiden, Luis]
Tested every weld and flange to find leaks. Only found that the flange on the turbo pump and reducing nipple was still at 2e-9 torr on the leak. The chamber still rose in pressure when the two gate valves were closed but no noticeable leak could be found on the lid or welds. |
|
274
|
Tue Nov 21 14:47:24 2023 |
Tyler | Update | Lore | 1129 Workbench Assembly Update 1 |
[Tyler, Shane, Mohak, Cynthia, Luke, Michael, Luis]
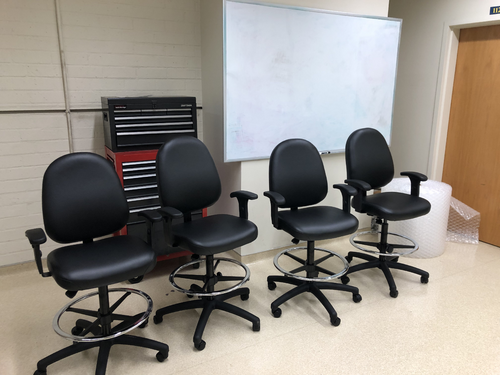
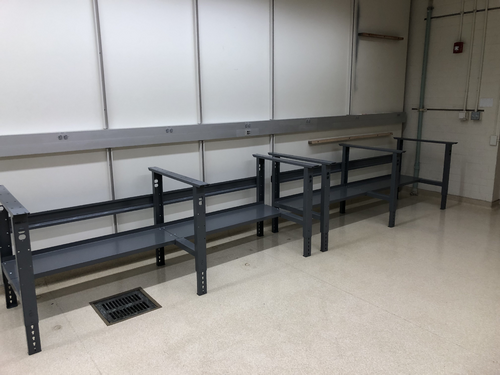
Started assembly of the workbench equipment today. We completed the stools, and have constructed the frames of each workbench. All that needs to be added are the tabletops and the top shelves, which will be done on Monday. |
| Attachment 1: IMG_7569.jpg
|
|
| Attachment 2: IMG_7568.jpg
|
|
|
275
|
Tue Nov 21 22:09:44 2023 |
Aiden | Update | General | Testing Parts |
| [Aiden, Luis]
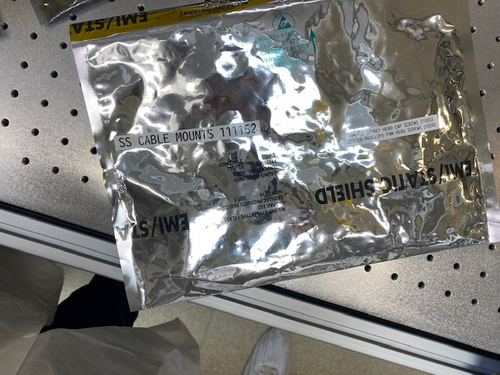
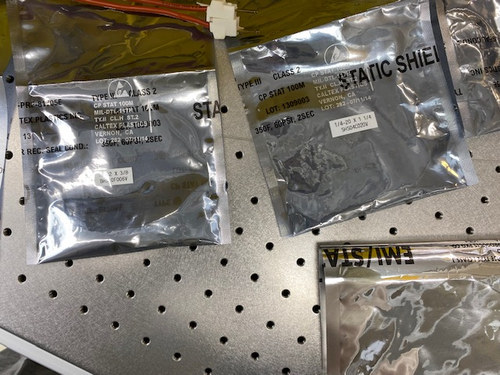
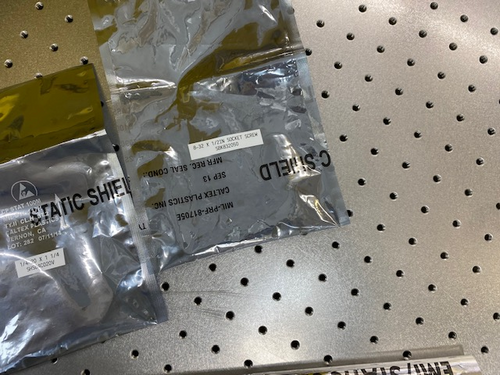
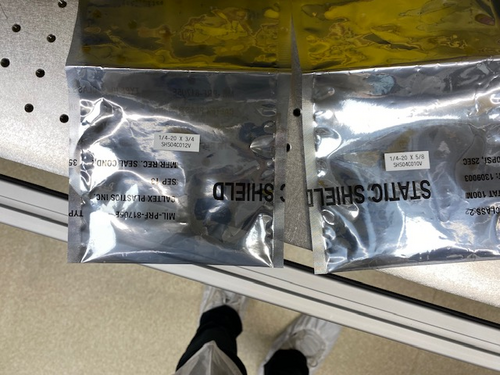
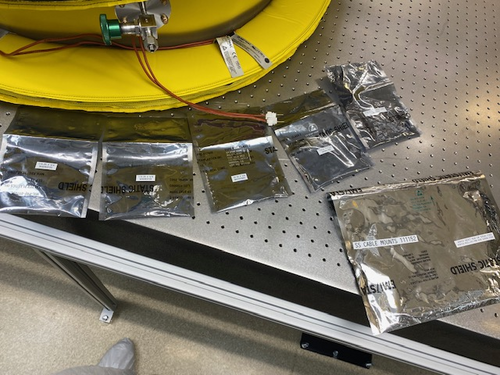
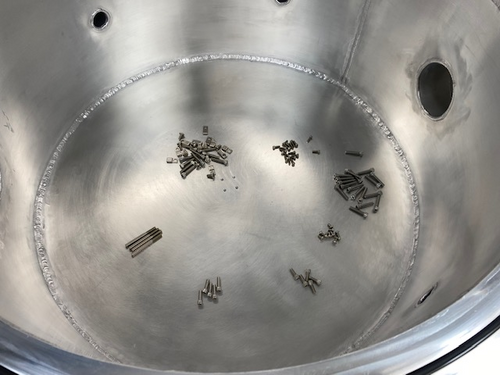
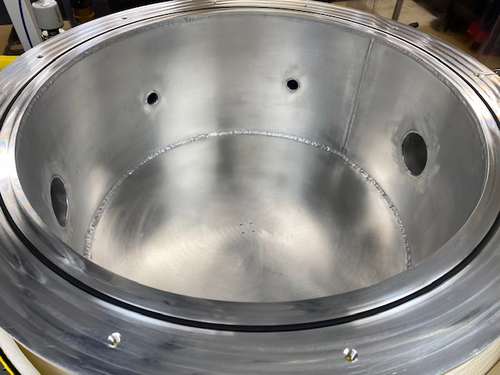
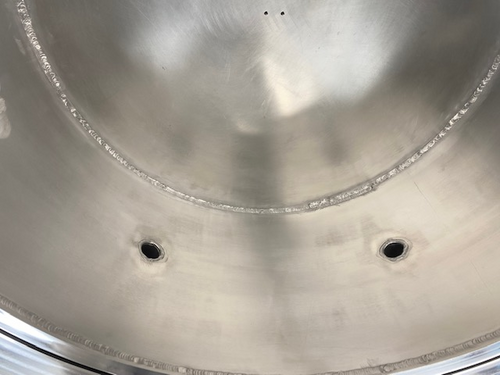
Luis and Aiden vented the chamber today. We closed off the RGA section and then proceeded to open the the vent on the main body after turning off the turbo and backing pump. We then opened the lid and placed in all the stainless steel hardware that will be used in evaluating the FROSTI optics and heater elements. We also inspected the weldments before closing it up. Check the clean and bake data base where there is now a new section outlining the parts in each test. We then closed the lid, tightened the bolts, turned the backing pump back on and let the pressure drop until it was below 1e-1 torr. Then turned the turbo pump back on and after a few hours the pressure was back down to 4.16e-7 torr. The RGA was turned off during all of this and was turned back on when done even though we closed both valves to keep the RGA volume under vacuum. |
| Attachment 1: IMG_4817.jpg
|
|
| Attachment 2: IMG_4815.jpg
|
|
| Attachment 3: IMG_4816.jpg
|
|
| Attachment 4: IMG_4814.jpg
|
|
| Attachment 5: IMG_4813.jpg
|
|
| Attachment 6: IMG_4812.jpg
|
|
| Attachment 7: IMG_4810.jpg
|
|
| Attachment 8: IMG_4811.jpg
|
|
|
276
|
Wed Nov 22 15:46:50 2023 |
Shane | Update | CDS | DB25 signal connections for FROSTI heaters |
[Shane, Jon]
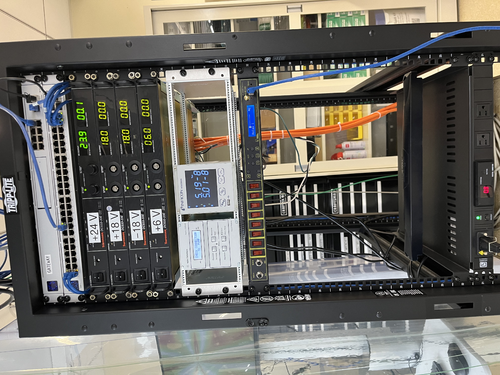
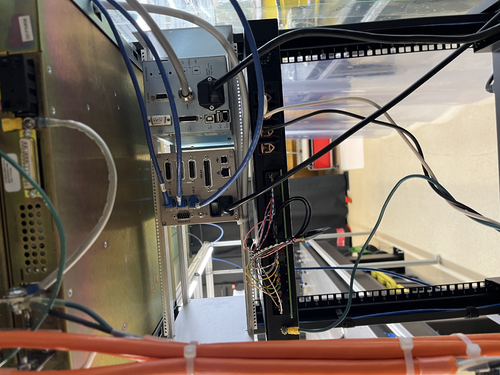
Installed new DC smart switch in electronics rack, configured power connections. Images attached. Attached is a diagram of the male DB25 signal connections to be used for FROSTI heaters. Also included below is table detailing pin and signal configuration.
| Pin |
Signal |
| 1 |
V+ Heater 1 |
| 2 |
V+ Heater 2 |
| 3 |
V+ Heater 3 |
| 4 |
V+ Heater 4 |
| 5 |
V+ Heater 5 |
| 6 |
V+ Heater 6 |
| 7 |
V+ Heater 7 |
| 8 |
V+ Heater 8 |
| 9 |
N/C |
| 10 |
N/C |
| 11 |
N/C |
| 12 |
N/C |
| 13 |
N/C |
| 14 |
RTN heater 1 |
| 15 |
RTN heater 2 |
| 16 |
RTN heater 3 |
| 17 |
RTN heater 4 |
| 18 |
RTN heater 5 |
| 19 |
RTN heater 6 |
| 20 |
RTN heater 7 |
| 21 |
RTN heater 8 |
| 22 |
N/C |
| 23 |
N/C |
| 24 |
N/C |
| 25 |
N/C |
|
| Attachment 1: DB25input_signals.pdf
|

|
| Attachment 2: IMG_3137.jpeg
|
|
| Attachment 3: dc_smart_switch_signal_connections.jpeg
|
|
|
277
|
Thu Nov 23 12:34:44 2023 |
Jon | Update | CDS | DB25 signal connections for FROSTI heaters |
Update: I was able to put the FROSTI power controller on the lab network. It is connected to the switch in the top of the rack and is assigned a static IP address of 192.168.1.12 and an NDS hostname of relay1.
The controller can be remotely accessed through an SSH command line interface as well as an HTML webpage, which can be opened from any web browser on the lab network by navigating to the above IP address (the login credentials are the same as for the workstation computers).
There is also an unofficial Python package for interfacing with the controller: dlipower. We will investigate using this package to interface the controller with soft EPICS channels hosted on the CyMAC. This will allow us to create a custom MEDM screen for controlling the FROSTI heater elements.
Edit: The login credentials were set up to be the same as for the CDS workstations. |
|
278
|
Mon Nov 27 14:22:30 2023 |
Tyler | Update | Lore | 1129 Assembly Update |
| [Tyler, Michael, Luke, Cynthia]
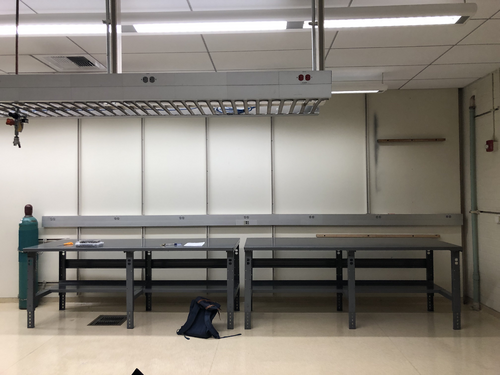
The tabletops have been attached to the workbench frames. Unfortunately, one of the tabletops came out of the box with a large scratch and small dent in the middle. One of the electric top shelves is ready to be attached to the undamaged table, but the other is yet to be opened. Assembly will be completed Wednesday morning.
|
| Attachment 1: IMG_7669.jpg
|
|
| Attachment 2: IMG_7668.jpg
|

|
|
279
|
Mon Nov 27 19:34:50 2023 |
Aiden | Update | Clean & Bake | Clean and Bake Batch 20 Bagging |
| Bagged and tagged bath 20 which included the macor hardware and place it inside the clean room on the table. |
|
280
|
Wed Nov 29 21:13:32 2023 |
Aiden | Update | VAC | VAC System Heating Update |
| Started Bake 8 today. Set the PID controllers to 120 C and will check in the morning for equilibrium temperatures for the lid and chamber wall. The chamber pressure was 2.13 e-8 torr before taking off the full range gauges.
After the bake is done on Saturday it will be cooled down and RGA data will be taken to measure the out gassing rate of the stainless steel fasteners inside the chamber. Then on Tuesday we will plan to vent and open the chamber again to put the macor inside and repeat the another low temp bake and then test the macor early in week 11. Then the next material will be the aluminum mounting hardware for mounting the heaters and that should hopefully be done before the end of week 11 so the heaters can be tested afterwards after being cleaned with vector alpha wipes. |
|
281
|
Thu Nov 30 13:50:32 2023 |
Tyler | Update | Lore | Workbench Assembly Completed |
| [Tyler, Luke, Aiden]
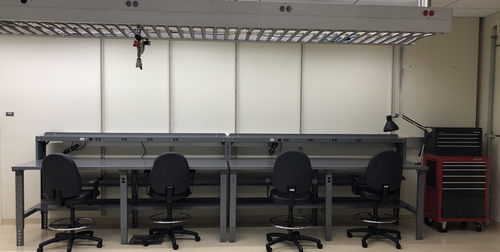
The workbenches are now completely assembled and put into their final places. Additionally, the tool chest has been moved.
|
| Attachment 1: IMG_7686.jpg
|
|
|
282
|
Thu Nov 30 13:58:18 2023 |
Aiden | Update | VAC | VAC System Heating Update |
| [Aiden]
Came into the lab in the morning to check on the chamber heating. I decided to set the PID controllers to 110C rather than 120C as the chamber lid and wall were reading near 140C. With the PID controllers at 110C the chamber lid and wall now read 126C and 132C. Currently the PID controllers are placed on the cross in front of the RGA and the reducing nipple in front of the turbo pump. I believe this is a good equilibrium and will leave the tape on until Saturday when it will be turned off to cool down. |
|
283
|
Sat Dec 2 18:10:23 2023 |
Aiden | Update | VAC | VAC System Heating Update |
| [Aiden]
Turned off the heating tape today in anticipation to take more RGA data on Sunday or Monday morning before the meeting. |
|
284
|
Mon Dec 4 11:19:50 2023 |
Aiden | Update | VAC | Vacuum Chamber Baking Update |
| [Aiden]
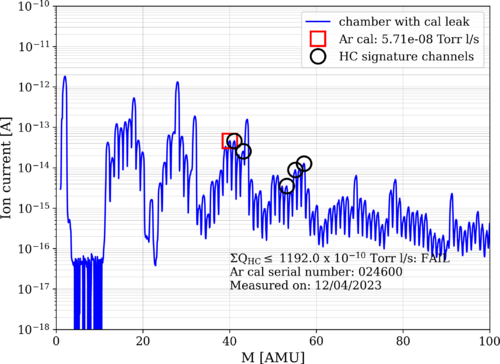
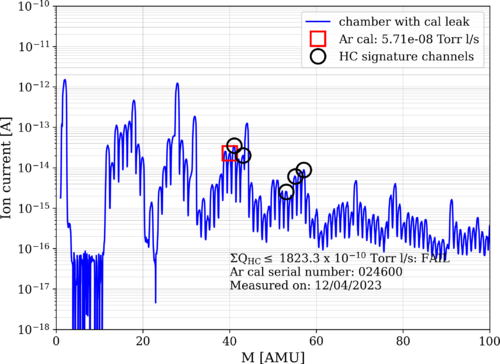
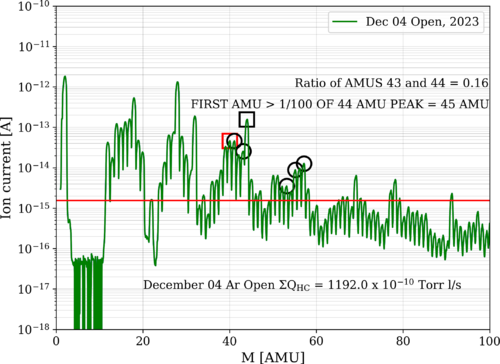
Took some RGA data of the chamber after it has been cooling down. I do not believe that this data accurately shows the HC levels in the chamber as the pressure is still above where it was at before the bake and was still falling. I believe more time is needed to let the pressure fall and for the RGA filament to remain on to return to a point where the data can be trusted. |
| Attachment 1: bake8_231204_SSFasteners_ArO.png
|
|
| Attachment 2: bake8_231204_SSFasteners_ArC.png
|
|
| Attachment 3: December_04_Ar_Open_Stainless_Steel_Fasteners_Analyzed.png
|
|
| Attachment 4: bake8_231204_SSFasteners_ArO.png
|

|
|
285
|
Mon Dec 4 21:27:53 2023 |
Shane | Update | CDS | ADC-DAC loopback test results |
| Here are the test results from today's ADC-DAC loopback tests. Channels 14 and 15 were the only ones behaving abnormally. Not sure what the issue is, but needs further debugging. The DAC output was as expected for both of them, but the corresponding ADC inputs were the same regardless of what offset was used (hovering around values of -4 and -5). NOTE: all measurements listed in the attached table are 'averages' in the sense that the ADC inputs and DAC outputs hovered around the listed values, changing by +1 or -1. |
| Attachment 1: adc-dac_loopback_testing_results.pdf
|

|
|
286
|
Thu Dec 7 12:42:42 2023 |
Aiden | Update | VAC | Vacuum Chamber Baking Update |
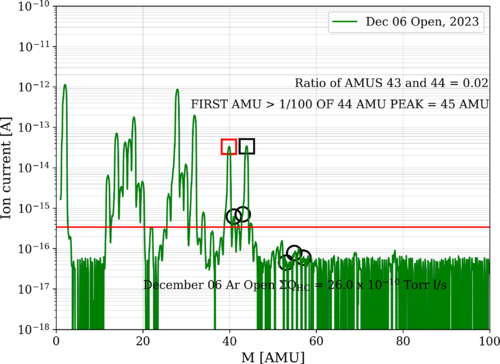
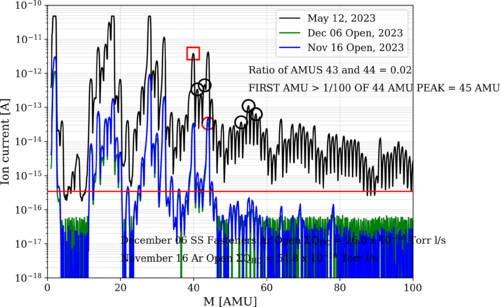
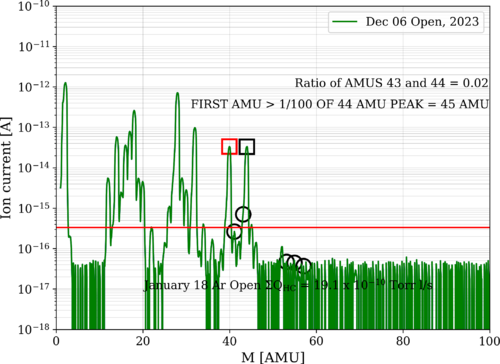
| After leaving the RGA on for a few days the chamber has settled at 2.01 e-8 torr. I also have good news that the chamber looks to be even cleaner as the HC levels are now the lowest they have been being at 26 e-10 Torr l/s. |
| Attachment 1: December_06_Ar_Open_Stainless_Steel_Fasteners_Analyzed.png
|
|
| Attachment 2: bake8_231206_SSFasteners_ArO.png
|
|
|
287
|
Thu Dec 7 14:13:15 2023 |
Shane | Update | Cleanroom | cleanroom cleaning and particle count |
|
[Aiden, Shane, Michael, Luke, Cynthia]
cleaning cleanroom and particle count
- 12:30 pm: ran zero count test on particle counter
- 12:32 pm: started particle count.
- zone 3:
- 0.3 u: 59,488
- 0.5 u: 9561
- 1.0 u: 706
- zone 4:
- 0.3 u: 7732
- 0.5 u: 1912
- 1.0 u: 290
NOTE: Frame ceiling tile collapsed in cleanroom, explaining insanely high 0.3 u particle count in zone 3 (nearly 6 times above limit). Wiped down tile and put it back in ceiling frame.
- 12:56 pm: began surface check and wipedown, including softwalls
- 1:16 pm: started vacuuming the floor
- 1:32 pm: finished vacuuming the floor
- 1:33 pm: started mopping the floor
- 1:47 pm: finished mopping the floor
- 1:48 pm: started cleaning the buckets
- 1:53 pm: started mopping with IPA wipes
- 2:05 pm: finished mopping with IPA wipes
- 2:06 pm: changed sticky floor mats
- 1:53 pm: started particle count
- zone 3:
- 0.3 u: 6401
- 0.5 u: 3450
- 1.0 u: 1787
- zone 4:
- 0.3 u: 4073
- 0.5 u: 2452
- 1.0 u: 1039
|
|
288
|
Fri Dec 8 11:15:21 2023 |
Peter | Update | VLC Update | VLC Assembly |
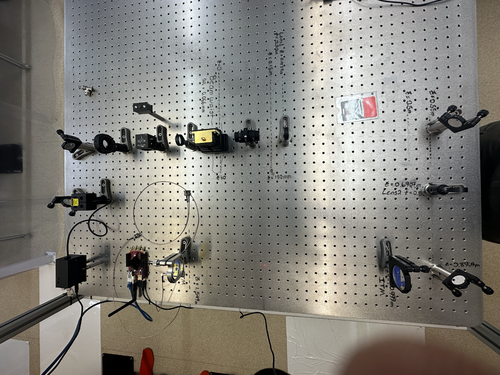
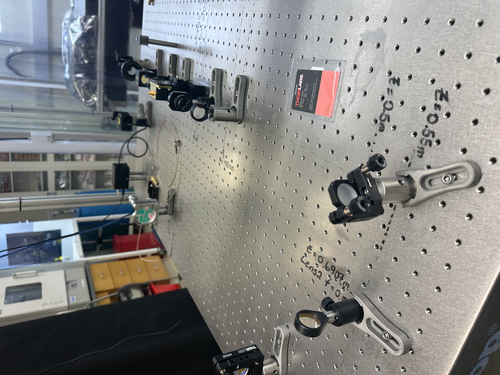
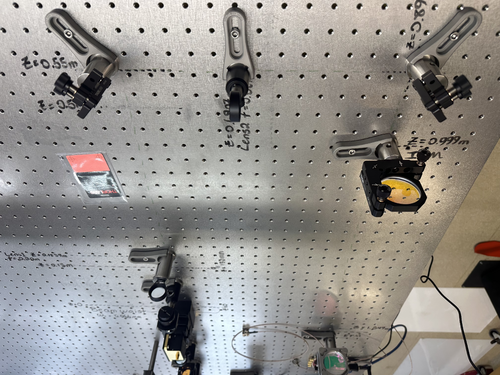
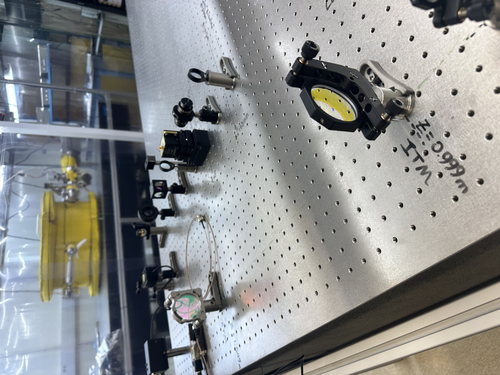
| The optics of the visible light cavity have been assembled. The mode matching telescope is folded through the two stirring mirrors at the corners shown in the image below, with the first lens (f=0.2m) before the first stirring mirror, and the second lens (f=0.5m) between the two stirring mirrors. The distance from the cavity to the edge of the table is 14cm. There is still some work to be done on the alignment of the cavity, as the beam does not seem to be completely centered on the two mirrors. |
| Attachment 1: IMG_4194.jpg
|
|
| Attachment 2: IMG_4195.jpg
|
|
| Attachment 3: IMG_4197.jpg
|
|
| Attachment 4: IMG_4196.jpg
|
|
|
289
|
Sat Dec 9 12:34:12 2023 |
Jon | Update | General | Electronics workshop migrated to 1129 |
[Jon, Tyler, Shane, Luis]
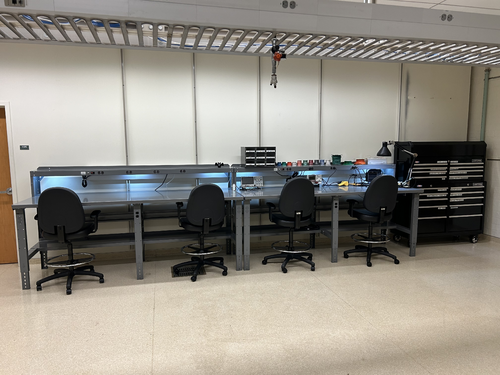
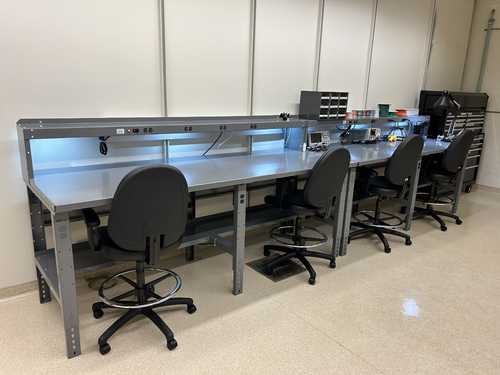
On Wednesday we completed the migration of the electronics workshop from 1119 to the large new workbenches in 1129. The two workstations pictured closest to the front of the room are for electronics assembly and testing, while the two in the rear will house LIGO CDS workstations. We moved all of the tools, cabling, and soldering and test equipment from 1119 to this new location. We also moved the large tool chest to 1129, as pictured, and moved the smaller tool chest to 1119 in its place.
The electronics workbench is ready for use. |
| Attachment 1: IMG_0765.jpg
|
|
| Attachment 2: IMG_0767.jpeg
|
|
|
290
|
Mon Dec 11 12:58:57 2023 |
Shane, Luis | Update | CDS | DAC-ADC loopback test debugging |
| [Luis, Shane]
Working on debugging last week's weird results for the ADC-DAC loopback test for channels 14 and 15. With DAC output channels 12-15 connected to ADC input channels 12-15: tried setting matrix coefficients for channels 12-15 to 1, and as with last week's results, DAC is outputting as expected for all three channels and ADC is not reading in the signal (hovering around -4,-5) for channels 14 and 15. Channels 12 and 13 still reading in correctly. Tried switching DAC output plug into channels 0-3, with ADC input plugged into channels 12-15, and all input/output signals were reading correctly. Then switched to plugging in DAC output to channels 12-15 and ADC input to channels 0-3, and saw that channels 0-3 were only able to receive the first two ADC input values. This shows that channels 12-15 are capable of receiving the correct inputs from other channels, but are failing to produce outputs for channels 14 and 15. |
|
293
|
Sun Dec 17 19:43:18 2023 |
Aiden | Update | VAC | Vac Heating Update |
| [Aiden]
I measured the temperature of the flanges where some of the electronics will go and I found that the RGA flange was at 55C and the two full range gauges were at 65C. I also stopped bake 9 to cool down for measurement. |
|
295
|
Mon Dec 18 15:51:49 2023 |
Aiden | Update | VAC | VAC System Heating Update |
| After letting the chamber cool down I put the electronics back on and turned the RGA element back on. No data has been taken yet as to let the pressure continue to fall as the RGA is powered. |
|
296
|
Tue Dec 19 15:45:05 2023 |
Aiden | Update | VAC | Vacuum Chamber Baking Update |
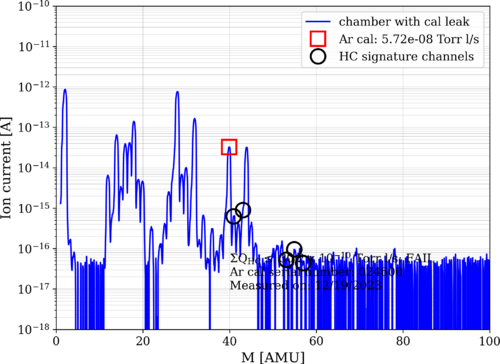
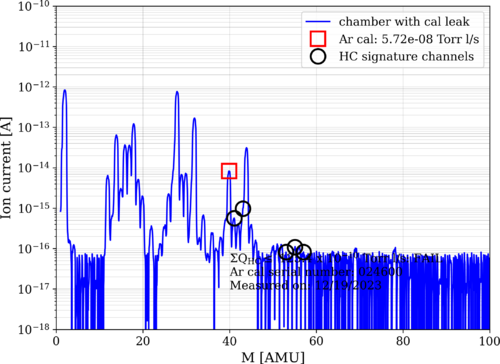
| Took RGA data for the macor parts inside of the chamber. With the Ar open the HC levels read 30 torrl/s which is around where it was before the bake. |
| Attachment 1: bake9_231219_Macor_ArO.png
|
|
| Attachment 2: bake9_231219_Macor_ArC.png
|
|
|
299
|
Mon Jan 8 20:24:53 2024 |
Aiden | Update | General | |
| [Jon, Aiden]
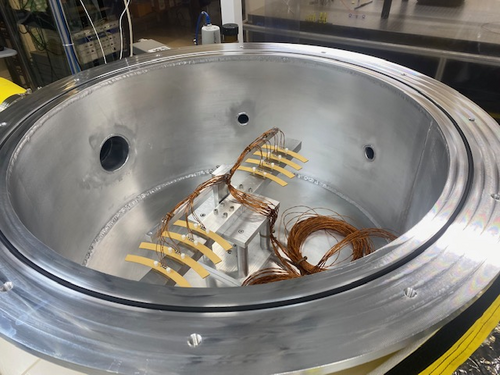
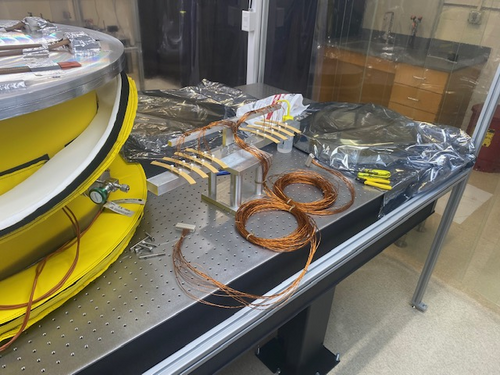
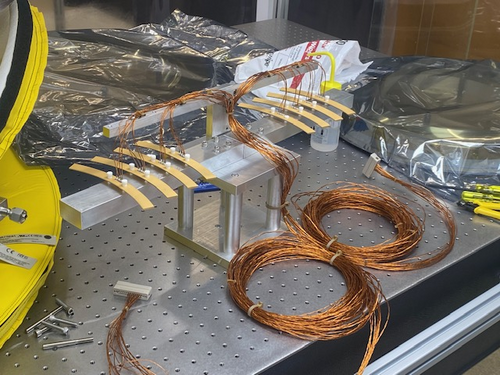
Installed the heater elements into their fixture and prepped the cables by twisting the wires into pairs. We also installed the pins onto the wires and placed them into the peek DB 25 connector. The installation tool we had did not fit the pin size we had so the pins needed to be installed by hand by opening the connector and holding them in place. In the future we will need to make sure we twist the wires together, group them, and then splice them all to the same size for easier installation. We then grouped all the twisted pairs into a bundle and zipped them together. On the left with two peek zip ties is the power and on the right is the RTD with one peek zip tie. This orientation remains true when looking at the feed through flange from the outside with the power port on closest to the wall.
We also installed the heater elements numbered 1-8 starting from the left in image 3. These elements have numbers as resistance data was taken before as to identify the heaters after they are in the chamber. After installing the DB 25 connectors we tested that the pins were in the right orientation by using a volt meter and testing the resistance where the cable runs into the the actual power supply. It seems that all the pins were properly installed and the resistance values all match with each one gaining about 2 Ohms from the cable itself.
Then the pump down was started. The pump was very slow and we suspected a leak but after changing the o-ring pump down was not any faster and we decided to leave it over break as it seemed to just be water outgassing from the aluminum. The chamber is now able to be RGA scanned and leak tested before the next bake as it is low enough pressure. |
| Attachment 1: IMG_4888.jpg
|
|
| Attachment 2: IMG_4886.jpg
|
|
| Attachment 3: IMG_4887.jpg
|
|
|
301
|
Tue Jan 9 16:35:09 2024 |
Aiden | Update | VAC | VAC System Leak and Heating |
| [Luis, Luke, Aiden]
Leak tested each flange and weld and only found two flanges to have noticeable leaks with the electron multiplier on. These were the turbo pump flange and the RGA flange that connects to the cross. The RGA one is rather new as it has not had a measurable leak before and it was around 2 e-8. We then applied the new sealant to these two flanges as directed by the instructions on the packaging.
Then after waiting a few minutes for the sealant to dry we started the bake. We got the PID controllers set to 120 after many steps and we checked the temperature of the flanges throughout this increase. The flanges never reached 70C with the electronics still left on it. The RGA was left on as well. |
|
302
|
Wed Jan 10 15:27:18 2024 |
Shane | Update | Cleanroom | cleanroom cleaning and particle count |
|
[Aiden, Shane]
cleaning cleanroom and particle count
- 2:03 pm: changed sticky floor mats
- 2:05 pm: started particle count
- zone 3:
- 0.3 u: 4863
- 0.5 u: 1205
- 1.0 u: 872
- zone 4:
- 0.3 u: 1953
- 0.5 u: 789
- 1.0 u: 457
- 2:35 pm: began surface check and wipedown, including softwalls and ceiling tiles
- 2:45 pm: started vacuuming the floor
- 2:56 pm: finished vacuuming the floor
- 2:57 pm: started mopping the floor
- 3:01 pm: finished mopping the floor
- 3:02 pm: started cleaning the buckets
- 3:05 pm: started mopping with IPA wipes
- 3:08 pm: finished mopping with IPA wipes
- 3:09 pm: started particle count
- zone 3:
- 0.3 u: 5528
- 0.5 u: 2203
- 1.0 u: 1662
- zone 4:
- 0.3 u: 1080
- 0.5 u: 415
- 1.0 u: 332
|
|
304
|
Tue Jan 16 10:01:21 2024 |
Peter | Update | VLC Update | VLC Faraday Isolator and Mode Matching |
| Attached is a PDF of my weekly updates. |
| Attachment 1: VLC_Mode_Matching_Design_-_Remastered.pdf
|

|
|
306
|
Tue Jan 16 16:11:41 2024 |
Aiden | Update | VAC | |
| [Aiden,Luis]
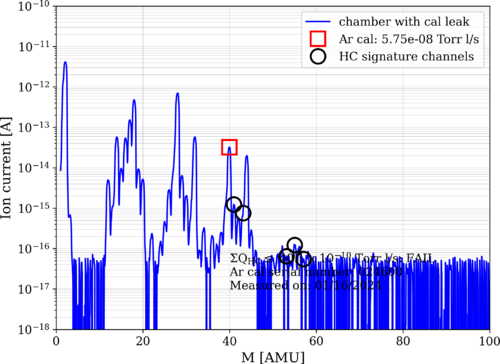
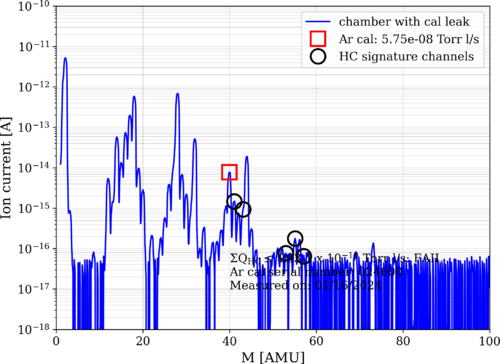
Below is the data for the most recent bake. I believe the chamber is cleaner than it is actually showing as the RGA data was still getting lower while the data was being taken. I will take the data again tomorrow just in case. Still, the data shows that the chamber is basically as clean as it was before bake 10 and this means further power testing can proceed.
Helium leak tested the chamber again today to check if the sealant changed anything. The two primary target flanges from last time have improved significantly with the flange from the RGA on the cross now being below 2e-14. While the turbo pump flange was leaking at a rate of 4e-13. Much better than what it has been before. |
| Attachment 1: bake10_240116_Elements_ArO.png
|
|
| Attachment 2: bake10_240116_Elements_ArC.png
|
|
|
307
|
Wed Jan 17 15:47:49 2024 |
Aiden | Update | General | Resistors for Heater Elements |
| Power Res (Ohm) RTD Res (Ohm)
Heater 1= 73.6; 81.8
Heater 2= 70.4; 82.1
Heater 3= 71; 84.5
Heater 4= 71.5; 80
Heater 5= 70.5; 81.7
Heater 6= 72; 79.4
Heater 7= 69.2; 78.2
Heater 8= 71.1; 84.2 |
|
308
|
Thu Jan 18 15:13:37 2024 |
Aiden | Update | VAC | VAC Heating System Update |
| [Aiden]
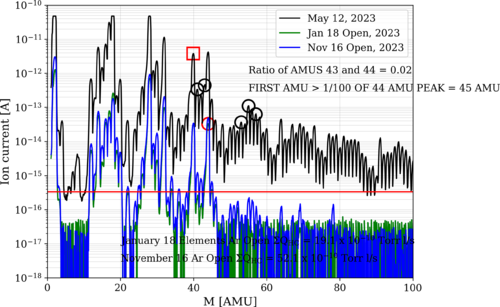
Took more data today and the chamber and elements are showing an even lower HC level than we have gotten before. It is safe to say that the elements are not contaminated and out gassing HC into the chamber. |
| Attachment 1: bake10_240118_Elements_ArO.png
|
|
| Attachment 2: January_18_Ar_Open_Elements_Analyzed.png
|
|
|
309
|
Thu Jan 18 18:06:49 2024 |
shane | Update | Cleanroom | cleanroom 5 zone particle count measurement |
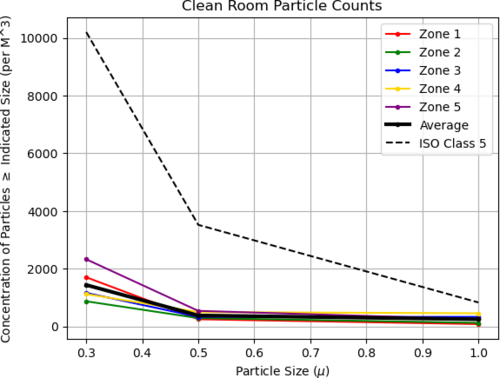
| Here's today's full five zone measurement of the cleanroom |
| Attachment 1: 24.png
|
|
|
310
|
Tue Jan 23 12:17:41 2024 |
Tyler | Update | Electronics | RTD Chassis |
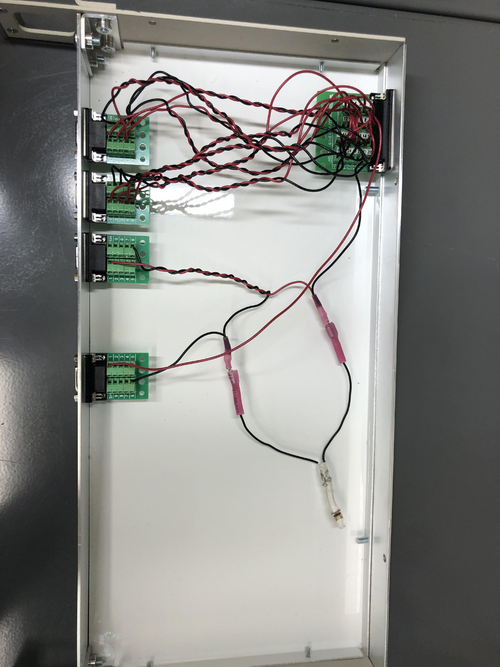
After updating the wiring in the RTD Chassis, a signal is now seen at each ADC input. However, there seems to be a discrepancy between the voltages I measured out with the multimeter (see below). Next steps include:
- Finish final debugging
- Calibrate ADC inputs with known voltage source (likely to use DAC).
Voltage Readings:
RTD 1: 0.576 V
RTD 2: 0.578 V
RTD 3: 0.598 V
RTD 4: 0.563 V
RTD 5: 0.477 V
RTD 6: 0.463 V
RTD 7: 0.456 V
RTD 8: 0.491 V
Reference Resistor: 5.463 V
Total Voltage: 9.665 V |
| Attachment 1: rtd_updated_circuitry.jpg
|
|
|
311
|
Tue Jan 30 11:36:19 2024 |
Tyler | Update | Electronics | RTD Chassis |
| Quote: |
After updating the wiring in the RTD Chassis, a signal is now seen at each ADC input. However, there seems to be a discrepancy between the voltages I measured out with the multimeter (see below). Next steps include:
- Finish final debugging
- Calibrate ADC inputs with known voltage source (likely to use DAC).
Voltage Readings:
RTD 1: 0.576 V
RTD 2: 0.578 V
RTD 3: 0.598 V
RTD 4: 0.563 V
RTD 5: 0.477 V
RTD 6: 0.463 V
RTD 7: 0.456 V
RTD 8: 0.491 V
Reference Resistor: 5.463 V
Total Voltage: 9.665 V |
After further modification of the RTD readout chassis (i.e. adding resistors, placing reference resistor in front of RTDs), here are the following direct measurements:
RTD 1: 0.484 V
RTD 2: 0.486 V
RTD 3: 0.503 V
RTD 4: 0.474 V
RTD 5: 0.495 V
RTD 6: 0.483 V
RTD 7: 0.476 V
RTD 8: 0.510 V
Reference: 5.847 V
Here are the Cymac signal readings:
RTD 1: 74
RTD 2: 67
RTD 3: 73
RTD 4: 45
RTD 5: 82
RTD 6: 75
RTD 7: 70
RTD 8: 71
Reference: 884
The one (possible) discrepancy here is the readout for RTD 4 via Cymac, since it's signal reading is ~30 counts lower than the others. I do not believe this is a wiring issue due to the direct measurements taken. |
|
313
|
Fri Feb 2 16:56:56 2024 |
Jon | Update | CDS | RTS model implemented for FROSTI RTD readouts |
Summary
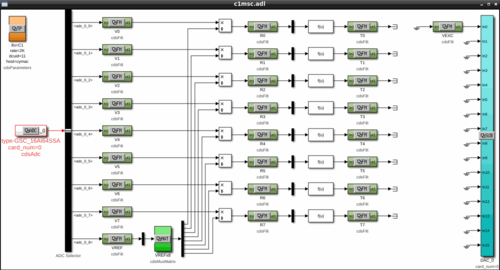
Today I finished implementing an RTS model to read out the integrated FROSTI RTDs (temperature sensors) via the CyMAC. The model is named "MSC" and is located at cymac:/opt/rtcds/usercode/models/c1msc.mdl. We successfully tested it with the heater elements operating in vacuum at low power (12 VDC), finding them to reach an average steady-state temperature of 160 C.
From the cymac host, the MEDM control screen can be accessed with the terminal command "sitemap" (from any directory).
Measurement Technique
Each FROSTI heater element [299] contains an internal two-wire RTD placed near the front emitting surface, which enables the temperature of the blackbody emitter to be directly monitored. From the measured temperature and the emissivity of the uncoated aluminum nitride surface (known to be ~1 in the IR), the radiated source-plane power can also be estimated.
The resistance of each RTD is measured via a ratiometric technique. The RTDs are powered in series with a 1 kΩ reference resistor located inside the readout chassis [305], whose temperature is not changing. The signal is obtained by taking the ratio of the voltage difference across each individual RTD to the voltage difference across the reference resisitor. The advantage of this technique is that the ratio of the voltage differences is insensitive to changes in the current through the resistors (since they are all in series; see [271] for wiring diagram).
Implementation Detail
The signal flow is shown in Attachment 1. The eight RTD signals enter through ADC channels 0-7, along with the reference resistor signal on channel 8. The first set of filter modules apply a calibration gain to convert the signals from raw ADU counts to units of input-referred voltage. The ratio of each RTD signal to the reference resistor signal is then taken. The second set of filter modules multiply the voltage-difference ratios by the resistance of the reference resistor, 1 kΩ ± 0.01%, to obtain the RTD resistances in physical units of ohms.
Finally, a freeform math module is used to invert the quadratic relation between each RTD's resistance and temperature. The final signals passed to the third set of filter modules are the RTD temperatures in physical units of degrees C. The temperatures of the tungsten RTDs are estimated assuming TCR coefficients of A=0.0030 C-1 (±10%) and B=1.003E-6 C-2, which were provided by the manufacturer.
One DAC channel is used to provide the excitation voltage for the RTD measurement, which is visible on the far right of the control screen. At its maximum output voltage of +10 V, the DAC can drive a maximum current of 10 mA. |
| Attachment 1: sitemap_screen.png
|
|
|
314
|
Fri Feb 2 19:08:20 2024 |
Aiden | Update | VAC | 1st Hot Element RGA Scan |
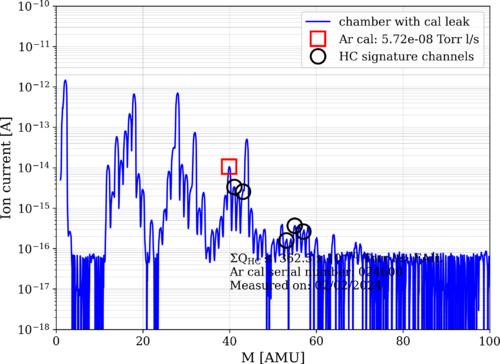
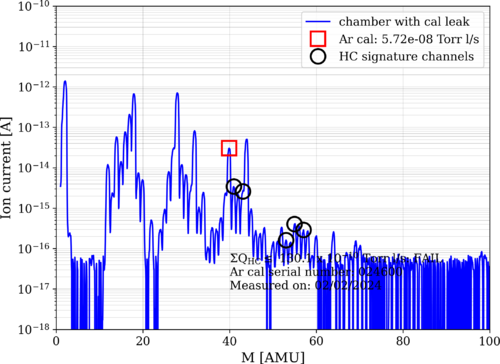
| Here are the measurements for the RGA scan of the elements while on at around 160C. The pressure of the chamber during the test was 4.12 e-8 torr. |
| Attachment 1: bake10_240202_Elements_ArC.png
|
|
| Attachment 2: bake10_240202_Elements_ArO.png
|
|
|
315
|
Fri Feb 2 19:18:24 2024 |
shane | Update | Cleanroom | cleanroom cleaning and particle count |
|
[Aiden, Shane, Luis, Luke]
cleaning cleanroom and particle count
|
|
316
|
Mon Feb 5 14:17:52 2024 |
Aiden | Update | VAC | Heater Element RGA Scan |
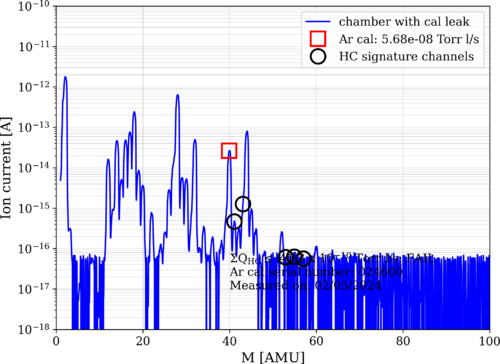
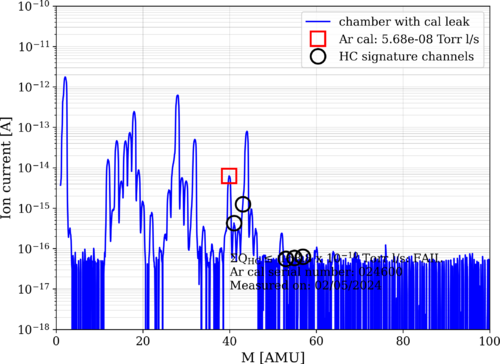
| Here are the new RGA scans for the powered Heater elements. The pressure at the time of taking data was 2.88 e-8 torr. The HC levels are at 40 e-10 torrl/s which is not bad but still higher than the lowest we have recorded. |
| Attachment 1: bake10_240205_Elements_ArO.png
|
|
| Attachment 2: bake10_240205_Elements_ArC.png
|
|
|
317
|
Tue Feb 6 22:40:25 2024 |
Michael | Update | Scripts/Programs | Long Crab 1 Design Created In Gtrace |
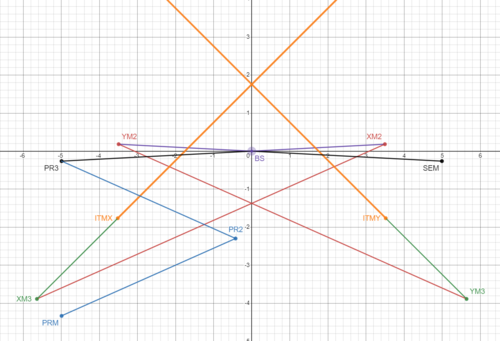
| Worked on and completed the python code for the simulation of the Long Crab 1 layout for Cosmic Explorer basing off of Pooyan's original work with the Crab 1 layout. From here I'll look into creating the shoelaces layouts. |
| Attachment 1: Long_Crab1.png
|

|
| Attachment 2: long_crab_1_desmos.PNG
|
|